Instalação e Configuração Redmine Docker
- Instalação Redmine Docker Bitnami
- Plugins Redmine Docker
- Plugin Redmine Mattermost
- Instalação Redmine Docker Sameersbn
Instalação Redmine Docker Bitnami
Link: https://github.com/bitnami/containers/tree/main/bitnami/redmine
Bitnami package for Redmine
What is Redmine?
Redmine is an open source management application. It includes a tracking issue system, Gantt charts for a visual view of projects and deadlines, and supports SCM integration for version control.
Overview of Redmine Trademarks: This software listing is packaged by Bitnami. The respective trademarks mentioned in the offering are owned by the respective companies, and use of them does not imply any affiliation or endorsement.
TL;DR
docker run --name redmine bitnami/redmine:latest
Warning: This quick setup is only intended for development environments. You are encouraged to change the insecure default credentials and check out the available configuration options in the Environment Variables section for a more secure deployment.
Why use Bitnami Images?
- Bitnami closely tracks upstream source changes and promptly publishes new versions of this image using our automated systems.
- With Bitnami images the latest bug fixes and features are available as soon as possible.
- Bitnami containers, virtual machines and cloud images use the same components and configuration approach - making it easy to switch between formats based on your project needs.
- All our images are based on minideb -a minimalist Debian based container image that gives you a small base container image and the familiarity of a leading Linux distribution- or scratch -an explicitly empty image-.
- All Bitnami images available in Docker Hub are signed with Notation. Check this post to know how to verify the integrity of the images.
- Bitnami container images are released on a regular basis with the latest distribution packages available.
Looking to use Redmine in production? Try VMware Tanzu Application Catalog, the commercial edition of the Bitnami catalog.
How to deploy Redmine in Kubernetes?
Deploying Bitnami applications as Helm Charts is the easiest way to get started with our applications on Kubernetes. Read more about the installation in the Bitnami Redmine Chart GitHub repository.
Bitnami containers can be used with Kubeapps for deployment and management of Helm Charts in clusters.
Only latest stable or LTS branch maintained in the free Bitnami catalog
Starting December 10th 2024, only the latest stable or LTS branch of any container will receive updates in the free Bitnami catalog. To access up-to-date releases for all upstream-supported branches, consider upgrading to Bitnami Premium. Previous versions already released will not be deleted. They are still available to pull from DockerHub.
Please check the Bitnami Premium page in our partner Arrow Electronics for more information.
Supported tags and respective Dockerfile links
Learn more about the Bitnami tagging policy and the difference between rolling tags and immutable tags in our documentation page.
You can see the equivalence between the different tags by taking a look at the tags-info.yaml file present in the branch folder, i.e bitnami/ASSET/BRANCH/DISTRO/tags-info.yaml.
Subscribe to project updates by watching the bitnami/containers GitHub repo.
Get this image
The recommended way to get the Bitnami Redmine Docker Image is to pull the prebuilt image from the Docker Hub Registry.
docker pull bitnami/redmine:latest
To use a specific version, you can pull a versioned tag. You can view the list of available versions in the Docker Hub Registry.
docker pull bitnami/redmine:[TAG]
If you wish, you can also build the image yourself by cloning the repository, changing to the directory containing the Dockerfile and executing the docker build command. Remember to replace the APP, VERSION and OPERATING-SYSTEM path placeholders in the example command below with the correct values.
git clone https://github.com/bitnami/containers.git
cd bitnami/APP/VERSION/OPERATING-SYSTEM
docker build -t bitnami/APP:latest .
How to use this image
Redmine requires access to a MySQL, MariaDB or PostgreSQL database to store information. We'll use the Bitnami Docker Image for MariaDB for the database requirements.
Using the Docker Command Line
Step 1: Create a network
docker network create redmine-network
Step 2: Create a volume for MariaDB persistence and create a MariaDB container
$ docker volume create --name mariadb_data
docker run -d --name mariadb \
  --env ALLOW_EMPTY_PASSWORD=yes \
  --env MARIADB_USER=bn_redmine \
  --env MARIADB_PASSWORD=bitnami \
  --env MARIADB_DATABASE=bitnami_redmine \
  --network redmine-network \
  --volume mariadb_data:/bitnami/mariadb \
  bitnami/mariadb:latest
Step 3: Create volumes for Redmine persistence and launch the container
$ docker volume create --name redmine_data
docker run -d --name redmine \
  -p 8080:8080 -p 8443:8443 \
  --env ALLOW_EMPTY_PASSWORD=yes \
  --env REDMINE_DATABASE_USER=bn_redmine \
  --env REDMINE_DATABASE_PASSWORD=bitnami \
  --env REDMINE_DATABASE_NAME=bitnami_redmine \
  --network redmine-network \
  --volume redmine_data:/bitnami/redmine \
  bitnami/redmine:latest
Access your application at http://your-ip/
Run the application using Docker Compose
curl -sSL https://raw.githubusercontent.com/bitnami/containers/main/bitnami/redmine/docker-compose.yml > docker-compose.yml
docker-compose up -d
Please be aware this file has not undergone internal testing. Consequently, we advise its use exclusively for development or testing purposes. For production-ready deployments, we highly recommend utilizing its associated Bitnami Helm chart.
If you detect any issue in the docker-compose.yaml file, feel free to report it or contribute with a fix by following our Contributing Guidelines.
Persisting your application
If you remove the container all your data will be lost, and the next time you run the image the database will be reinitialized. To avoid this loss of data, you should mount a volume that will persist even after the container is removed.
For persistence you should mount a directory at the /bitnami/redmine path. If the mounted directory is empty, it will be initialized on the first run. Additionally you should mount a volume for persistence of the MariaDB data.
The above examples define the Docker volumes named mariadb_data and redmine_data. The Redmine application state will persist as long as volumes are not removed.
To avoid inadvertent removal of volumes, you can mount host directories as data volumes. Alternatively you can make use of volume plugins to host the volume data.
Mount host directories as data volumes with Docker Compose
This requires a minor change to the docker-compose.yml file present in this repository:
   mariadb:
     ...
     volumes:
-      - 'mariadb_data:/bitnami/mariadb'
+      - /path/to/mariadb-persistence:/bitnami/mariadb
   ...
   redmine:
     ...
     volumes:
-      - 'redmine_data:/bitnami/redmine'
+      - /path/to/redmine-persistence:/bitnami/redmine
   ...
-volumes:
-  mariadb_data:
-    driver: local
-  redmine_data:
-    driver: local
NOTE: As this is a non-root container, the mounted files and directories must have the proper permissions for the UID
1001.
Mount host directories as data volumes using the Docker command line
Step 1: Create a network (if it does not exist)
docker network create redmine-network
Step 2. Create a MariaDB container with host volume
docker run -d --name mariadb \
  --env ALLOW_EMPTY_PASSWORD=yes \
  --env MARIADB_USER=bn_redmine \
  --env MARIADB_PASSWORD=bitnami \
  --env MARIADB_DATABASE=bitnami_redmine \
  --network redmine-network \
  --volume /path/to/mariadb-persistence:/bitnami/mariadb \
  bitnami/mariadb:latest
Step 3. Create the Redmine container with host volumes
docker run -d --name redmine \
  -p 8080:8080 -p 8443:8443 \
  --env ALLOW_EMPTY_PASSWORD=yes \
  --env REDMINE_DATABASE_USER=bn_redmine \
  --env REDMINE_DATABASE_PASSWORD=bitnami \
  --env REDMINE_DATABASE_NAME=bitnami_redmine \
  --network redmine-network \
  --volume /path/to/redmine-persistence:/bitnami/redmine \
  bitnami/redmine:latest
Configuration
Environment variables
Customizable environment variables
| Name | Description | Default Value |
|---|---|---|
REDMINE_DATA_TO_PERSIST |
Files to persist relative to the Redmine installation directory. To provide multiple values, separate them with a whitespace. | ${REDMINE_CONF_DIR}/configuration.yml ${REDMINE_CONF_DIR}/database.yml files plugins public/plugin_assets |
REDMINE_PORT_NUMBER |
Port number in which Redmine will run. | 3000 |
REDMINE_ENV |
Redmine environment mode. Allowed values: development, production, test. | production |
REDMINE_LANGUAGE |
Redmine site default language. | en |
REDMINE_REST_API_ENABLED |
Whether to allow REST API calls to Redmine. | 0 |
REDMINE_LOAD_DEFAULT_DATA |
Whether to generate default data for Redmine. | yes |
REDMINE_SKIP_BOOTSTRAP |
Whether to perform initial bootstrapping for the application. | nil |
REDMINE_QUEUE_ADAPTER |
Active job queue adapter. You may need to install additional dependencies if you select a value other than "async" or "inline". | inline |
REDMINE_USERNAME |
Redmine user name. | user |
REDMINE_PASSWORD |
Redmine user password. | bitnami1 |
REDMINE_EMAIL |
Redmine user e-mail address. | user@example.com |
REDMINE_FIRST_NAME |
Redmine user first name. | UserName |
REDMINE_LAST_NAME |
Redmine user last name. | LastName |
REDMINE_SMTP_HOST |
Redmine SMTP server host. | nil |
REDMINE_SMTP_PORT_NUMBER |
Redmine SMTP server port number. | nil |
REDMINE_SMTP_USER |
Redmine SMTP server user. | nil |
REDMINE_SMTP_DOMAIN |
Redmine SMTP domain. USER@ part from SMTP_USER is used when not defined. | nil |
REDMINE_SMTP_PASSWORD |
Redmine SMTP server user password. | nil |
REDMINE_SMTP_PROTOCOL |
Redmine SMTP server protocol to use. | nil |
REDMINE_SMTP_AUTH |
Redmine SMTP server protocol to use. Allowed values: login, plain, cram_md5. | login |
REDMINE_SMTP_OPENSSL_VERIFY_MODE |
SMTP sets the level of verification for the SSL certificate presented by the server. Allowed values: none, peer. | peer |
REDMINE_SMTP_CA_FILE |
Path to the SMTP CA file. | /etc/ssl/certs/ca-certificates.crt |
REDMINE_DATABASE_TYPE |
Database type to be used for the Redmine installation. Allowed values: mariadb, postgresql. | mariadb |
REDMINE_DATABASE_HOST |
Database server host. | $REDMINE_DEFAULT_DATABASE_HOST |
REDMINE_DATABASE_PORT_NUMBER |
Database server port. | 3306 |
REDMINE_DATABASE_NAME |
Database name. | bitnami_redmine |
REDMINE_DATABASE_USER |
Database user name. | bn_redmine |
REDMINE_DATABASE_PASSWORD |
Database user password. | nil |
Read-only environment variables
| Name | Description | Value |
|---|---|---|
REDMINE_BASE_DIR |
Redmine installation directory. | ${BITNAMI_ROOT_DIR}/redmine |
REDMINE_CONF_DIR |
Redmine directory for configuration files. | ${REDMINE_BASE_DIR}/config |
REDMINE_VOLUME_DIR |
Redmine directory for mounted configuration files. | ${BITNAMI_VOLUME_DIR}/redmine |
REDMINE_DAEMON_USER |
Redmine system user. | redmine |
REDMINE_DAEMON_GROUP |
Redmine system group. | redmine |
REDMINE_DEFAULT_DATABASE_HOST |
Default database server host. | mariadb |
When you start the Redmine image, you can adjust the configuration of the instance by passing one or more environment variables either on the docker-compose file or on the docker run command line. If you want to add a new environment variable:
-
For docker-compose add the variable name and value under the application section in the
docker-compose.ymlfile present in this repository:redmine: ... environment: - REDMINE_PASSWORD=my_password ... -
For manual execution add a
--envoption with each variable and value:$ docker run -d --name redmine -p 80:8080 -p 443:8443 \ --env REDMINE_PASSWORD=my_password \ --network redmine-tier \ --volume /path/to/redmine-persistence:/bitnami \ bitnami/redmine:latest
Examples
SMTP configuration using a Gmail account
This would be an example of SMTP configuration using a Gmail account:
-
Modify the
docker-compose.ymlfile present in this repository:redmine: ... environment: - REDMINE_DATABASE_USER=bn_redmine - REDMINE_DATABASE_NAME=bitnami_redmine - ALLOW_EMPTY_PASSWORD=yes - REDMINE_SMTP_HOST=smtp.gmail.com - REDMINE_SMTP_PORT=587 - REDMINE_SMTP_USER=your_email@gmail.com - REDMINE_SMTP_PASSWORD=your_password ... -
For manual execution:
$ docker run -d --name redmine -p 80:8080 -p 443:8443 \
  --env REDMINE_DATABASE_USER=bn_redmine \
  --env REDMINE_DATABASE_NAME=bitnami_redmine \
  --env REDMINE_SMTP_HOST=smtp.gmail.com \
  --env REDMINE_SMTP_PORT=587 \
  --env REDMINE_SMTP_USER=your_email@gmail.com \
  --env REDMINE_SMTP_PASSWORD=your_password \
  --network redmine-tier \
  --volume /path/to/redmine-persistence:/bitnami \
  bitnami/redmine:latest
Connect Redmine container to an existing database
The Bitnami Redmine container supports connecting the Redmine application to an external database. This would be an example of using an external database for Redmine.
-
Modify the
docker-compose.ymlfile present in this repository:redmine: ... environment: - - REDMINE_DATABASE_HOST=mariadb + - REDMINE_DATABASE_HOST=mariadb_host - REDMINE_DATABASE_PORT_NUMBER=3306 - REDMINE_DATABASE_NAME=redmine_db - REDMINE_DATABASE_USER=redmine_user - - ALLOW_EMPTY_PASSWORD=yes + - REDMINE_DATABASE_PASSWORD=redmine_password ... -
For manual execution:
$ docker run -d --name redmine\
  -p 8080:8080 -p 8443:8443 \
  --network redmine-network \
  --env REDMINE_DATABASE_HOST=mariadb_host \
  --env REDMINE_DATABASE_PORT_NUMBER=3306 \
  --env REDMINE_DATABASE_NAME=redmine_db \
  --env REDMINE_DATABASE_USER=redmine_user \
  --env REDMINE_DATABASE_PASSWORD=redmine_password \
  --volume redmine_data:/bitnami/redmine \
  bitnami/redmine:latest
In case the database already contains data from a previous Redmine installation, you need to set the variable REDMINE_SKIP_BOOTSTRAP to yes. Otherwise, the container would execute the installation wizard and could modify the existing data in the database. Note that, when setting REDMINE_SKIP_BOOTSTRAP to yes, values for environment variables such as REDMINE_USERNAME, REDMINE_PASSWORD or REDMINE_EMAIL will be ignored.
Logging
The Bitnami Redmine Docker image sends the container logs to stdout. To view the logs:
docker logs redmine
Or using Docker Compose:
docker-compose logs redmine
You can configure the containers logging driver using the --log-driver option if you wish to consume the container logs differently. In the default configuration docker uses the json-file driver.
Customize this image
The Bitnami Redmine Docker image is designed to be extended.
Extend this image
Before extending this image, please note there are certain configuration settings you can modify using the original image:
- Settings that can be adapted using environment variables. For instance, you can change the port used by Redmine by setting the environment variable
REDMINE_PORT_NUMBER. - You can mount your custom scripts under
/docker-entrypoint-init.ddirectory. These scripts will be executed in alphabetical order when the container during the 1st container bootstrap.
If your desired customizations cannot be covered using the methods mentioned above, extend the image. To do so, create your own image using a Dockerfile with the format below:
FROM bitnami/redmine
### Put your customizations below
...
Here is an example of extending to install custom plugins:
FROM bitnami/redmine

### Install custom plugins
RUN cd /opt/bitnami/redmine && \
    git clone https://github.com/user_name/name_of_the_plugin.git plugins/name_of_the_plugin && \
    bundle config set frozen false && bundle install && bundle config set frozen true
Maintenance
Backing up your container
To backup your data, configuration and logs, follow these simple steps:
Step 1: Stop the currently running container
docker stop redmine
Or using Docker Compose:
docker-compose stop redmine
Step 2: Run the backup command
We need to mount two volumes in a container we will use to create the backup: a directory on your host to store the backup in, and the volumes from the container we just stopped so we can access the data.
docker run --rm -v /path/to/redmine-backups:/backups --volumes-from redmine busybox \
  cp -a /bitnami/redmine /backups/latest
Restoring a backup
Restoring a backup is as simple as mounting the backup as volumes in the containers.
For the MariaDB database container:
 $ docker run -d --name mariadb \
   ...
-  --volume /path/to/mariadb-persistence:/bitnami/mariadb \
+  --volume /path/to/mariadb-backups/latest:/bitnami/mariadb \
   bitnami/mariadb:latest
For the Redmine container:
 $ docker run -d --name redmine \
   ...
-  --volume /path/to/redmine-persistence:/bitnami/redmine \
+  --volume /path/to/redmine-backups/latest:/bitnami/redmine \
   bitnami/redmine:latest
Upgrade this image
Bitnami provides up-to-date versions of MariaDB and Redmine, including security patches, soon after they are made upstream. We recommend that you follow these steps to upgrade your container. We will cover here the upgrade of the Redmine container. For the MariaDB upgrade see: https://github.com/bitnami/containers/tree/main/bitnami/mariadb#upgrade-this-image
The bitnami/redmine:latest tag always points to the most recent release. To get the most recent release you can simple repull the latest tag from the Docker Hub with docker pull bitnami/redmine:latest. However it is recommended to use tagged versions.
Step 1: Get the updated image
docker pull bitnami/redmine:latest
Step 2: Stop the running container
Stop the currently running container using the command
docker-compose stop redmine
Step 3: Take a snapshot of the application state
Follow the steps in Backing up your container to take a snapshot of the current application state.
Step 4: Remove the currently running container
Remove the currently running container by executing the following command:
docker-compose rm -v redmine
Step 5: Run the new image
Update the image tag in docker-compose.yml and re-create your container with the new image:
docker-compose up -d
Notable Changes
4.2.1-debian-10-r70
-
The size of the container image has been decreased.
-
The configuration logic is now based on Bash scripts in the rootfs/ folder.
-
It is now possible to use an already populated Redmine database from another installation. In order to do this, use the environment variable
REDMINE_SKIP_BOOTSTRAP, which forces the container not to run the initial Redmine setup wizard. -
The following environment variables have been deprecated. They will continue to work as before, but support for these may be removed in a future update:
REDMINE_DB_POSTGRESin favor ofREDMINE_DATABASE_HOST. When used,REDMINE_DATABASE_TYPE=postgresqlwill also be set.REDMINE_DB_MYSQL, in favor ofREDMINE_DATABASE_HOST. Whenused,REDMINE_DATABASE_TYPE=mariadbwill also be set.
Contributing
We'd love for you to contribute to this container. You can request new features by creating an issue or submitting a pull request with your contribution.
Issues
If you encountered a problem running this container, you can file an issue. For us to provide better support, be sure to fill the issue template.
License
Copyright © 2025 Broadcom. The term "Broadcom" refers to Broadcom Inc. and/or its subsidiaries.
Licensed under the Apache License, Version 2.0 (the "License"); you may not use this file except in compliance with the License. You may obtain a copy of the License at
http://www.apache.org/licenses/LICENSE-2.0
Unless required by applicable law or agreed to in writing, software distributed under the License is distributed on an "AS IS" BASIS, WITHOUT WARRANTIES OR CONDITIONS OF ANY KIND, either express or implied. See the License for the specific language governing permissions and limitations under the License.
Plugins Redmine Docker
Link: https://www.redmine.org/plugins?page=1&sort=&utf8=%E2%9C%93&v=6.0
Plugins Versão 6.0: https://www.redmine.org/plugins?utf8=%E2%9C%93&page=1&sort=&v=6.0
Plugins Versão 5.0 : https://www.redmine.org/plugins?page=4&sort=&utf8=%E2%9C%93&v=5.0
Plugins Versão 5.1: https://www.redmine.org/plugins?utf8=%E2%9C%93&page=1&sort=&v=5.1
Links de Plugins para instalar:
Add new elements on detailed issue page to dynamically update issue's attributes and custom fields, directly in the details block of the issue without any page refresh (JIRA style). https://github.com/Ilogeek/redmine_issue_dynamic_edit
Redmine plugin. Adds date formats with day names to Redmine settings: https://github.com/ablidadev/add_date_formats_with_day_names
Redmine plugin. Adds option to change issue due date and start date via context menu on issues list. Selectable options are: Today Tomorrow, In 2 days, Next workday, In 7 days, In 14 days e In 30 days. https://github.com/ablidadev/context_menu_dates
A Redmine plugin which displays the documents list in a shorter way. https://github.com/smoreau/redmine_documents_short
Adds a download button to zip and download all attachments for an issue. Installation P Download the Attachments Plugin for Redmine This plugin adds a download button to each issue in Redmine, allowing users to download all attachments for the issue as a zip file. The button is enabled only if the issue has attachments. https://github.com/vaibhavpetkar/redmine_issue_attachments
A very simple Redmine plugin that will redirect signed-in users to My Page when they sign-in or when they click the home link in the website header. https://www.redmine.org/plugins/home-page-redirector
The Issue Reminder Plugin adds the functionality to send issue reminders automatically and manually. https://www.redmine.org/plugins/issue_reminder
This plugin posts updates to issues in your Redmine installation to a Microsoft Teams channel. https://github.com/wellbia/redmine_microsoftteams
This plugin automatically creates issues when a period of time passes. https://github.com/jperelli/Redmine-Periodic-Task/
Provides a better projects overview. Subprojects displayed as a table including stats about open/closed/total issues. https://github.com/maxrossello/redmine_better_overview
This Redmine plugin add an issue dashboard that supports drag and drop for issues and various filters. https://github.com/jgraichen/redmine_dashboard
This plugin let administrators securely login to other users' account with a single click. https://github.com/nounder/redmine_impersonate
This is a plugin for Redmine that adds issue hierarchy filter. https://github.com/sk-ys/redmine_issue_hierarchy_filter/
This plugin adds two buttons to the right edge of the jsToolBar that allow sliding the toolbar buttons when the toolbar is overflowing. https://github.com/sk-ys/redmine_jstoolbar_slider/
This is a plugin for Redmine which adds OR filters. https://github.com/apsmir/redmine_or_filters
This plugin allows to customize specific terms in Redmine translations, and allows third party plugins to support translations containing customizable terms. https://github.com/maxrossello/redmine_translation_terms/tree/master
This plugin adds the possibility to limit the visibility of issue descriptions, based on role permissions and selected trackers. https://github.com/redminetrustteam/redmine_view_issue_description
Plugin Redmine Mattermost
Link: https://github.com/alphanodes/redmine_messenger/tree/main?tab=readme-ov-file
git clone https://github.com/alphanodes/redmine_messenger.git
Messenger plugin for Redmine
This plugin posts updates to issues in your Redmine installation to Slack, Rocket.Chat, Discord or Mattermost channel.
Features
- Post information to messenger channel
- post issue updates
- post private issue updates
- display watchers
- convert username to mentions
- post wiki updates
- post db entry (if redmine_db is installed) updates
- post password (if redmine_passwords is installed) updates
- post contact (if redmine_contacts is installed) updates
- Post information directly to users to be notified (users names should be the same in Redmine and chat). Tested with Rocket.Chat
- overwrite messenger settings at project level
- parent project support (inherit messenger settings from parent project)
- multiple channel support (define one or more channels to deliver note)
Screenshot
Rocket.Chat output:
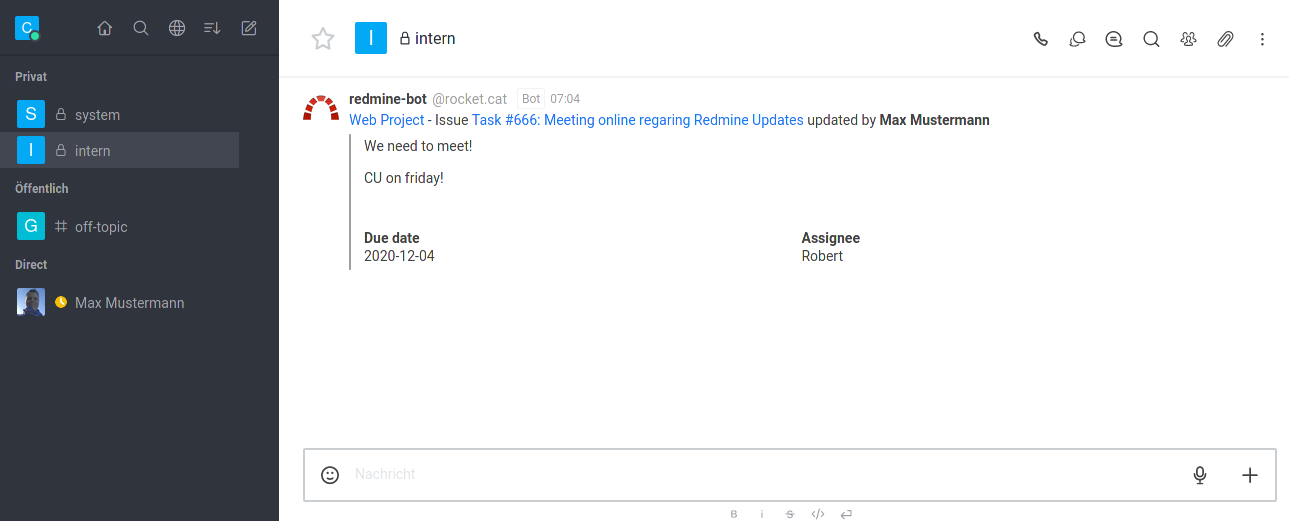
Redmine configuration:
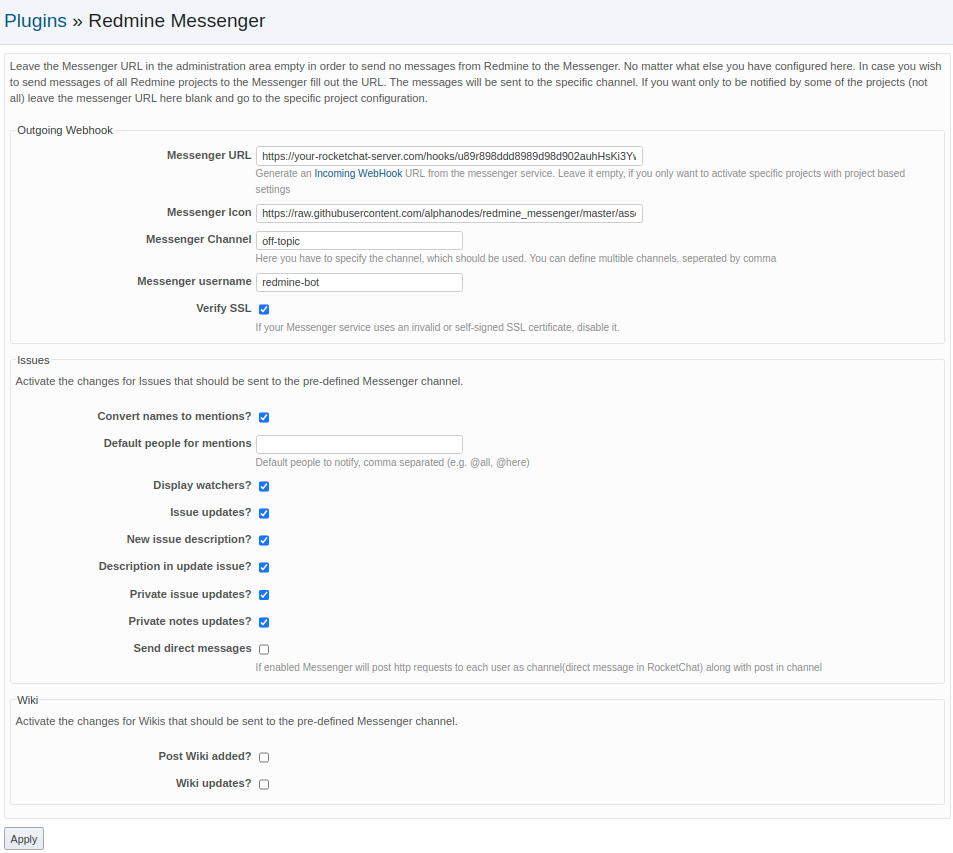
-
Convert names to mentions: Automatically converts Redmine mentions into Slack mentions so a user is notified through Slack when mentioned in a Redmine note. Depends on Redmine Mentions plugin.
-
Display watchers: Issue watchers are included in notifications.
-
Post issue updates: All newly created notes on an issue generate a notification (does not include private issues).
-
Description in new issue: Include the text description of a new issue in the notification.
-
Description in update issue: Include the text encompassed in a note upon updating the issue in the notification.
-
Post updates for private issue: Same as Post issue updates but for private issues.
-
Post private notes: Same as Description in update issue but for private issues.
-
Post wiki updates: Generates a notification when a projects Wiki is updated.
Prepare your messenger service
Slack
Go to Slack documentation Incoming Webhooks for more information to set up Incoming WebHook
Mattermost
Go to Mattermost documentation Incoming Webhooks for more information to set up Incoming WebHook
Discord
Go to Discord documentation Intro to Webhooks for more information to set up Incoming WebHook You have to add /slack after your webhook url.
Rocket.Chat
Go to Rocket.Chat documentation Incoming WebHook Scripting for more information to set up Incoming WebHook
Requirements
- Redmine version >= 5.0
- Ruby version >= 2.7.0
Older versions
- If you want to use it with Redmine 3.x, use git tag 1.0.5
- If you want to use it with Redmine 4.0, use git tag 1.0.7
- If you want to use it with Redmine 4.1, use git tag 1.0.13
- If you want to use it with Redmine 4.2, use git tag 1.0.14
Installation
Install redmine_messenger plugin for Redmine
cd $REDMINE_ROOT
git clone https://github.com/AlphaNodes/redmine_messenger.git plugins/redmine_messenger
bundle config set --local without 'development test'
bundle install
bundle exec rake redmine:plugins:migrate RAILS_ENV=production
Make sure that the directory is named redmine_messenger (you cannot use another name for it)! Restart Redmine (application server) and you should see the plugin show up in the Plugins page. Under the configuration options, set the Messenger API URL to the URL for an Incoming WebHook integration in your Messenger account and also set the Messenger Channel to the channel's handle (be careful, this is not the channel's display name visible to users, you can find each channel's handle by navigating inside the channel and clicking the down-arrow and selecting view info).
Uninstall
Uninstall redmine_messenger
cd $REDMINE_ROOT
bundle exec rake redmine:plugins:migrate NAME=redmine_messenger VERSION=0 RAILS_ENV=production
rm -rf plugins/redmine_messenger
Restart Redmine (application server)
License
redmine_messenger plugin is developed under the MIT License.
Redmine Copyright
The redmine_messenger is a plugin extension for Redmine Project Management Software, whose Copyright follows. Copyright (C) 2006- Jean-Philippe Lang
Redmine is a flexible project management web application written using Ruby on Rails framework. More details can be found in the doc directory or on the official website http://www.redmine.org
This program is free software; you can redistribute it and/or modify it under the terms of the GNU General Public License as published by the Free Software Foundation; either version 2 of the License, or (at your option) any later version.
This program is distributed in the hope that it will be useful, but WITHOUT ANY WARRANTY; without even the implied warranty of MERCHANTABILITY or FITNESS FOR A PARTICULAR PURPOSE. See the GNU General Public License for more details.
You should have received a copy of the GNU General Public License along with this program; if not, write to the Free Software Foundation, Inc., 51 Franklin Street, Fifth Floor, Boston, MA 02110-1301, USA.
Credits
The source code is forked from
Special thanks to the original author and contributors for making this awesome hook for Redmine. This fork is just refactored to use Messenger-namespaced configuration options in order to use all hooks for Rocket.Chat, Mattermost AND Slack in a Redmine installation.
Instalação Redmine Docker Sameersbn
Link: https://github.com/sameersbn/docker-redmine
git clone https://github.com/sameersbn/docker-redmine.git
Agosto/2025
Table of Contents
- Table of Contents
- Introduction
- Contributing
- Issues
- Installation
- Quick Start
- Configuration
- Plugins
- Themes
- Maintenance
- Development
- References
Introduction
Dockerfile to build a Redmine container image.
Version
Current Version: sameersbn/redmine:6.0.6
P.S.: If your installation depends on various third party plugins, please stick with 2.6.xx series to avoid breakage.
Contributing
If you find this image useful here's how you can help:
- Send a Pull Request with your awesome new features and bug fixes
- Help new users with Issues they may encounter
- Support the development of this image with a donation
Issues
Docker is a relatively new project and is active being developed and tested by a thriving community of developers and testers and every release of docker features many enhancements and bugfixes.
Given the nature of the development and release cycle it is very important that you have the latest version of docker installed because any issue that you encounter might have already been fixed with a newer docker release.
Install the most recent version of the Docker Engine for your platform using the official Docker releases, which can also be installed using:
wget -qO- https://get.docker.com/ | sh
Fedora and RHEL/CentOS users should try disabling selinux with setenforce 0 and check if resolves the issue. If it does than there is not much that I can help you with. You can either stick with selinux disabled (not recommended by redhat) or switch to using ubuntu.
If using the latest docker version and/or disabling selinux does not fix the issue then please file a issue request on the issues page.
In your issue report please make sure you provide the following information:
- The host distribution and release version.
- Output of the
docker versioncommand. - Output of the
docker infocommand. - The
docker runcommand you used to run the image (mask out the sensitive bits).
Installation
Automated builds of the image are available on Dockerhub and is the recommended method of installation.
Note: Builds are also available on Quay.io
docker pull sameersbn/redmine:latest
Since version 2.4.2, the image builds are being tagged. You can now pull a particular version of redmine by specifying the version number. For example,
docker pull sameersbn/redmine:6.0.6
Alternately you can build the image yourself.
docker build -t sameersbn/redmine github.com/sameersbn/docker-redmine
Quick Start
The quickest way to get started is using docker compose.
wget https://raw.githubusercontent.com/sameersbn/docker-redmine/master/docker-compose.yml
docker compose up
Alternately, you can manually launch the redmine container and the supporting postgresql container by following this two step guide.
Step 1. Launch a postgresql container
docker run --name=postgresql-redmine -d \
  --env='DB_NAME=redmine_production' \
  --env='DB_USER=redmine' --env='DB_PASS=password' \
  --volume=/srv/docker/redmine/postgresql:/var/lib/postgresql \
  sameersbn/postgresql:14-20230628
Step 2. Launch the redmine container
docker run --name=redmine -d \
  --link=postgresql-redmine:postgresql --publish=10083:80 \
  --env='REDMINE_PORT=10083' \
  --volume=/srv/docker/redmine/redmine:/home/redmine/data \
  --volume=/srv/docker/redmine/redmine-logs:/var/log/redmine/ \
  sameersbn/redmine:6.0.6
NOTE: Please allow a minute or two for the Redmine application to start.
Point your browser to http://localhost:10083 and login using the default username and password:
- username: admin
- password: admin
Make sure you visit the Administration link and Load the default configuration before creating any projects.
You now have the Redmine application up and ready for testing. If you want to use this image in production the please read on.
The rest of the document will use the docker command line. You can quite simply adapt your configuration into a docker-compose.yml file if you wish to do so.
Configuration
Data Store
For the file storage we need to mount a volume at the following location.
/home/redmine/data/var/log/redminefor server logs
NOTE
Existing users need to move the existing files directory inside
/srv/docker/redmine/redmine/.mkdir -p /srv/docker/redmine/redmine mv /opt/redmine/files /srv/docker/redmine/redmine
SELinux users are also required to change the security context of the mount point so that it plays nicely with selinux.
mkdir -p /srv/docker/redmine/redmine
sudo chcon -Rt svirt_sandbox_file_t /srv/docker/redmine/redmine
Volumes can be mounted in docker by specifying the '-v' option in the docker run command.
docker run --name=redmine -it --rm \
  --volume=/srv/docker/redmine/redmine:/home/redmine/data \
  --volume=/srv/docker/redmine/redmine-logs:/var/log/redmine/ \
  sameersbn/redmine:6.0.6
Database
Redmine uses a database backend to store its data.
MySQL
Internal MySQL Server
The internal mysql server has been removed from the image. Please use a linked mysql or postgresql container instead or connect with an external mysql or postgresql server.
Refer to Linking to MySQL Container for more information.
External MySQL Server
The image can be configured to use an external MySQL database instead of starting a MySQL server internally. The database configuration should be specified using environment variables while starting the Redmine image.
Before you start the Redmine image create user and database for redmine.
mysql -uroot -p
CREATE USER 'redmine'@'%.%.%.%' IDENTIFIED BY 'password';
CREATE DATABASE IF NOT EXISTS `redmine_production` DEFAULT CHARACTER SET `utf8` COLLATE `utf8_unicode_ci`;
GRANT SELECT, LOCK TABLES, INSERT, UPDATE, DELETE, CREATE, DROP, INDEX, ALTER ON `redmine_production`.* TO 'redmine'@'%.%.%.%';
We are now ready to start the redmine application.
docker run --name=redmine -it --rm \
  --env='DB_ADAPTER=mysql2' \
  --env='DB_HOST=192.168.1.100' --env='DB_NAME=redmine_production' \
  --env='DB_USER=redmine' --env='DB_PASS=password' \
  --volume=/srv/docker/redmine/redmine:/home/redmine/data \
  --volume=/srv/docker/redmine/redmine-logs:/var/log/redmine/ \
  sameersbn/redmine:6.0.6
This will initialize the redmine database and after a couple of minutes your redmine instance should be ready to use.
Linking to MySQL Container
See example docker-compose-mysql.yml.
PostgreSQL
External PostgreSQL Server
The image also supports using an external PostgreSQL Server. This is also controlled via environment variables.
CREATE ROLE redmine with LOGIN CREATEDB PASSWORD 'password';
CREATE DATABASE redmine_production;
GRANT ALL PRIVILEGES ON DATABASE redmine_production to redmine;
We are now ready to start the redmine application.
docker run --name=redmine -it --rm \
  --env='DB_ADAPTER=postgresql' \
  --env='DB_HOST=192.168.1.100' --env='DB_NAME=redmine_production' \
  --env='DB_USER=redmine' --env='DB_PASS=password' \
  --volume=/srv/docker/redmine/redmine:/home/redmine/data \
  --volume=/srv/docker/redmine/redmine-logs:/var/log/redmine/ \
  sameersbn/redmine:6.0.6
This will initialize the redmine database and after a couple of minutes your redmine instance should be ready to use.
Linking to PostgreSQL Container
You can link this image with a postgresql container for the database requirements. The alias of the postgresql server container should be set to postgresql while linking with the redmine image.
If a postgresql container is linked, only the DB_ADAPTER, DB_HOST and DB_PORT settings are automatically retrieved using the linkage. You may still need to set other database connection parameters such as the DB_NAME, DB_USER, DB_PASS and so on.
To illustrate linking with a postgresql container, we will use the sameersbn/postgresql image. When using postgresql image in production you should mount a volume for the postgresql data store. Please refer the README of docker-postgresql for details.
First, lets pull the postgresql image from the docker index.
docker pull sameersbn/postgresql:14-20230628
For data persistence lets create a store for the postgresql and start the container.
SELinux users are also required to change the security context of the mount point so that it plays nicely with selinux.
mkdir -p /srv/docker/redmine/postgresql
sudo chcon -Rt svirt_sandbox_file_t /srv/docker/redmine/postgresql
The run command looks like this.
docker run --name=postgresql-redmine -d \
  --env='DB_NAME=redmine_production' \
  --env='DB_USER=redmine' --env='DB_PASS=password' \
  --volume=/srv/docker/redmine/postgresql:/var/lib/postgresql \
  sameersbn/postgresql:14-20230628
The above command will create a database named redmine_production and also create a user named redmine with the password password with access to the redmine_production database.
We are now ready to start the redmine application.
docker run --name=redmine -it --rm --link=postgresql-redmine:postgresql \
  --volume=/srv/docker/redmine/redmine:/home/redmine/data \
  --volume=/srv/docker/redmine/redmine-logs:/var/log/redmine/ \
  sameersbn/redmine:6.0.6
Here the image will also automatically fetch the DB_NAME, DB_USER and DB_PASS variables from the postgresql container as they are specified in the docker run command for the postgresql container. This is made possible using the magic of docker links and works with the following images:
AWS RDS Integration
docker-redmine has support for fetching secrets from AWS Secrets Manager at runtime. Read docs/aws.md for detailed instructions.
Memcached (Optional)
This image can (optionally) be configured to use a memcached server to speed up Redmine. This is particularly useful when you have a large number users.
External Memcached Server
The image can be configured to use an external memcached server. The memcached server host and port configuration should be specified using environment variables MEMCACHE_HOST and MEMCACHE_PORT like so:
Assuming that the memcached server host is 192.168.1.100
docker run --name=redmine -it --rm \
  --env='MEMCACHE_HOST=192.168.1.100' --env='MEMCACHE_PORT=11211' \
  sameersbn/redmine:6.0.6
Linking to Memcached Container
Alternately you can link this image with a memcached container. The alias of the memcached server container should be set to memcached while linking with the redmine image.
To illustrate linking with a memcached container, we will use the sameersbn/memcached image. Please refer the README of docker-memcached for details.
First, lets pull and launch the memcached image from the docker index.
docker run --name=memcached-redmine -d sameersbn/memcached:1.5.6
Now you can link memcached to the redmine image:
docker run --name=redmine -it --rm --link=memcached-redmine:memcached \
  sameersbn/redmine:6.0.6
The mail configuration should be specified using environment variables while starting the redmine image. The configuration defaults to using gmail to send emails and requires the specification of a valid username and password to login to the gmail servers.
Please refer the Available Configuration Parameters section for the list of SMTP parameters that can be specified.
docker run --name=redmine -it --rm \
  --env='SMTP_USER=USER@gmail.com' --env='SMTP_PASS=PASSWORD' \
  --volume=/srv/docker/redmine/redmine:/home/redmine/data \
  --volume=/srv/docker/redmine/redmine-logs:/var/log/redmine/ \
  sameersbn/redmine:6.0.6
If you are not using google mail, then please configure the SMTP host and port using the SMTP_HOST and SMTP_PORT configuration parameters.
If you are using a google apps account with a custom domain (other than google.com), you need to set the SMTP_DOMAIN parameters or else you will get internal server error when doing an action that would normally send a mail.
Please see redmine email config for examples of different email configurations: https://www.redmine.org/projects/redmine/wiki/emailconfiguration
Similary you can configure receiving emails using the IMAP_ configuration options. Please refer Available Configuration Parameters for details. When receiving emails is enabled users can comment on issues by replying to emails.
P.S. The receiving emails feature is only available since versions 2.6.6-2, 3.0.4-2 and 3.1.0-2. Refer the Changelog for details.
SSL
Access to the redmine application can be secured using SSL so as to prevent unauthorized access. While a CA certified SSL certificate allows for verification of trust via the CA, a self signed certificates can also provide an equal level of trust verification as long as each client takes some additional steps to verify the identity of your website. I will provide instructions on achieving this towards the end of this section.
To secure your application via SSL you basically need two things:
- Private key (.key)
- SSL certificate (.crt)
When using CA certified certificates, these files are provided to you by the CA. When using self-signed certificates you need to generate these files yourself. Skip the following section if you are armed with CA certified SSL certificates.
Jump to the Using HTTPS with a load balancer section if you are using a load balancer such as hipache, haproxy or nginx.
Generation of Self Signed Certificates
Generation of self-signed SSL certificates involves a simple 3 step procedure.
STEP 1: Create the server private key
openssl genrsa -out redmine.key 2048
STEP 2: Create the certificate signing request (CSR)
openssl req -new -key redmine.key -out redmine.csr
STEP 3: Sign the certificate using the private key and CSR
openssl x509 -req -days 365 -in redmine.csr -signkey redmine.key -out redmine.crt
Congratulations! you have now generated an SSL certificate thats valid for 365 days.
Strengthening the server security
This section provides you with instructions to strengthen your server security. To achieve this we need to generate stronger DHE parameters.
openssl dhparam -out dhparam.pem 2048
Installation of the SSL Certificates
Out of the four files generated above, we need to install the redmine.key, redmine.crt and dhparam.pem files at the redmine server. The CSR file is not needed, but do make sure you safely backup the file (in case you ever need it again).
The default path that the redmine application is configured to look for the SSL certificates is at /home/redmine/data/certs, this can however be changed using the SSL_KEY_PATH, SSL_CERTIFICATE_PATH and SSL_DHPARAM_PATH configuration options.
If you remember from above, the /home/redmine/data path is the path of the data store, which means that we have to create a folder named certs inside /srv/docker/redmine/redmine/ and copy the files into it and as a measure of security we will update the permission on the redmine.key file to only be readable by the owner.
mkdir -p /srv/docker/redmine/redmine/certs
cp redmine.key /srv/docker/redmine/redmine/certs/
cp redmine.crt /srv/docker/redmine/redmine/certs/
cp dhparam.pem /srv/docker/redmine/redmine/certs/
chmod 400 /srv/docker/redmine/redmine/certs/redmine.key
Great! we are now just one step away from having our application secured.
Enabling HTTPS support
HTTPS support can be enabled by setting the REDMINE_HTTPS option to true.
docker run --name=redmine -d \
  --publish=10083:80 --publish 10445:443 \
  --env='REDMINE_PORT=10445' --env='REDMINE_HTTPS=true' \
  --volume=/srv/docker/redmine/redmine:/home/redmine/data \
  --volume=/srv/docker/redmine/redmine-logs:/var/log/redmine/ \
  sameersbn/redmine:6.0.6
In this configuration, any requests made over the plain http protocol will automatically be redirected to use the https protocol. However, this is not optimal when using a load balancer.
Note: If startup prints SSL keys and certificates were not found. refer to SSL and verify you put the certs in the correct place. Unless your trying to setup for Using HTTPS with a load balancer
Configuring HSTS
HSTS if supported by the browsers makes sure that your users will only reach your server via HTTPS. When the user comes for the first time it sees a header from the server which states for how long from now this site should only be reachable via HTTPS - that's the HSTS max-age value.
With NGINX_HSTS_MAXAGE you can configure that value. The default value is 31536000 seconds. If you want to disable a already sent HSTS MAXAGE value, set it to 0.
docker run --name=redmine -d \
  --env='REDMINE_HTTPS=true' \
  --env='NGINX_HSTS_MAXAGE=2592000'
  --volume=/srv/docker/redmine/redmine:/home/redmine/data \
  --volume=/srv/docker/redmine/redmine-logs:/var/log/redmine/ \
  sameersbn/redmine:6.0.6
If you want to completely disable HSTS set NGINX_HSTS_ENABLED to false.
Using HTTPS with a load balancer
Load balancers like nginx/haproxy/hipache talk to backend applications over plain http and as such the installation of ssl keys and certificates are not required and should NOT be installed in the container. The SSL configuration has to instead be done at the load balancer. Hoewever, when using a load balancer you MUST set REDMINE_HTTPS to true.
With this in place, you should configure the load balancer to support handling of https requests. But that is out of the scope of this document. Please refer to Using SSL/HTTPS with HAProxy for information on the subject.
When using a load balancer, you probably want to make sure the load balancer performs the automatic http to https redirection. Information on this can also be found in the link above.
In summation, when using a load balancer, the docker command would look for the most part something like this:
docker run --name=redmine -d --publish=10083:80 \
  --env='REDMINE_HTTPS=true' \
  --volume=/srv/docker/redmine/redmine:/home/redmine/data \
  --volume=/srv/docker/redmine/redmine-logs:/var/log/redmine/ \
  sameersbn/redmine:6.0.6
Deploy to a subdirectory (relative url root)
By default redmine expects that your application is running at the root (eg. /). This section explains how to run your application inside a directory.
Let's assume we want to deploy our application to '/redmine'. Redmine needs to know this directory to generate the appropriate routes. This can be specified using the REDMINE_RELATIVE_URL_ROOT configuration option like so:
docker run --name=redmine -d --publish=10083:80 \
  --env='REDMINE_RELATIVE_URL_ROOT=/redmine' \
  --volume=/srv/docker/redmine/redmine:/home/redmine/data \
  --volume=/srv/docker/redmine/redmine-logs:/var/log/redmine/ \
  sameersbn/redmine:6.0.6
Redmine will now be accessible at the /redmine path, e.g. http://www.example.com/redmine.
Note: The REDMINE_RELATIVE_URL_ROOT parameter should always begin with a slash and SHOULD NOT have any trailing slashes.
Apache Proxy as frontend
Ref #370
Apache config
# REDMINE Pass connections to docker
ProxyRequests Off
ProxyPass /redmine http://127.0.0.1:10083/redmine/
ProxyPassReverse /redmine http://127.0.0.1:10083/redmine/
Note the following should be set: REDMINE_RELATIVE_URL_ROOT=/redmine and port mapped --publish=10083:80
Mapping host user and group
Per default the container is configured to run redmine as user and group redmine with uid and gid 1000. The host possibly uses this ids for different purposes leading to unfavorable effects. From the host it appears as if the mounted data volumes are owned by the host's user/group 1000.
Also the container processes seem to be executed as the host's user/group 1000. The container can be configured to map the uid and gid of redmine user to different ids on host by passing the environment variables USERMAP_UID and USERMAP_GID. The following command maps the ids to user and group redmine on the host.
docker run --name=redmine -it --rm [options] \
  --env="USERMAP_UID=500" --env="USERMAP_GID=500" \
  sameersbn/redmine:6.0.6
Available Configuration Parameters
Please refer the docker run command options for the --env-file flag where you can specify all required environment variables in a single file. This will save you from writing a potentially long docker run command.
Below is the complete list of parameters that can be set using environment variables.
- REDMINE_HTTPS: Enable HTTPS (SSL/TLS) port on server. Defaults to
false - REDMINE_PORT: The port of the Redmine server. Defaults to
80for plain http and443when https is enabled. - REDMINE_RELATIVE_URL_ROOT: The relative url of the Redmine server, e.g.
/redmine. No default. - REDMINE_ATTACHMENTS_DIR: The attachments directory. Defaults to
/home/redmine/data/files - REDMINE_SECRET_TOKEN: Secret key for verifying cookie session data integrity. Defaults to a random alphanumeric string.
- REDMINE_MINIMAGICK_FONT_PATH: The minimagick_font_path for the png export function of GANTT to work. Defaults to
/usr/share/fonts/truetype/dejavu/DejaVuSans.ttf. - REDMINE_CONCURRENT_UPLOADS: Maximum number of simultaneous AJAX uploads. Defaults to
2. - REDMINE_SUDO_MODE_ENABLED: Requires users to re-enter their password for sensitive actions. Defaults to
false. - REDMINE_SUDO_MODE_TIMEOUT: Sudo mode timeout. Defaults to
15minutes. - REDMINE_FETCH_COMMITS: Setup cron job to fetch commits. Possible values
disable,hourly,dailyormonthly. Disabled by default. - REDMINE_AUTOLOGIN_COOKIE_NAME: The name of autologin-cookie. Defaults to
autologin. - REDMINE_AUTOLOGIN_COOKIE_PATH: The path of autologin-cookie. Defaults to
/. - REDMINE_AUTOLOGIN_COOKIE_SECURE: Set autologin-cookie to secure. Defaults to
truewhenREDMINE_HTTPSistrue, else defaults tofalse. - REDMINE_BACKUPS_DIR: The backup folder in the container. Defaults to
/home/redmine/data/backups - REDMINE_BACKUP_SCHEDULE: Setup cron job to schedule automatic backups. Possible values
disable,daily,weeklyormonthly. Disabled by default - REDMINE_BACKUP_EXPIRY: Configure how long (in seconds) to keep backups before they are deleted. By default when automated backups are disabled backups are kept forever (0 seconds), else the backups expire in 7 days (604800 seconds).
- REDMINE_BACKUP_TIME: Set a time for the automatic backups in
HH:MMformat. Defaults to04:00. - REDMINE_AVATAR_SERVER_URL: Avatar server for displaying user icons. Defaults to
https://www.gravatar.com - DATABASE_URL: The database URL. See Configuring a Database. Possible schemes:
postgres,postgresql,mysql2, andsqlite3. Defaults to no URL. - DB_ADAPTER: The database type. Possible values:
mysql2,postgresql, and 'sqlite3'. Defaults tomysql. - DB_CREATE: Whether the db should be automatically created (
bundle exec rake db:create). Defaults totrue. - DB_ENCODING: The database encoding. For
DB_ADAPTERvaluespostresqlandmysql2, this parameter defaults tounicodeandutf8respectively. For full unicode support (all emojis) with mariadb or mysql set this toutf8mb4and make sure to also set all tables toutf8mb4and usecollate utf8mb4_unicode_ci. Existing databases can be converted by following this HowTo. - DB_HOST: The database server hostname. Defaults to
localhost. - DB_PORT: The database server port. Defaults to
3306. - DB_NAME: The database name. Defaults to
redmine_production - DB_USER: The database user. Defaults to
root - DB_PASS: The database password. Defaults to no password
- DB_POOL: The database connection pool count. Defaults to
5. - DB_SKIP_CHECK: Skip waiting for the database to start. Defaults to
false. - DB_SSL_MODE: Configures the database ssl mode. Valid options for postgresql (disable|allow|prefer|require|verify-ca|verify-full) and mysql (disable||preferred|required|verify_ca|verify_identity). Defaults to ''
- LOGGER_LEVEL: Configures the amount of messages that are generated when redmine is running. Possible values are:
debug,info,warn,error. Defaults toinfo - NGINX_ENABLED: Enable/disable the nginx server. Disabling Nginx is not recommended (see #148), use at your discretion. Defaults to
true. When disabled publish port8080instead of the usual port80or443. - NGINX_WORKERS: The number of nginx workers to start. Defaults to
1. - NGINX_MAX_UPLOAD_SIZE: Maximum acceptable upload size. Defaults to
20m. - NGINX_X_FORWARDED_PROTO: Advanced configuration option for the
proxy_set_header X-Forwarded-Protosetting in the redmine nginx vHost configuration. Defaults tohttpswhenREDMINE_HTTPSistrue, else defaults to$scheme. - NGINX_HSTS_ENABLED: Advanced configuration option for turning off the HSTS configuration. Applicable only when SSL is in use. Defaults to
true. See #138 for use case scenario. - NGINX_HSTS_MAXAGE: Advanced configuration option for setting the HSTS max-age in the redmine nginx vHost configuration. Applicable only when SSL is in use. Defaults to
31536000. - NGINX_CORS_ALLOW_ORIGIN: Sets
Access-Control-Allow-Originresponse header to indicate that the response can be shared with requesting code from the given origin. - NGINX_CORS_ALLOW_METHODS: Sets
Access-Control-Allow-Methodsresponse header to specify the methods allowed when accessing the resource in response to a preflight request. - NGINX_CORS_ALLOW_HEADERS: Sets
Access-Control-Allow-Headersresponse header to specify which headers can be used during the actual request. - NGINX_CORS_ALLOW_CREDENTIALS: Sets
Access-Control-Allow-Credentialsresponse header to tell browsers whether to expose the response to frontend JavaScript code when the request's credentials mode (Request.credentials) is include. - PUMA_WORKERS: The number of puma workers to start. Defaults to
2. - MEMCACHE_HOST: The host name of the memcached server. No defaults.
- MEMCACHE_PORT: The connection port of the memcached server. Defaults to
11211. - SSL_CERTIFICATE_PATH: The path to the SSL certificate to use. Defaults to
/home/redmine/data/certs/redmine.crt. - SSL_KEY_PATH: The path to the SSL certificate's private key. Defaults to
/home/redmine/data/certs/redmine.key. - SSL_DHPARAM_PATH: The path to the Diffie-Hellman parameter. Defaults to
/home/redmine/data/certs/dhparam.pem. - SSL_VERIFY_CLIENT: Enable verification of client certificates using the
SSL_CA_CERTIFICATES_PATHfile. Configures ssl_verify_client in nginx, options (off,on,optional,optional_no_ca). Defaults tooff - SSL_CA_CERTIFICATES_PATH: List of SSL certificates to trust. Defaults to
/home/redmine/data/certs/ca.crt. - SMTP_ENABLED: Enable mail delivery via SMTP. Defaults to
trueifSMTP_USERis defined, else defaults tofalse. - SMTP_DOMAIN: SMTP domain. Defaults to
www.gmail.com - SMTP_HOST: SMTP server host. Defaults to
smtp.gmail.com - SMTP_PORT: SMTP server port. Defaults to
587. - SMTP_USER: SMTP username.
- SMTP_PASS: SMTP password.
- SMTP_METHOD: SMTP delivery method. Possible values:
smtp. Defaults tosmtp. - SMTP_OPENSSL_VERIFY_MODE: SMTP openssl verification mode. Accepted values are
none,peer,client_onceandfail_if_no_peer_cert. SSL certificate verification is performed by default. - SMTP_STARTTLS: Enable STARTTLS. Defaults to
true. - SMTP_TLS: Enable SSL/TLS. Defaults to
false. - SMTP_SSL: Enable SSL. Defaults to
false. https://www.redmine.org/projects/redmine/wiki/EmailConfiguration#Error-TimeoutError-due-to-SSL-SMTP-server-connection - SMTP_AUTHENTICATION: Specify the SMTP authentication method. Defaults to
:loginifSMTP_USERis set. - SMTP_CA_ENABLED: Enable custom CA certificates for SMTP email configuration. Defaults to
false. - SMTP_CA_PATH: Specify the
ca_pathparameter for SMTP email configuration. Defaults to/home/redmine/data/certs. - SMTP_CA_FILE: Specify the
ca_fileparameter for SMTP email configuration. Defaults to/home/redmine/data/certs/ca.crt. - IMAP_ENABLED: Enable receiving email via IMAP. Defaults to
false. - IMAP_USER: IMAP username. Defaults to value of
SMTP_USER. NOTE: May require escaping special characters for (CRON or Bash). Currently known: '%' needs to be escaped '%' - IMAP_PASS: IMAP password. Defaults to value of
SMTP_PASS. NOTE: May require escaping special characters for (CRON or Bash). Currently known: '%' needs to be escaped '%' - IMAP_HOST: IMAP server host. Defaults to
imap.gmail.com. - IMAP_PORT: IMAP server port. Defaults to
993. - IMAP_SSL: IMAP enable SSL. Defaults to
true. - IMAP_STARTTLS: IMAP enabled STARTTLS. Defaults to
false. - IMAP_INTERVAL: The interval in minutes between checking emails. Defaults to
30. Values allowed in the range1 - 60. - IMAP_FOLDER: IMAP folder to read. Defaults to
INBOX. - IMAP_MOVE_ON_SUCCESS: Move emails that were successfully received to
MAILBOXinstead of deleting them. - IMAP_MOVE_ON_FAILURE: Move emails that were ignored to
MAILBOX. - INCOMING_EMAIL_UNKNOWN_USER: How to handle emails from an unknown user. Accepted values are
ignore,acceptandcreate. Defaults toignore. - INCOMING_EMAIL_NO_PERMISSION_CHECK: Disable permission checking when receiving the email. Defaults to
false. - INCOMING_EMAIL_NO_ACCOUNT_NOTICE: Disable new user account notification. Defaults to
true. - INCOMING_EMAIL_DEFAULT_GROUP: Adds created user to foo and bar groups.
- INCOMING_EMAIL_PROJECT: Identifier of the target project.
- INCOMING_EMAIL_PROJECT_FROM_SUBADRESS: ADDR select project from subaddress of ADDR found in To, Cc, Bcc headers.
- INCOMING_EMAIL_STATUS: Name of the target status.
- INCOMING_EMAIL_TRACKER: Name of the target tracker.
- INCOMING_EMAIL_CATEGORY: Name of the target category.
- INCOMING_EMAIL_PRIORITY: Name of the target priority.
- INCOMING_EMAIL_PRIVATE: Create new issues as private.
- INCOMING_EMAIL_ALLOW_OVERRIDE: Allow email content to override attributes specified by previous options. Value is a comma separated list of attributes. See redmine documentation for acceptable values.
- USERMAP_UID: ID of user redmine inside container. Defaults to
1000. - USERMAP_GID: ID of group redmine inside container. Defaults to
1000.
Plugins
The functionality of redmine can be extended using plugins developed by the community. You can find a list of available plugins in the Redmine Plugins Directory. You can also search for plugins on github.
Please check the plugin compatibility with the redmine version before installing a plugin.
Installing Plugins
Plugins should be installed in the plugins directory at the data store. If you are following the readme verbatim, on the host this location would be /srv/docker/redmine/redmine/plugins.
mkdir -p /srv/docker/redmine/redmine/plugins
To install a plugin, simply copy the plugin assets to the plugins directory. For example, to install the recurring tasks plugin:
cd /srv/docker/redmine/redmine/plugins
git clone https://github.com/nutso/redmine-plugin-recurring-tasks.git
For most plugins this is all you need to do. With the plugin installed you can start the docker image normally. The image will detect that a plugin has been added (or removed) and automatically install the required gems and perform the plugin migrations and will be ready for use.
If the gem installation fails after adding a new plugin, please retry after removing the /srv/docker/redmine/redmine/tmp directory
In some cases it might be necessary to install additional packages and/or perform some post installation setup for a plugin to function correctly. For such case the image allows you to install a pre-install.sh and post-install.sh script at the /srv/docker/redmine/redmine/plugins directory that will be executed everytime the image is started.
For example, the recurring tasks plugin requires that you create a cron job to periodically execute a rake task. To achieve this, create the /srv/docker/redmine/redmine/plugins/post-install.sh file with the following content:
## Recurring Tasks Configuration

# get the list existing cron jobs for the redmine user
crontab -u redmine -l 2>/dev/null >/tmp/cron.redmine

# add new job for recurring tasks if it does not exist
if ! grep -q redmine:recur_tasks /tmp/cron.redmine; then
  echo '@hourly /sbin/entrypoint.sh app:rake redmine:recur_tasks RAILS_ENV=production >> log/cron_rake.log 2>&1' >>/tmp/cron.redmine
  crontab -u redmine /tmp/cron.redmine 2>/dev/null
fi

# remove the temporary file
rm -rf /tmp/cron.redmine

## End of Recurring Tasks Configuration
Now whenever the image is started the post-install.sh script will be executed and the required cron job will be installed.
If you need to install additional packages to satisfy a plugins dependencies then install such packages using the pre-install.sh script.
Previously this image packaged a couple of plugins by default. Existing users would notice that those plugins are no longer available. If you want them back, follow these instructions:
cd /srv/docker/redmine/redmine/plugins
wget http://goo.gl/iJcvCP -O - | sh
Please Note: this plugin install script is not maintained and you would need to fix it if required (especially broken links)
Reloading plugins for development
Changing files in /srv/docker/redmine/redmine/plugins won't be automatically loaded. If you want to reload the plugins without restarting the docker, you can run the following.
docker exec -it redmine redmine-install-plugins
Uninstalling Plugins
To uninstall plugins you need to first tell redmine about the plugin you need to uninstall. This is done via a rake task:
docker run --name=redmine -it --rm \
  --volume=/srv/docker/redmine/redmine:/home/redmine/data \
  --volume=/srv/docker/redmine/redmine-logs:/var/log/redmine/ \
  sameersbn/redmine:6.0.6 \
  app:rake redmine:plugins:migrate NAME=plugin_name VERSION=0
Once the rake task has been executed, the plugin should be removed from the /srv/docker/redmine/redmine/plugins/ directory.
rm -rf /srv/docker/redmine/redmine/plugins/plugin_name
Any configuration that you may have added in the /srv/docker/redmine/redmine/plugins/post-install.sh script for the plugin should also be removed.
For example, to remove the recurring tasks plugin:
docker run --name=redmine -it --rm \
  --volume=/srv/docker/redmine/redmine:/home/redmine/data \
  --volume=/srv/docker/redmine/redmine-logs:/var/log/redmine/ \
  sameersbn/redmine:6.0.6 \
  app:rake redmine:plugins:migrate NAME=recurring_tasks VERSION=0
rm -rf /srv/docker/redmine/redmine/plugins/recurring_tasks
Now when the image is started the plugin will be gone.
Themes
Just like plugins, redmine allows users to install additional themes. You can find a list of available themes in the Redmine Themes Directory
Installing Themes
Themes should be installed in the themes directory at the data store. If you are following the readme verbatim, on the host this location would be /srv/docker/redmine/redmine/themes.
mkdir -p /srv/docker/redmine/redmine/themes
To install a theme, simply copy the theme assets to the themes directory. For example, to install the gitmike theme:
cd /srv/docker/redmine/redmine/themes
git clone https://github.com/makotokw/redmine-theme-gitmike.git gitmike
With the theme installed you can start the docker image normally and the newly installed theme should be available for use.
Previously this image packaged a couple of themes by default. Existing users would notice that those themes are no longer available. If you want them back, follow these instructions:
cd /srv/docker/redmine/redmine/themes
wget http://goo.gl/deKDpp -O - | sh
Please Note: this theme install script is not maintained and you would need to fix it if required (especially broken links)
Reloading themes for development
Changing files in /srv/docker/redmine/redmine/themes won't be automatically loaded. If you want to reload the themes without restarting the docker, you can run the following.
docker exec -it redmine redmine-install-themes
Uninstalling Themes
To uninstall themes you simply need to remove the theme from the /srv/docker/redmine/redmine/themes/ directory and restart the image.
rm -rf /srv/docker/redmine/redmine/themes/theme_name
For example, to remove the gitmike theme:
rm -rf /srv/docker/redmine/redmine/themes/gitmike
Now when the image is started the theme will be not be available anymore.
Maintenance
Creating backups
Only available in versions >3.2.0-2, >3.1.3-1, >3.0.7-1 and >2.6.9-1
The image allows users to create backups of the Redmine installation using the app:backup:create command or the redmine-backup-create helper script. The generated backup consists of configuration files, uploaded files and the sql database.
Before generating a backup — stop and remove the running instance.
docker stop redmine && docker rm redmine
Relaunch the container with the app:backup:create argument.
docker run --name redmine -it --rm [OPTIONS] \
  sameersbn/redmine:6.0.6 app:backup:create
The backup will be created in the backups/ folder of the Data Store. You can change the location using the REDMINE_BACKUPS_DIR configuration parameter.
NOTE
Backups can also be generated on a running instance using:
docker exec -it redmine redmine-backup-createTo avoid undesired side-effects, you are advised against creating a backup on a running instance.
Restoring Backups
Only available in versions >3.2.0-2, >3.1.3-1, >3.0.7-1 and >2.6.9-1
Backups created using instructions from the Creating backups section can be restored using the app:backup:restore argument.
Before restoring a backup — stop and remove the running instance.
docker stop redmine && docker rm redmine
Relaunch the container with the app:backup:restore argument. Ensure you launch the container in the interactive mode -it.
docker run --name redmine -it --rm [OPTIONS] \
  sameersbn/redmine:6.0.6 app:backup:restore
A list of existing backups will be displayed. Select a backup you wish to restore.
To avoid this interaction you can specify the backup filename using the BACKUP argument to app:backup:restore, eg.
docker run --name redmine -it --rm [OPTIONS] \
  sameersbn/redmine:6.0.6 app:backup:restore BACKUP=1417624827_redmine_backup.tar
Automated backups
Only available in versions >3.2.0-2, >3.1.3-1, >3.0.7-1 and >2.6.9-1
The image can be configured to automatically create backups daily, weekly or monthly using the REDMINE_BACKUP_SCHEDULE configuration option.
Daily backups are created everyday at REDMINE_BACKUP_TIME, which defaults to 04:00. Weekly backups are created every Sunday at REDMINE_BACKUP_TIME. Monthly backups are created on the 1st of every month at REDMINE_BACKUP_TIME.
By default when automated backups are enabled, backups are held for a period of 7 days before they are deleted. When disabled, the backups are held for an infinite period of time. This behavior can be modified using the REDMINE_BACKUP_EXPIRY option.
Rake Tasks
The app:rake command allows you to run redmine rake tasks. To run a rake task simply specify the task to be executed to the app:rake command. For example, if you want to send a test email to the admin user.
docker run --name=redmine -d [OPTIONS] \
  sameersbn/redmine:6.0.6 app:rake redmine:email:test[admin]
You can also use docker exec to run rake tasks on running redmine instance. For example,
docker exec redmine /sbin/entrypoint.sh app:rake redmine:email:test[admin] RAILS_ENV=production
Similarly, to remove uploaded files left unattached
docker run --name=redmine -d [OPTIONS] \
  sameersbn/redmine:6.0.6 app:rake redmine:attachments:prune
Or,
docker exec redmine /sbin/entrypoint.sh app:rake redmine:attachments:prune RAILS_ENV=production
For a complete list of available rake tasks please refer www.redmine.org/projects/redmine/wiki/RedmineRake.
Upgrading
To upgrade to newer redmine releases, simply follow this 4 step upgrade procedure.
- Step 1: Update the docker image.
docker pull sameersbn/redmine:6.0.6
- Step 2: Stop and remove the currently running image
docker stop redmine
docker rm redmine
- Step 3: Create a backup
docker run --name redmine -it --rm [OPTIONS] \
    sameersbn/redmine:x.x.x app:backup:create
Replace x.x.x with the version you are upgrading from. For example, if you are upgrading from version 2.6.4, set x.x.x to 2.6.4
- Step 4: Start the image
docker run --name=redmine -d [OPTIONS] sameersbn/redmine:6.0.6
When an upgrade is in progress the variable REDMINE_WAS_UPDATED will be defined and set to yes. This allows easy integration of individual upgrade-steps via entrypoint.custom.sh, pre-install.sh, and post-install.sh.
Shell Access
For debugging and maintenance purposes you may want access the containers shell. If you are using docker version 1.3.0 or higher you can access a running containers shell using docker exec command.
docker exec -it redmine bash
Development
Upgrading to next redmine release
- Commands to run to update image to next redmine release, examples are from 6.0.5 to 6.0.6
sed -i 's/6.0.5/6.0.6/g' VERSION README.md docker-compose* Dockerfile
vim Changelog.md # Update change log
make test-release # Runs the following
#  sudo rm -rf /srv/docker/redmine/ # Clean old run
#  sudo mkdir -p /srv/docker/redmine/redmine
#  sudo cp -rf $(CERTS_DIR) /srv/docker/redmine/redmine/ # Copy generated certificates
#  docker compose down
#  docker compose build
#  docker compose up # Test new build
./make_release.sh # Runs the following
#  git add -p
#  git commit -sS -m "release: $(cat VERSION)"
#  git tag -s $(cat VERSION) -m "$(cat VERSION)"
#  git push
#  git push origin --tags
- Open https://github.com/sameersbn/docker-redmine/releases and Draft new release
- Select tag 6.0.6 and set release title to 6.0.6
- Publish release
- Check https://quay.io/repository/sameersbn/redmine?tab=info and https://hub.docker.com/r/sameersbn/redmine/builds for build progress
References
* http://www.redmine.org/
* http://www.redmine.org/projects/redmine/wiki/Guide
* http://www.redmine.org/projects/redmine/wiki/RedmineInstall