# Instalação Beszel

Link: [https://www.beszel.dev/guide/getting-started](https://www.beszel.dev/guide/getting-started)  
Github: [https://github.com/henrygd/beszel](https://github.com/henrygd/beszel)

<main class="main" data-v-e6f2a212="" id="bkmrk-getting-started-for-">#### Getting Started

For background information, see the [What is Beszel?](https://www.beszel.dev/guide/what-is-beszel) page.

#### 1. Start the hub

The hub can be run with a single binary file or with Docker / Podman.

<div class="vp-doc _guide_getting-started" data-v-e6f2a212=""><div>- [Binary](https://www.beszel.dev/guide/hub-installation#binary)
- [Docker or Podman](https://www.beszel.dev/guide/hub-installation#docker-or-podman)

<div>  
</div><details class="details custom-block">IMPORTANT

This configuration should work out of the box, but you must follow these steps when adding the system in the web UI:

<div class="tip custom-block">1. Update the `KEY` and `TOKEN` environment variables with your public key and token, then restart the agent:

<div class="language- vp-adaptive-theme"><button class="copy" title="Copy Code"></button></div></div>```
docker compose up -d
```

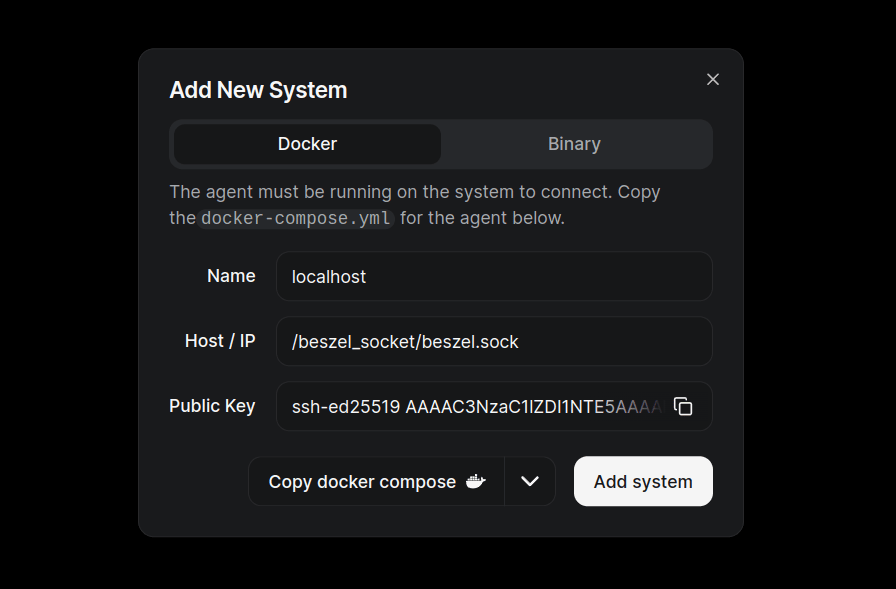
<div class="tip custom-block"><div class="language- vp-adaptive-theme"></div>2. Use the unix socket path as the **Host / IP** in the web UI:

<div class="language- vp-adaptive-theme"><button class="copy" title="Copy Code"></button></div></div>```
/beszel_socket/beszel.sock
```

<div class="vp-code-group vp-adaptive-theme"><div class="tabs"><label data-title="docker-compose.yml" for="tab-zAXlAjc">docker-compose.yml</label></div><div class="blocks"><div class="language-yaml vp-adaptive-theme active"><button class="copy" title="Copy Code"></button></div></div></div>```
services:
  beszel:
    image: henrygd/beszel:latest
    container_name: beszel
    restart: unless-stopped
    environment:
      APP_URL: http://localhost:8090
    ports:
      - 8090:8090
    volumes:
      - ./beszel_data:/beszel_data
      - ./beszel_socket:/beszel_socket

  beszel-agent:
    image: henrygd/beszel-agent:latest
    container_name: beszel-agent
    restart: unless-stopped
    network_mode: host
    volumes:
      - ./beszel_agent_data:/var/lib/beszel-agent
      - ./beszel_socket:/beszel_socket
      - /var/run/docker.sock:/var/run/docker.sock:ro
    environment:
      LISTEN: /beszel_socket/beszel.sock
      HUB_URL: http://localhost:8090
      TOKEN: <token>
      KEY: "<key>"
```

</details><details class="details custom-block">NOTE

If you prefer to set up containers in a different way, please feel free to do so.

1. Install [Docker](https://docs.docker.com/engine/install/) and [Docker Compose](https://docs.docker.com/compose/install/) if you haven't already.
2. Copy the `docker-compose.yml` content.
3. Create a directory somewhere to store the `docker-compose.yml` file.

```
mkdir beszel
cd beszel
```

4. Create a `docker-compose.yml` file, paste in the content, and save it.

<div class="vp-code-group vp-adaptive-theme"><div class="tabs"><label data-title="nano" for="tab-OjwQZM9">nano</label><label data-title="vim" for="tab-M_leCNE">vim</label><label data-title="emacs" for="tab-gQc7G3l">emacs</label><label data-title="vscode" for="tab-OxaSMK8">vscode</label></div><div class="blocks"><div class="language-bash vp-adaptive-theme active"><button class="copy" title="Copy Code"></button></div></div></div>```
nano docker-compose.yml
```

5. Change the `APP_URL` environment variable to the URL you’ll use to access the Hub (for example, a domain name or public IP including port if needed)
6. Start the service.

```
docker compose up -d
```

</details></div></div>#### 2. Create an admin user

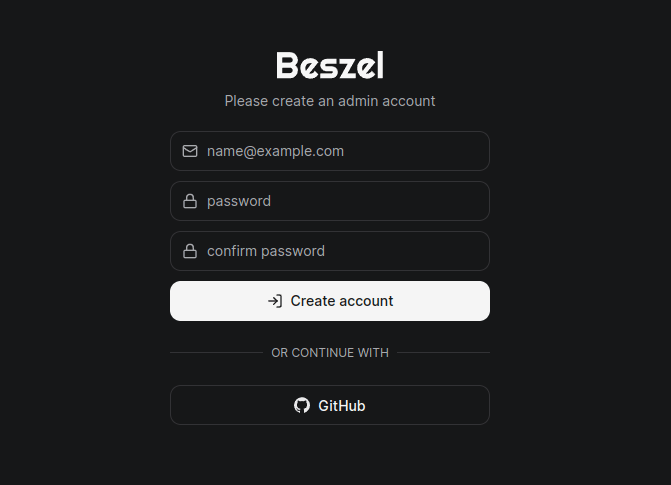
After starting the hub, navigate to [http://localhost:8090](http://localhost:8090/) or your chosen address.

You will be prompted to create an account:

<div class="vp-doc _guide_getting-started" data-v-e6f2a212=""><div>[![Screenshot of user creation form](https://www.beszel.dev/image/admin-creation.png)](https://www.beszel.dev/image/admin-creation.png)</div></div>#### 3. Configure your first system

Click the **Add System** button in the top right corner to open the system creation dialog. We're using a local unix socket in this example, but you can use a remote agent instead.

> Note: As of 0.12.0, you can also use a universal token (`/settings/tokens`) to connect the agent to the hub without needing to configure it ahead of time.

<div class="vp-doc _guide_getting-started" data-v-e6f2a212=""><div>[![Screenshot of system creation form](https://www.beszel.dev/image/add-system-socket-2.png)](https://www.beszel.dev/image/add-system-socket-2.png)</div></div>#### 4. Start the agent

<div class="vp-doc _guide_getting-started" data-v-e6f2a212=""><div><details class="details custom-block">NOTE

If you prefer to set up containers in a different way, please feel free to do so.

1. Copy the `docker-compose.yml` content from the **Add System** dialog.
2. Create a directory somewhere to store the agent's `docker-compose.yml` file.

```
mkdir beszel-agent
cd beszel-agent
```

3. Create a `docker-compose.yml` file and paste in the content provided in the **Add System** dialog.

<div class="vp-code-group vp-adaptive-theme"><div class="tabs"><label data-title="nano" for="tab-76Uwhdv">nano</label><label data-title="vim" for="tab-nvTTjXL">vim</label><label data-title="emacs" for="tab-kinKKZs">emacs</label><label data-title="vscode" for="tab-Roq4rxs">vscode</label></div><div class="blocks"><div class="language-bash vp-adaptive-theme active"><button class="copy" title="Copy Code"></button></div></div></div>```
nano docker-compose.yml
```

4. Start the agent.

```
docker compose up -d
```

</details><details class="details custom-block">The install script is for Linux only

If you use a different OS, please manually download and run the correct binary for your system. See the [Agent Installation](https://www.beszel.dev/guide/agent-installation#binary) page or the [Compiling](https://www.beszel.dev/guide/compiling) page for more information.

1. Copy the binary install command from the **Add System** dialog.
2. Open a terminal and run the command.

This will download the correct binary, create a user called `beszel`, and start the agent. It also creates a service to keep it running after reboot, and optionally enables automatic daily updates.

</details></div></div>#### 5. Finish adding the system

Now that the agent is running, click the **Add System** button in the dialog.

You will see the new system in table. If it flips to green, you're good to go.

<div class="vp-doc _guide_getting-started" data-v-e6f2a212=""><div>[![Screenshot of system creation form](https://www.beszel.dev/image/new-system.png)](https://www.beszel.dev/image/new-system.png)</div></div>If it changes to red, check the [Common Issues](https://www.beszel.dev/guide/common-issues) page.

</main><footer class="VPDocFooter" data-v-1bcd8184="" data-v-e6f2a212="" id="bkmrk-edit-this-page-on-gi"><div class="edit-info" data-v-1bcd8184=""><div class="edit-link" data-v-1bcd8184="">[Edit this page on GitHub](https://github.com/henrygd/beszel-docs/edit/main/en/guide/getting-started.md)</div><div class="last-updated" data-v-1bcd8184="">  
</div></div>Last updated: <time data-v-1bb0c8a8="" datetime="2026-03-31T23:10:11.000Z">31/03/2026, 20:10</time>

<nav aria-labelledby="doc-footer-aria-label" class="prev-next" data-v-1bcd8184=""><span class="visually-hidden" data-v-1bcd8184="" id="bkmrk-pager">Pager</span><div class="pager" data-v-1bcd8184="">[<span class="desc" data-v-1bcd8184="">Previous page</span><span class="title" data-v-1bcd8184="">What is Beszel?</span>](https://www.beszel.dev/guide/what-is-beszel)</div><div class="pager" data-v-1bcd8184="">[<span class="desc" data-v-1bcd8184="">Next page</span><span class="title" data-v-1bcd8184="">Hub Installation</span>](https://www.beszel.dev/guide/hub-installation)</div></nav></footer>