Beszel
Aplicativo de monitoração servidores e docker
Instalações e configurações Beszel
Instalação Beszel
Link: https://www.beszel.dev/guide/getting-started
Github: https://github.com/henrygd/beszel
Getting Started
For background information, see the What is Beszel? page.
1. Start the hub
The hub can be run with a single binary file or with Docker / Podman.
IMPORTANT
This configuration should work out of the box, but you must follow these steps when adding the system in the web UI:
- Update the
KEYandTOKENenvironment variables with your public key and token, then restart the agent:
docker compose up -d- Use the unix socket path as the Host / IP in the web UI:
/beszel_socket/beszel.sockservices:
beszel:
image: henrygd/beszel:latest
container_name: beszel
restart: unless-stopped
environment:
APP_URL: http://localhost:8090
ports:
- 8090:8090
volumes:
- ./beszel_data:/beszel_data
- ./beszel_socket:/beszel_socket
beszel-agent:
image: henrygd/beszel-agent:latest
container_name: beszel-agent
restart: unless-stopped
network_mode: host
volumes:
- ./beszel_agent_data:/var/lib/beszel-agent
- ./beszel_socket:/beszel_socket
- /var/run/docker.sock:/var/run/docker.sock:ro
environment:
LISTEN: /beszel_socket/beszel.sock
HUB_URL: http://localhost:8090
TOKEN: <token>
KEY: "<key>"NOTE
If you prefer to set up containers in a different way, please feel free to do so.
-
Install Docker and Docker Compose if you haven't already.
-
Copy the
docker-compose.ymlcontent. -
Create a directory somewhere to store the
docker-compose.ymlfile.
mkdir beszel
cd beszel- Create a
docker-compose.ymlfile, paste in the content, and save it.
nano docker-compose.yml-
Change the
APP_URLenvironment variable to the URL you’ll use to access the Hub (for example, a domain name or public IP including port if needed) -
Start the service.
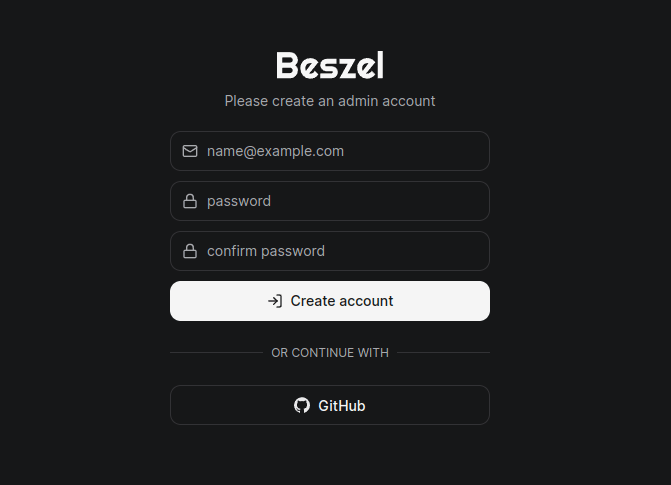
docker compose up -d2. Create an admin user
After starting the hub, navigate to http://localhost:8090 or your chosen address.
You will be prompted to create an account:
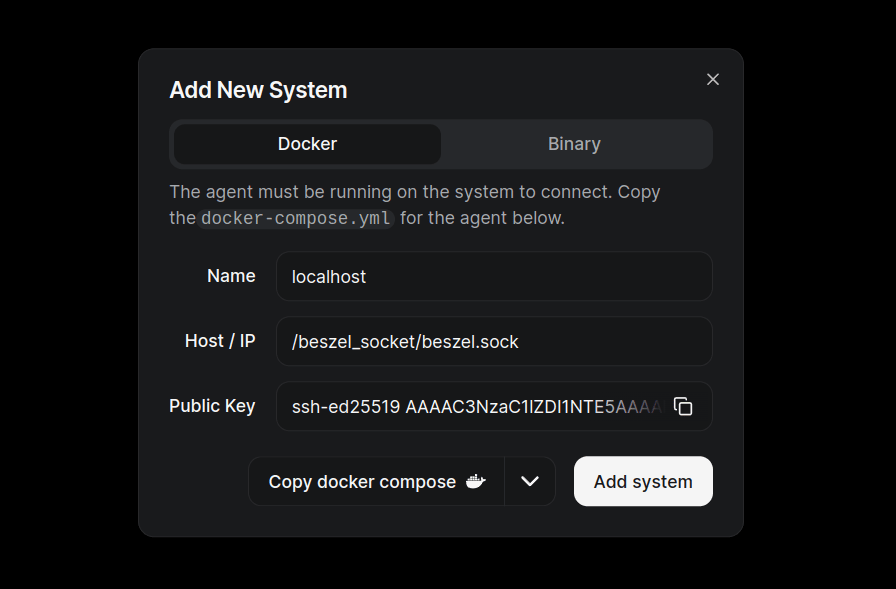
3. Configure your first system
Click the Add System button in the top right corner to open the system creation dialog. We're using a local unix socket in this example, but you can use a remote agent instead.
Note: As of 0.12.0, you can also use a universal token (
/settings/tokens) to connect the agent to the hub without needing to configure it ahead of time.
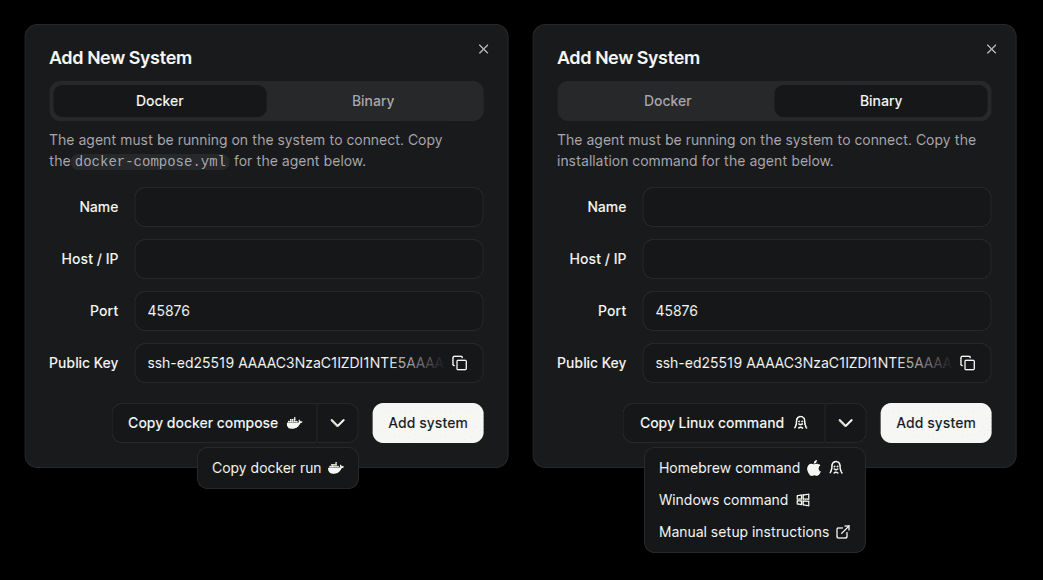
4. Start the agent
NOTE
If you prefer to set up containers in a different way, please feel free to do so.
-
Copy the
docker-compose.ymlcontent from the Add System dialog. -
Create a directory somewhere to store the agent's
docker-compose.ymlfile.
mkdir beszel-agent
cd beszel-agent- Create a
docker-compose.ymlfile and paste in the content provided in the Add System dialog.
nano docker-compose.yml- Start the agent.
docker compose up -dThe install script is for Linux only
If you use a different OS, please manually download and run the correct binary for your system. See the Agent Installation page or the Compiling page for more information.
-
Copy the binary install command from the Add System dialog.
-
Open a terminal and run the command.
This will download the correct binary, create a user called beszel, and start the agent. It also creates a service to keep it running after reboot, and optionally enables automatic daily updates.
5. Finish adding the system
Now that the agent is running, click the Add System button in the dialog.
You will see the new system in table. If it flips to green, you're good to go.

If it changes to red, check the Common Issues page.
Instalação Hub Beszel
Link: https://www.beszel.dev/guide/hub-installation
Hub Installation
Beszel supports installation via Docker/ Podman or single binary file.
TIP
Check the Getting Started guide if you're setting up Beszel for the first time.
Docker or Podman
All methods will start the Beszel service on port 8090 and mount the ./beszel_data directory for persistent storage.
services:
  beszel:
    image: henrygd/beszel
    container_name: beszel
    restart: unless-stopped
    environment:
      - APP_URL=http://localhost:8090
    ports:
      - 8090:8090
    volumes:
      - ./beszel_data:/beszel_data
IMPORTANT
This configuration should work out of the box, but you must follow these steps when adding the system in the web UI:
- Update the
KEYandTOKENenvironment variables with your public key and token, then restart the agent:
docker compose up -d- Use the unix socket path as the Host / IP in the web UI:
/beszel_socket/beszel.sockservices:
beszel:
image: henrygd/beszel:latest
container_name: beszel
restart: unless-stopped
environment:
APP_URL: http://localhost:8090
ports:
- 8090:8090
volumes:
- ./beszel_data:/beszel_data
- ./beszel_socket:/beszel_socket
beszel-agent:
image: henrygd/beszel-agent:latest
container_name: beszel-agent
restart: unless-stopped
network_mode: host
volumes:
- ./beszel_agent_data:/var/lib/beszel-agent
- ./beszel_socket:/beszel_socket
- /var/run/docker.sock:/var/run/docker.sock:ro
environment:
LISTEN: /beszel_socket/beszel.sock
HUB_URL: http://localhost:8090
TOKEN: <token>
KEY: "<key>"NOTE
If you prefer to set up containers in a different way, please feel free to do so.
-
Install Docker and Docker Compose if you haven't already.
-
Copy the
docker-compose.ymlcontent. -
Create a directory somewhere to store the
docker-compose.ymlfile.
mkdir beszel
cd beszel- Create a
docker-compose.ymlfile, paste in the content, and save it.
nano docker-compose.yml-
Change the
APP_URLenvironment variable to the URL you’ll use to access the Hub (for example, a domain name or public IP including port if needed) -
Start the service.
docker compose up -dBinary
Beszel is written in pure Go and can be easily compiled (or cross-compiled) if a prebuilt binary isn't available.
1. Linux / FreeBSD install script
This command downloads and runs our install-hub.sh script. The script installs the latest binary and creates a systemd service to keep it running after reboot.
-u: Uninstall-p <port>: Specify a port number (default: 8090)-c <url>: Use a custom GitHub mirror URL (e.g. https://ghfast.top/)--auto-update: Enable automatic daily updates-h: Show help
curl -sL https://get.beszel.dev/hub -o /tmp/install-hub.sh && chmod +x /tmp/install-hub.sh && /tmp/install-hub.sh2. Manual download and start (Linux, FreeBSD, others)
Download
Download the latest binary from releases that matches your server's CPU architecture and run it manually. You will need to create a service manually to keep it running after reboot.
curl -sL "https://github.com/henrygd/beszel/releases/latest/download/beszel_$(uname -s)_$(uname -m | sed -e 's/x86_64/amd64/' -e 's/armv6l/arm/' -e 's/armv7l/arm/' -e 's/aarch64/arm64/').tar.gz" | tar -xz -O beszel | tee ./beszel >/dev/null && chmod +x beszelStart the hub
./beszel serve --http "0.0.0.0:8090"Update the hub
./beszel updateCreate a service (optional)
If your system uses systemd, you can create a service to keep the hub running after reboot.
- Create a service file in
/etc/systemd/system/beszel.service, replacing{/path/to/working/directory}with the path to the working directory. A non-root user can be used if the user has write access to the working directory.
[Unit]
Description=Beszel Hub
After=network.target

[Service]
Type=simple
Restart=always
RestartSec=3
User=root
WorkingDirectory={/path/to/working/directory}
ExecStart={/path/to/working/directory}/beszel serve --http "0.0.0.0:8090"

[Install]
WantedBy=multi-user.target- Enable and start the service.
sudo systemctl daemon-reload
sudo systemctl enable beszel.service
sudo systemctl start beszel.service
3. Manual compile and start (any platform)
Compile
See Compiling for information on how to compile the hub yourself.
Start the hub
./beszel serve --http "0.0.0.0:8090"Update the hub
./beszel updateCreate a service (optional)
If your system uses systemd, you can create a service to keep the hub running after reboot.
- Create a service file in
/etc/systemd/system/beszel.service. A non-root user can be used if the user has write access to the working directory.
[Unit]
Description=Beszel Hub
After=network.target

[Service]
Type=simple
Restart=always
RestartSec=5
User=root
WorkingDirectory={/path/to/working/directory}
ExecStart={/path/to/working/directory}/beszel serve --http "0.0.0.0:8090"

[Install]
WantedBy=multi-user.target- Enable and start the service.
sudo systemctl daemon-reload
sudo systemctl enable beszel.service
sudo systemctl start beszel.service
Instalação Agente Beszel
Link: https://www.beszel.dev/guide/agent-installation
Agent Installation
The agent can be installed via Docker / Podman, single binary file, Homebrew package, WinGet / Scoop package, or Home Assistant add-on.
TIP
Check the Getting Started guide if you're setting up Beszel for the first time.
Required variables
KEY: The public key shown when adding a system in the Hub.TOKEN: Used to authenticate the agent (see/settings/tokens).HUB_URL: Used for outgoing WebSocket connection (not required for SSH connection).
More information is available on the Security and Environment Variables pages.
Using the Hub
The docker-compose.yml or binary install command is provided for copy/paste in the hub's web UI.
Click the Add System button to manually configure the agent, or use a universal token (/settings/tokens) to connect the agent without needing to set it up ahead of time.
Docker or Podman
TIP
Preconfigured docker-compose.yml content can be copied the hub's web UI when adding a new system, so in most cases you do not need to set this up manually.
services:
  beszel-agent:
    image: henrygd/beszel-agent
    container_name: beszel-agent
    restart: unless-stopped
    network_mode: host
    volumes:
      - ./beszel_agent_data:/var/lib/beszel-agent
      - /var/run/docker.sock:/var/run/docker.sock:ro
      # monitor other disks / partitions by mounting a folder in /extra-filesystems
      # - /mnt/disk1/.beszel:/extra-filesystems/disk1:ro
    environment:
      LISTEN: 45876
      KEY: "<public key>"
      HUB_URL: "<hub url>"
      TOKEN: "<token>"
Why host network mode?
The agent must use host network mode to access the host's network interface stats. This automatically exposes the port, so change the port using an environment variable if needed.
If you don't need host network stats, you can remove that line from the compose file and map the port manually.
Connecting to a local agent
When connecting to a local agent, localhost will not work because the containers are in different networks. The recommended way to connect them is to use a unix socket.
IMPORTANT
This configuration should work out of the box, but you must follow these steps when adding the system in the web UI:
- Update the
KEYandTOKENenvironment variables with your public key and token, then restart the agent:
docker compose up -d- Use the unix socket path as the Host / IP in the web UI:
/beszel_socket/beszel.sockservices:
beszel:
image: henrygd/beszel:latest
container_name: beszel
restart: unless-stopped
environment:
APP_URL: http://localhost:8090
ports:
- 8090:8090
volumes:
- ./beszel_data:/beszel_data
- ./beszel_socket:/beszel_socket
beszel-agent:
image: henrygd/beszel-agent:latest
container_name: beszel-agent
restart: unless-stopped
network_mode: host
volumes:
- ./beszel_agent_data:/var/lib/beszel-agent
- ./beszel_socket:/beszel_socket
- /var/run/docker.sock:/var/run/docker.sock:ro
environment:
LISTEN: /beszel_socket/beszel.sock
HUB_URL: http://localhost:8090
TOKEN: <token>
KEY: "<key>"NOTE
If you prefer to set up containers in a different way, please feel free to do so.
-
Install Docker and Docker Compose if you haven't already.
-
Copy the
docker-compose.ymlcontent. -
Create a directory somewhere to store the
docker-compose.ymlfile.
mkdir beszel
cd beszel- Create a
docker-compose.ymlfile, paste in the content, and save it.
nano docker-compose.yml-
Change the
APP_URLenvironment variable to the URL you’ll use to access the Hub (for example, a domain name or public IP including port if needed) -
Start the service.
docker compose up -dBinary
Beszel is written in pure Go and can be easily compiled (or cross-compiled) if a prebuilt binary isn't available.
1. Install script (Linux, FreeBSD)
Root privileges required
The script needs root privileges to create a beszel user and set up a service to keep the agent running after reboot. The agent process itself does not run as root.
The script installs the latest binary and optionally enables automatic daily updates.
-k: Public key (enclose in quotes; interactive if not provided)-p: Port or address (default: 45876)-t: Token (optional for backwards compatibility)-url: Hub URL (optional for backwards compatibility)-v: Version (default: latest)-u: Uninstall--auto-update: Enable or disable automatic daily updates (interactive if not provided)--china-mirrors: Use GitHub mirror to resolve network issues in mainland China-h: Show help
curl -sL https://get.beszel.dev -o /tmp/install-agent.sh && chmod +x /tmp/install-agent.sh && /tmp/install-agent.sh2. Manual download and start (Linux, FreeBSD, others)
Download the binary
Download the latest binary from releases that matches your server's OS / architecture.
curl -sL "https://github.com/henrygd/beszel/releases/latest/download/beszel-agent_$(uname -s)_$(uname -m | sed -e 's/x86_64/amd64/' -e 's/armv6l/arm/' -e 's/armv7l/arm/' -e 's/aarch64/arm64/').tar.gz" | tar -xz beszel-agentStart the agent
Use -h to see all available options.
./beszel-agent -key "<public key>" -token "<token>" -url "<hub url>"Update the agent
./beszel-agent updateCreate a service (optional)
If your system uses systemd, you can create a service to keep the agent running after reboot.
- Create a service file in
/etc/systemd/system/beszel-agent.service. Replace the placeholder values (e.g.,<path-to-binary>,<public key>) with your actual configuration. You can also useKEY_FILEandTOKEN_FILEto load secrets from protected files (see issue #1627).
[Unit]
Description=Beszel Agent Service
After=network-online.target
Wants=network-online.target

[Service]
ExecStart=<path-to-binary>/beszel-agent
Environment="LISTEN=45876"
Environment="KEY=<public key>"
Environment="TOKEN=<token>"
Environment="HUB_URL=<hub url>"
# Environment="EXTRA_FILESYSTEMS=sdb"
Restart=on-failure
RestartSec=5
StateDirectory=beszel-agent

# Security/sandboxing settings
KeyringMode=private
LockPersonality=yes
NoNewPrivileges=yes
ProtectClock=yes
ProtectHome=read-only
ProtectHostname=yes
ProtectKernelLogs=yes
ProtectSystem=strict
RemoveIPC=yes
RestrictSUIDSGID=true

[Install]
WantedBy=multi-user.target- Enable and start the service.
sudo systemctl daemon-reload
sudo systemctl enable beszel-agent.service
sudo systemctl start beszel-agent.service
3. Manual compile and start (any platform)
Compile
See Compiling for information on how to compile the agent yourself.
Start the agent
Use -h to see all available options.
./beszel-agent -key "<public key>" -token "<token>" -url "<hub url>"Update the agent
./beszel-agent updateCreate a service (optional)
If your system uses systemd, you can create a service to keep the agent running after reboot.
- Create a service file in
/etc/systemd/system/beszel-agent.service. Replace the placeholder values (e.g.,<path-to-binary>,<public key>) with your actual configuration. You can also useKEY_FILEandTOKEN_FILEto load secrets from protected files (see issue #1627).
[Unit]
Description=Beszel Agent Service
After=network-online.target
Wants=network-online.target

[Service]
ExecStart=<path-to-binary>/beszel-agent
Environment="LISTEN=45876"
Environment="KEY=<public key>"
Environment="TOKEN=<token>"
Environment="HUB_URL=<hub url>"
# Environment="EXTRA_FILESYSTEMS=sdb"
Restart=on-failure
RestartSec=5
StateDirectory=beszel-agent

# Security/sandboxing settings
KeyringMode=private
LockPersonality=yes
NoNewPrivileges=yes
ProtectClock=yes
ProtectHome=read-only
ProtectHostname=yes
ProtectKernelLogs=yes
ProtectSystem=strict
RemoveIPC=yes
RestrictSUIDSGID=true

[Install]
WantedBy=multi-user.target- Enable and start the service.
sudo systemctl daemon-reload
sudo systemctl enable beszel-agent.service
sudo systemctl start beszel-agent.service
Homebrew (macOS, Linux)
Environment variables can be changed in ~/.config/beszel/beszel-agent.env.
Logs are written to ~/.cache/beszel/beszel-agent.log.
Homebrew install script
-k: SSH key (interactive if not provided)-p: Port (default: 45876)-t: Token (optional for backwards compatibility)-url: Hub URL (optional for backwards compatibility)-h: Show help
curl -sL https://get.beszel.dev/brew -o /tmp/install-agent.sh && chmod +x /tmp/install-agent.sh && /tmp/install-agent.shHomebrew manual install
mkdir -p ~/.config/beszel ~/.cache/beszel
echo 'KEY="ssh-ed25519 AAAA..."' > ~/.config/beszel/beszel-agent.env
brew tap henrygd/beszel
brew install beszel-agent
brew services start beszel-agent
WinGet / Scoop (Windows)
The agent is available as a package in WinGet and Scoop.
The script below uses Scoop if you have it installed, otherwise it uses WinGet if that's installed. If neither are available, it will install both Scoop and the agent.
It also installs NSSM and creates a service to keep the agent running after reboot.
-Key: SSH key (interactive if not provided)-Port: Port (default: 45876)-Url: Hub URL-Token: Token-InstallMethod: "Auto", "WinGet", or "Scoop"-ConfigureFirewall: Add an incoming firewall rule.
& iwr -useb https://get.beszel.dev -OutFile "$env:TEMP\install-agent.ps1"; & Powershell -ExecutionPolicy Bypass -File "$env:TEMP\install-agent.ps1"The script's source code is available on GitHub.
There are also community-developed GUI applications to install and manage the agent:
- vmhomelab/beszel-agent-installer which uses Chocolatey.
- MiranoVerhoef/BeszelAgentManager which uses WinGet.
Edit configuration
Edit the service in NSSM by running the command below. Scroll to the right in the GUI to find environment variables.
nssm edit beszel-agentYou can also change options directly from the command line:
nssm set beszel-agent AppEnvironmentExtra "+EXTRA_FILESYSTEMS=D:,E:"Restart the service when finished: nssm restart beszel-agent
Logs
Logs are saved in C:\ProgramData\beszel-agent\logs.
Upgrade
Scoop
nssm stop beszel-agent; & scoop update beszel-agent; & nssm start beszel-agentWinGet
Uninstall
Scoop
nssm stop beszel-agent
nssm remove beszel-agent confirm
scoop uninstall beszel-agent
WinGet
nssm stop beszel-agent
nssm remove beszel-agent confirm
winget uninstall henrygd.beszel-agent
Home Assistant
See the Home Assistant Agent page for instructions on setting up the agent as a Home Assistant add-on.