# Authentik

Solução completa de autenticação e autorização de acessos.

# Instalação e Configurações do Authentik

# Instalação Authentik em docker compose

Link: [https://docs.goauthentik.io/install-config/install/docker-compose/](https://docs.goauthentik.io/install-config/install/docker-compose/)

em 10/04/2026

<article id="bkmrk-docker-compose-insta"><div class="theme-doc-markdown markdown"><header>#### Docker Compose installation

</header></div>This installation method is for test setups and small-scale production setups.

#### Requirements

<div class="theme-doc-markdown markdown">- A host with at least 2 CPU cores and 2 GB of RAM
- Podman or Docker Compose (Compose v2, see [instructions for upgrade](https://docs.docker.com/compose/migrate/))

</div>##### Video

View our video about installing authentik on Docker.

<div class="theme-doc-markdown markdown"><iframe allow="accelerometer; autoplay; clipboard-write; encrypted-media; gyroscope; picture-in-picture; web-share" allowfullscreen="allowfullscreen" frameborder="0" height="315" src="https://www.youtube.com/embed/O1qUbrk4Yc8?si=HiSBjmJYhE_oJhB1&start=22" title="YouTube video player" width="560"></iframe>

</div>##### Download the Compose file

To download the latest `compose.yml` open your terminal, navigate to the directory of your choice, and then run the following command:

<div class="theme-doc-markdown markdown"><div class="theme-tabs-container tabs-container tabList_J5MA">- Linux
- macOS

<div class="margin-top--md"><div class="tabItem_wHwb" role="tabpanel"></div></div></div></div>```shell
wget https://docs.goauthentik.io/compose.yml
```

<div class="theme-doc-markdown markdown"><div class="theme-tabs-container tabs-container tabList_J5MA"><div class="margin-top--md"><div class="tabItem_wHwb" role="tabpanel"><div class="language-shell codeBlockContainer_mQmQ theme-code-block"><div class="codeBlockContent_t_Hd"></div></div></div></div></div></div>#### Generate PostgreSQL password and secret key

If this is a fresh authentik installation, you need to generate a PostgreSQL password and a secret key. Use a secure password generator of your choice such as `pwgen`, or you can use `openssl` as below.

Run the following commands to generate a PostgreSQL password and secret key and write them to your `.env` file:

```shell
echo "PG_PASS=$(openssl rand -base64 36 | tr -d '\n')" >> .env
echo "AUTHENTIK_SECRET_KEY=$(openssl rand -base64 60 | tr -d '\n')" >> .env
```

<div class="theme-doc-markdown markdown"><div class="language-shell codeBlockContainer_mQmQ theme-code-block"><div class="codeBlockContent_t_Hd"><div class="buttonGroup_B0hJ"><button aria-label="Copy code to clipboard" class="clean-btn" title="Copy" type="button"><span aria-hidden="true" class="copyButtonIcons_Fy7c"><svg class="copyButtonIcon_r1h_" viewbox="0 0 24 24"><path d="M19,21H8V7H19M19,5H8A2,2 0 0,0 6,7V21A2,2 0 0,0 8,23H19A2,2 0 0,0 21,21V7A2,2 0 0,0 19,5M16,1H4A2,2 0 0,0 2,3V17H4V3H16V1Z" fill="currentColor"></path></svg><svg class="copyButtonSuccessIcon_BIMv" viewbox="0 0 24 24"><path d="M21,7L9,19L3.5,13.5L4.91,12.09L9,16.17L19.59,5.59L21,7Z" fill="currentColor"></path></svg></span></button></div></div></div><div class="theme-admonition theme-admonition-info admonition_WCGJ alert alert--info"><div class="admonitionHeading_GCBg">INFO</div><div class="admonitionContent_pbrs">  
</div></div></div>Because of a PostgreSQL limitation, only passwords up to 99 chars are supported. See: [https://www.postgresql.org/message-id/09512C4F-8CB9-4021-B455-EF4C4F0D55A0@amazon.com](https://www.postgresql.org/message-id/09512C4F-8CB9-4021-B455-EF4C4F0D55A0@amazon.com)

To enable error reporting, run the following command:

```shell
echo "AUTHENTIK_ERROR_REPORTING__ENABLED=true" >> .env
```

<div class="theme-doc-markdown markdown"><div class="language-shell codeBlockContainer_mQmQ theme-code-block"><div class="codeBlockContent_t_Hd"><div class="buttonGroup_B0hJ"><button aria-label="Copy code to clipboard" class="clean-btn" title="Copy" type="button"><span aria-hidden="true" class="copyButtonIcons_Fy7c"><svg class="copyButtonIcon_r1h_" viewbox="0 0 24 24"><path d="M19,21H8V7H19M19,5H8A2,2 0 0,0 6,7V21A2,2 0 0,0 8,23H19A2,2 0 0,0 21,21V7A2,2 0 0,0 19,5M16,1H4A2,2 0 0,0 2,3V17H4V3H16V1Z" fill="currentColor"></path></svg><svg class="copyButtonSuccessIcon_BIMv" viewbox="0 0 24 24"><path d="M21,7L9,19L3.5,13.5L4.91,12.09L9,16.17L19.59,5.59L21,7Z" fill="currentColor"></path></svg></span></button></div></div></div></div>For an explanation about what each service in the Docker Compose file does, see [Architecture](https://docs.goauthentik.io/core/architecture/).

#### Configure custom ports

By default, authentik listens internally on port 9000 for HTTP and 9443 for HTTPS. To use different exposed ports such as 80 and 443, you can set the following variables in `.env`:

```shell
COMPOSE_PORT_HTTP=80
COMPOSE_PORT_HTTPS=443
```

<div class="theme-doc-markdown markdown"><div class="language-shell codeBlockContainer_mQmQ theme-code-block"><div class="codeBlockContent_t_Hd"><div class="buttonGroup_B0hJ"><button aria-label="Copy code to clipboard" class="clean-btn" title="Copy" type="button"><span aria-hidden="true" class="copyButtonIcons_Fy7c"><svg class="copyButtonIcon_r1h_" viewbox="0 0 24 24"><path d="M19,21H8V7H19M19,5H8A2,2 0 0,0 6,7V21A2,2 0 0,0 8,23H19A2,2 0 0,0 21,21V7A2,2 0 0,0 19,5M16,1H4A2,2 0 0,0 2,3V17H4V3H16V1Z" fill="currentColor"></path></svg><svg class="copyButtonSuccessIcon_BIMv" viewbox="0 0 24 24"><path d="M21,7L9,19L3.5,13.5L4.91,12.09L9,16.17L19.59,5.59L21,7Z" fill="currentColor"></path></svg></span></button></div></div></div></div>See [Configuration](https://docs.goauthentik.io/install-config/configuration/) to change the internal ports. Be sure to run `docker compose up -d` to rebuild with the new port numbers.

#### Docker socket

By default, the authentik Docker Compose file mounts the Docker socket to the authentik worker container:

```yaml
- /var/run/docker.sock:/var/run/docker.sock
```

<div class="theme-doc-markdown markdown"><div class="language-yaml codeBlockContainer_mQmQ theme-code-block"><div class="codeBlockContent_t_Hd"></div></div></div>This is used for [automatic deployment and management of authentik Outposts](https://docs.goauthentik.io/add-secure-apps/outposts/integrations/docker/).

Mounting the Docker socket to a container comes with some inherent security risks. To reduce these risks, you can utilize a [Docker Socket Proxy](https://docs.goauthentik.io/add-secure-apps/outposts/integrations/docker/#docker-socket-proxy) as an additional layer of protection.

Alternatively, you can remove this mount and instead [manually deploy and manage outposts](https://docs.goauthentik.io/add-secure-apps/outposts/manual-deploy-docker-compose/).

##### Email configuration (optional but recommended)

It is also recommended to configure global email settings. These are used by authentik to notify administrators about alerts, configuration issues and new releases. They can also be used by [Email stages](https://docs.goauthentik.io/add-secure-apps/flows-stages/stages/email/) to send verification/recovery emails.

For more information, refer to our [Email configuration](https://docs.goauthentik.io/install-config/email/) documentation.

#### Install and start authentik

<div class="theme-doc-markdown markdown"><div class="theme-admonition theme-admonition-warning admonition_WCGJ alert alert--warning"><div class="admonitionHeading_GCBg">WARNING  
  
</div></div></div>All internal operations use UTC. Times displayed in the UI are automatically localized for the user. Do not update or mount `/etc/timezone` or `/etc/localtime` in the authentik containers; it will cause problems with OAuth and SAML authentication, as seen this [GitHub issue](https://github.com/goauthentik/authentik/issues/3005).

After you have downloaded the `docker-compose.yml` file, generated a password and a secret key, and optionally configured your global email, run these commands to retrieve and install the current version of authentik:

```shell
docker compose pull
docker compose up -d
```

<div class="theme-doc-markdown markdown"><div class="language-shell codeBlockContainer_mQmQ theme-code-block"><div class="codeBlockContent_t_Hd"><div class="buttonGroup_B0hJ"><button aria-label="Copy code to clipboard" class="clean-btn" title="Copy" type="button"><span aria-hidden="true" class="copyButtonIcons_Fy7c"><svg class="copyButtonIcon_r1h_" viewbox="0 0 24 24"><path d="M19,21H8V7H19M19,5H8A2,2 0 0,0 6,7V21A2,2 0 0,0 8,23H19A2,2 0 0,0 21,21V7A2,2 0 0,0 19,5M16,1H4A2,2 0 0,0 2,3V17H4V3H16V1Z" fill="currentColor"></path></svg><svg class="copyButtonSuccessIcon_BIMv" viewbox="0 0 24 24"><path d="M21,7L9,19L3.5,13.5L4.91,12.09L9,16.17L19.59,5.59L21,7Z" fill="currentColor"></path></svg></span></button></div></div></div></div>The `compose.yml` file statically references the latest version available at the time of downloading the compose file. Each time you upgrade to a newer version of authentik, you download a new `compose.yml` file, which points to the latest available version. For more information, refer to the **Upgrading** section in the [Release Notes](https://docs.goauthentik.io/releases/).

#### Access authentik

<span style="color: rgb(241, 196, 15);">**To start the initial setup, navigate to `http://<your server's IP or hostname>:9000/if/flow/initial-setup/`.**</span>

<div class="theme-doc-markdown markdown"><div class="theme-admonition theme-admonition-info admonition_WCGJ alert alert--info"><div class="admonitionContent_pbrs">**Initial setup in browser**</div></div></div>You will get a `Not Found` error if initial setup URL doesn't include the trailing forward slash `/`. Also verify that the authentik server, worker, and PostgreSQL database are running and healthy. Review additional tips in our [troubleshooting docs](https://docs.goauthentik.io/troubleshooting/login/#cant-access-initial-setup-flow-during-installation-steps).

There you are prompted to set a password for the `akadmin` user (the default user).

#### First steps in authentik

You are now ready to add your first application and its provider. Then you'll want to add a new user.

To view a typical workflow for adding applications and users, with helpful context and explanations for each step, refer to the [First Steps](https://docs.goauthentik.io/install-config/first-steps/) tutorial.

#### 📄️ First steps

Add an application and provider, then create a user.

<footer class="theme-doc-footer docusaurus-mt-lg">---

<div class="theme-admonition theme-admonition-note admonition_WCGJ alert alert--secondary admonitionContrib_Zv8a margin-top--sm theme-doc-footer-edit-meta-row"><div class="admonitionContent_pbrs"><div class="admonitionHeader_FPxu">**Help us improve this content**</div></div></div>We welcome your knowledge and expertise. If you see areas of the documentation that you can improve (fix a typo, correct a technical detail, add additional context, etc.) we would really appreciate your contribution.

<div class="theme-admonition theme-admonition-note admonition_WCGJ alert alert--secondary admonitionContrib_Zv8a margin-top--sm theme-doc-footer-edit-meta-row"><div class="admonitionContent_pbrs"><div class="row"><div class="col col--12">  
</div></div></div></div></footer></article><nav aria-label="Docs pages" class="docusaurus-mt-lg pagination-nav" id="bkmrk-installation-and-con">[<div class="pagination-nav__label">Installation and Configuration</div>](https://docs.goauthentik.io/install-config/)[<div class="pagination-nav__label" style="text-align: justify;">Kubernetes installation</div>](https://docs.goauthentik.io/install-config/install/kubernetes/)</nav>

# Integração do Nextcloud com Authentik OIDC

Link: [https://integrations.goauthentik.io/chat-communication-collaboration/nextcloud/](https://integrations.goauthentik.io/chat-communication-collaboration/nextcloud/)

Em 09/04/2026

### What is Nextcloud

> Nextcloud is a suite of client-server software for creating and using file hosting services. Nextcloud is free and open-source, which means that anyone is allowed to install and operate it on their own private server devices.
> 
> \-- [https://nextcloud.com/](https://nextcloud.com/)arning

  
<span style="color: rgb(241, 196, 15);">**WARNING**</span>  
If you require [server side encryption](https://docs.nextcloud.com/server/latest/admin_manual/configuration_files/encryption_configuration.html), you must use LDAP. OpenID and SAML will cause **irrevocable data loss**. Nextcloud server side encryption requires access to the user's cleartext password, which Nextcloud has access to only when using LDAP because the user enters their password directly into Nextcloud.aution

This setup only works when Nextcloud is running with HTTPS enabled. See [here](https://docs.nextcloud.com/server/stable/admin_manual/configuration_server/reverse_proxy_configuration.html?highlight=overwriteprotocol#overwrite-parameters) on how to configure this.nfo

<span style="color: rgb(230, 126, 35);">**If there’s an issue with the configuration, you can log in using the built-in authentication by  
visiting [http://nextcloud.company/login?direct=1](http://nextcloud.company/login?direct=1).**</span>

#### Configuration methods

It is possible to configure Nextcloud to use OIDC, SAML, or LDAP for authentication. Below are the steps to configure each method.

<div class="theme-doc-markdown markdown" id="bkmrk-oidc-saml-ldap" style="text-align: justify;"><div class="theme-tabs-container tabs-container tabList_J5MA">- OIDC
- SAML
- LDAP

</div></div>#### **OIDC**  
  
Preparation

The following placeholders are used in this guide:

<div class="theme-doc-markdown markdown" id="bkmrk-nextcloud.company%C2%A0is" style="text-align: justify;"><div class="theme-tabs-container tabs-container tabList_J5MA"><div class="margin-top--md"><div class="tabItem_wHwb" role="tabpanel">- `nextcloud.company` is the FQDN of the Nextcloud installation.
- `authentik.company` is the FQDN of the authentik installation.

</div></div></div></div>##### Info

This documentation lists only the settings that you need to change from their default values. Be aware that any changes other than those explicitly mentioned in this guide could cause issues accessing your application.  
  
<span style="color: rgb(241, 196, 15);">**WARNING**</span>

If you require [server side encryption](https://docs.nextcloud.com/server/latest/admin_manual/configuration_files/encryption_configuration.html), you must use LDAP. OpenID and SAML will cause **irrevocable data loss**.

Let's start by considering which user attributes need to be available in Nextcloud:

<div class="theme-doc-markdown markdown" id="bkmrk-name-email-unique-us" style="text-align: justify;"><div class="theme-tabs-container tabs-container tabList_J5MA"><div class="margin-top--md"><div class="tabItem_wHwb" role="tabpanel">- name
- email
- unique user ID
- storage quota (optional)
- groups (optional)

</div></div></div></div>authentik already provides some default *scopes* with *claims*, such as:

<div class="theme-doc-markdown markdown" id="bkmrk-email%C2%A0scope%3A-include" style="text-align: justify;"><div class="theme-tabs-container tabs-container tabList_J5MA"><div class="margin-top--md"><div class="tabItem_wHwb" role="tabpanel">- `email` scope: includes `email` and `email_verified`
- `profile` scope: includes `name`, `given_name`, `preferred_username`, `nickname`, `groups`
- `openid` scope: a default required by the OpenID spec (contains no claims)

</div></div></div></div>#### Create property mapping *(optional)*

If you do not need storage quota, group information, or to manage already existing users in Nextcloud, skip to the [next section](https://integrations.goauthentik.io/chat-communication-collaboration/nextcloud/#create-an-application-and-provider-in-authentik).  
If you want to control user storage and designate Nextcloud administrators, you will need to create a property mapping.

<div class="theme-doc-markdown markdown" id="bkmrk-log-in-to-authentik-" style="text-align: justify;"><div class="theme-tabs-container tabs-container tabList_J5MA"><div class="margin-top--md"><div class="tabItem_wHwb" role="tabpanel">1. Log in to authentik as an administrator and open the authentik Admin interface.
2. Navigate to **Customization** &gt; **Property mappings** and click **Create**.
    
    
    - **Select type**: select **Scope mapping**.
    - **Create Scope Mapping**: 
        - **Name**: `Nextcloud Profile`
        - **Scope name**: `nextcloud`
        - **Expression**:  
              
            <span style="color: rgb(53, 152, 219);">\# Extract all groups the user is a member of</span>  
            <span style="color: rgb(53, 152, 219);">groups = \[group.name for group in user.groups.all()\]</span>
            
            <span style="color: rgb(53, 152, 219);">\# In Nextcloud, administrators must be members of a fixed group called "admin".</span>
            
            <span style="color: rgb(53, 152, 219);">\# If a user is an admin in authentik, ensure that "admin" is appended to their group list.</span>  
            <span style="color: rgb(53, 152, 219);">if user.is\_superuser and "admin" not in groups:</span>  
            <span style="color: rgb(53, 152, 219);"> groups.append("admin")</span>
            
            <span style="color: rgb(53, 152, 219);">return {</span>  
            <span style="color: rgb(53, 152, 219);"> "name": request.user.name,</span>  
            <span style="color: rgb(53, 152, 219);"> "groups": groups,</span>  
            <span style="color: rgb(53, 152, 219);"> # Set a quota by using the "nextcloud\_quota" property in the user's attributes</span>  
            <span style="color: rgb(53, 152, 219);"> "quota": user.group\_attributes().get("nextcloud\_quota", None),</span>  
            <span style="color: rgb(53, 152, 219);"> # To connect an existing Nextcloud user, set "nextcloud\_user\_id" to the Nextcloud username.</span>  
            <span style="color: rgb(53, 152, 219);"> "user\_id": user.attributes.get("nextcloud\_user\_id", str(user.uuid)),</span>  
            <span style="color: rgb(53, 152, 219);">}</span>
3. Click **Finish**.

</div></div></div></div>##### Info

To set a quota, define the `nextcloud_quota` attribute for individual users or groups. For example, setting it to `1 GB` will restrict the user to 1GB of storage. If not set, storage is unlimited.

<div class="theme-doc-markdown markdown" id="bkmrk-" style="text-align: justify;"><div class="theme-tabs-container tabs-container tabList_J5MA"><div class="margin-top--md"><div class="tabItem_wHwb" role="tabpanel"><div class="theme-admonition theme-admonition-info admonition_WCGJ alert alert--info">  
</div></div></div></div></div><div class="theme-doc-markdown markdown" id="bkmrk--1" style="text-align: justify;"><div class="theme-tabs-container tabs-container tabList_J5MA"><div class="margin-top--md"><div class="tabItem_wHwb" role="tabpanel"><div class="theme-admonition theme-admonition-info admonition_WCGJ alert alert--info">  
</div></div></div></div></div>To connect to an existing Nextcloud user, set the `nextcloud_user_id` attribute to match the Nextcloud username (found under the user's `Display name` in Nextcloud).

#### Create an application and provider in authentik

<div class="theme-doc-markdown markdown" id="bkmrk-log-in-to-authentik--1" style="text-align: justify;"><div class="theme-tabs-container tabs-container tabList_J5MA"><div class="margin-top--md"><div class="tabItem_wHwb" role="tabpanel">1. Log in to authentik as an administrator and open the authentik Admin interface.
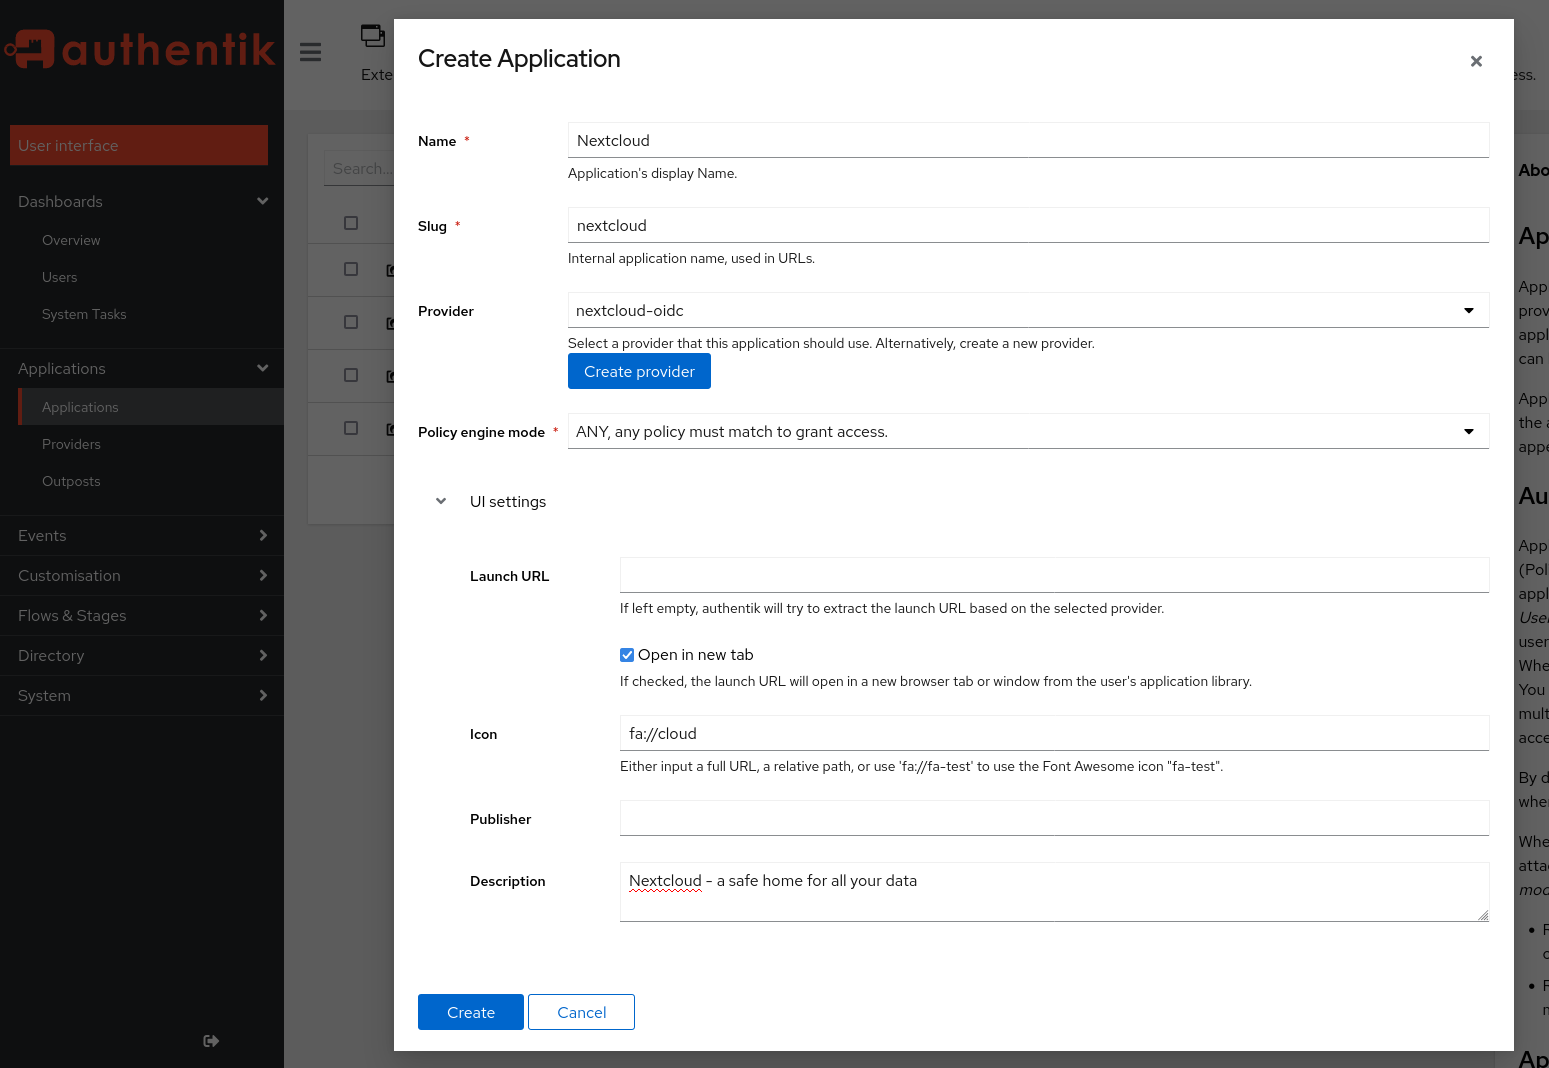
2. Navigate to **Applications** &gt; **Applications** and click **Create with Provider** to create an application and provider pair. (Alternatively you can first create a provider separately, then create the application and connect it with the provider.)
    
    
    - **Application**: provide a descriptive name, an optional group for the type of application, the policy engine mode, and optional UI settings.
    - **Choose a Provider type**: select **OAuth2/OpenID Connect** as the provider type.
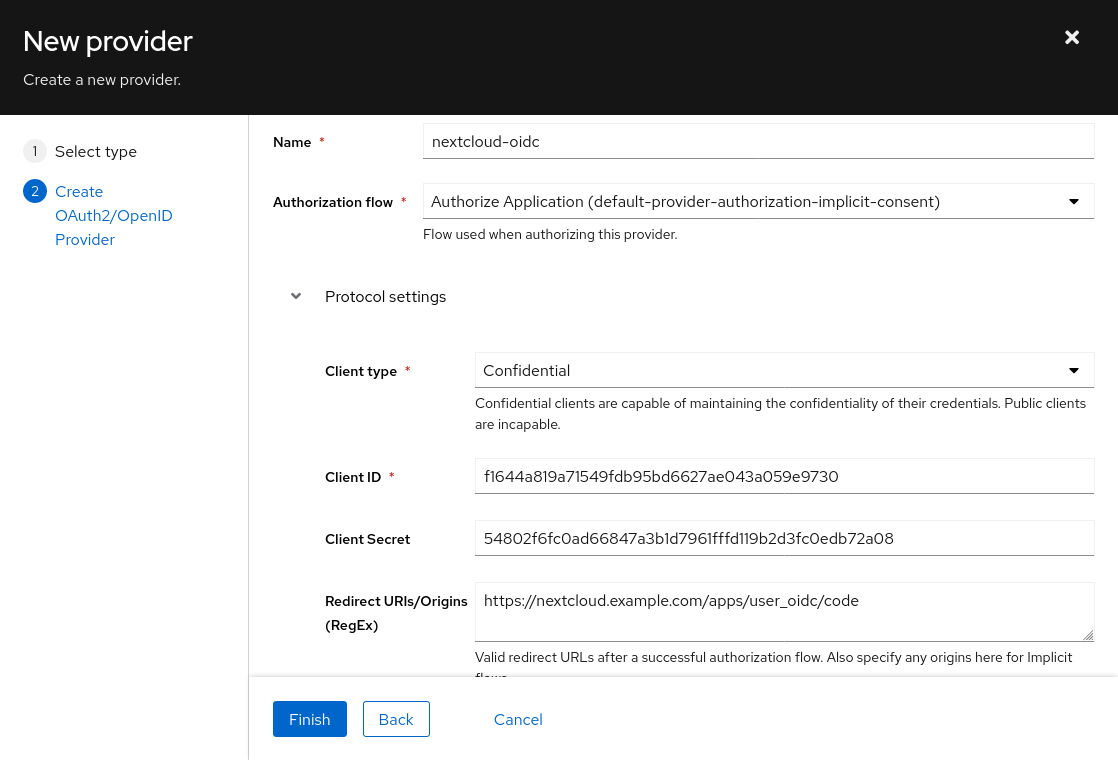
    - **Configure the Provider**: provide a name (or accept the auto-provided name), the authorization flow to use for this provider, and the following required configurations. 
        - Note the **Client ID** and **slug** values because they will be required later.
        - Set a `Strict` redirect URI to `https://nextcloud.company/apps/user_oidc/code`.
        - Select any available signing key.
        - Under **Advanced protocol settings**: 
            - *(optional)* If you created the `Nextcloud Profile` scope mapping, add it to **Selected Scopes**.
            - **Subject Mode**: `Based on the User's UUID`
    - **Configure Bindings** *(optional)*: you can create a [binding](https://docs.goauthentik.io/add-secure-apps/bindings-overview/) (policy, group, or user) to manage the listing and access to applications on a user's **My applications** page.
3. Click **Submit** to save the new application and provider.

<div class="theme-admonition theme-admonition-info admonition_WCGJ alert alert--info">  
</div></div></div></div></div>##### Info

Depending on your Nextcloud configuration, you may need to use `https://nextcloud.company/index.php/` instead of `https://nextcloud.company/`.


#### **Nextcloud configuration**

<div class="theme-doc-markdown markdown" id="bkmrk-in-nextcloud%2C-ensure" style="text-align: justify;"><div class="theme-tabs-container tabs-container tabList_J5MA"><div class="margin-top--md"><div class="tabItem_wHwb" role="tabpanel">1. In Nextcloud, ensure that the **OpenID Connect user backend** app is installed.
2. Log in to Nextcloud as an administrator and navigate to **Settings** &gt; **OpenID Connect**.
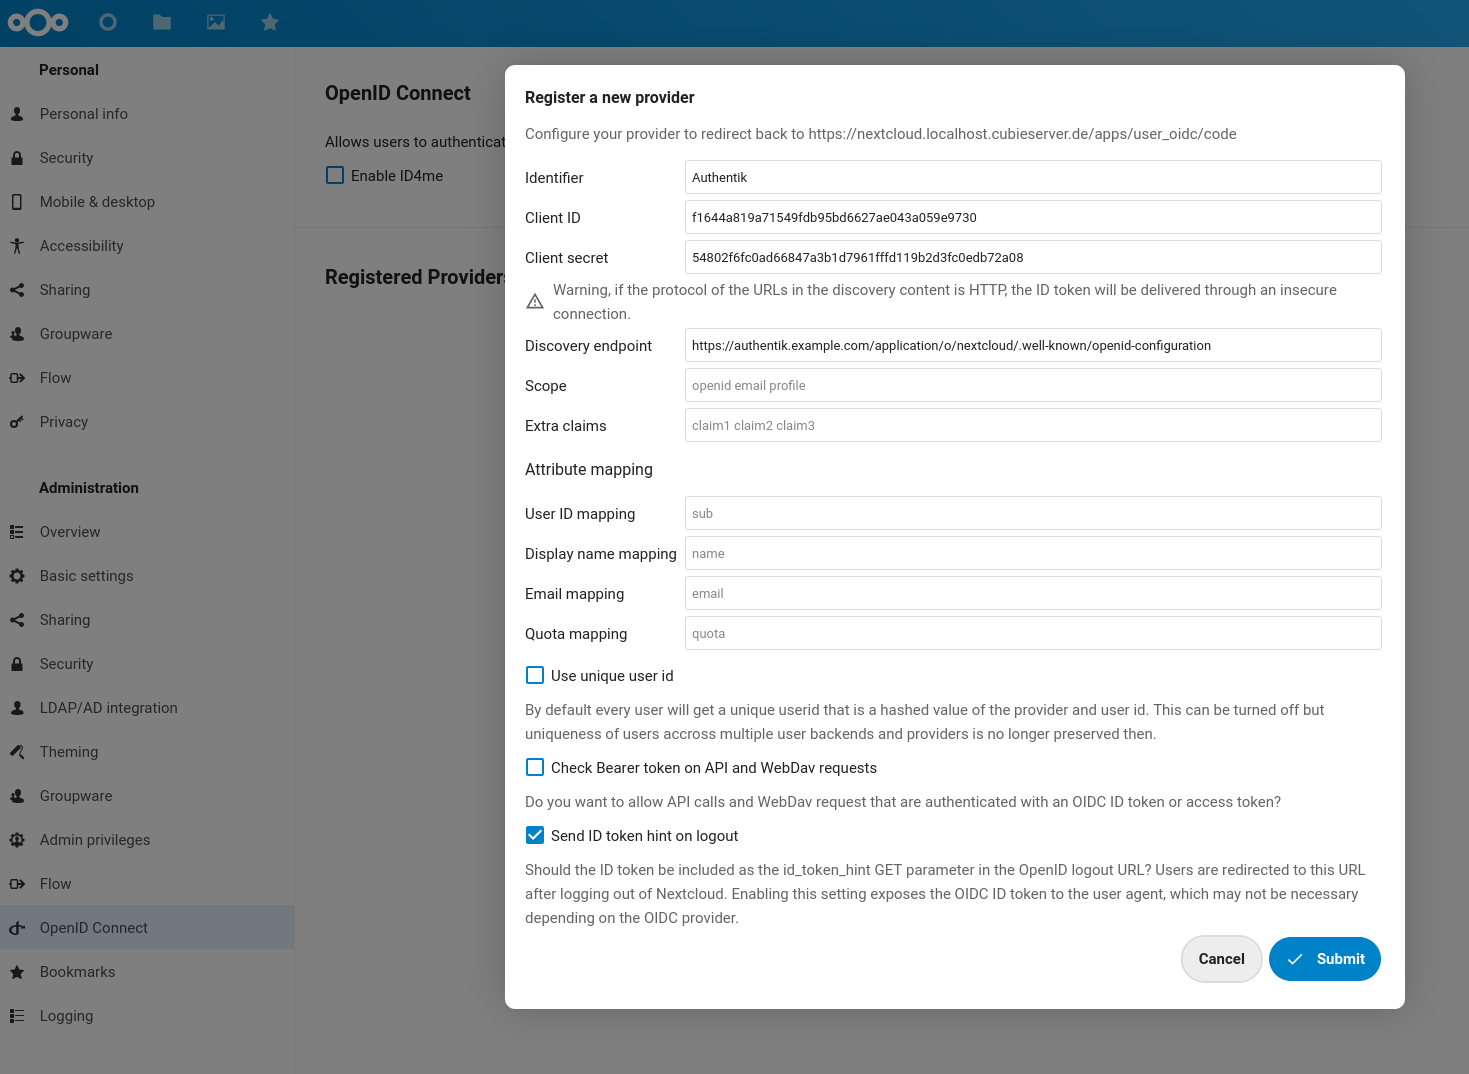
3. Click the **+** button and enter the following settings:
    
    
    - **Identifier**: `authentik`
    - **Client ID**: Client ID from authentik
    - **Client secret**: Client secret from authentik
    - **Discovery endpoint**: `https://authentik.company/application/o/<application_slug>/.well-known/openid-configuration`
    - **Scope**: `email profile nextcloud openid`
    - Under **Attribute mappings**:
        
        
        - **User ID mapping**: `sub` (or `user_id` for existing users)
        - **Display name mapping**: `name`
        - **Email mapping**: `email`
        - **Quota mapping**: `quota` (leave blank if the `Nextcloud Profile` property mapping was skipped)
        - **Groups mapping**: `groups` (leave blank if the `Nextcloud Profile` property mapping was skipped)  
            Tip: Enable **Use group provisioning** to allow writing to this field.
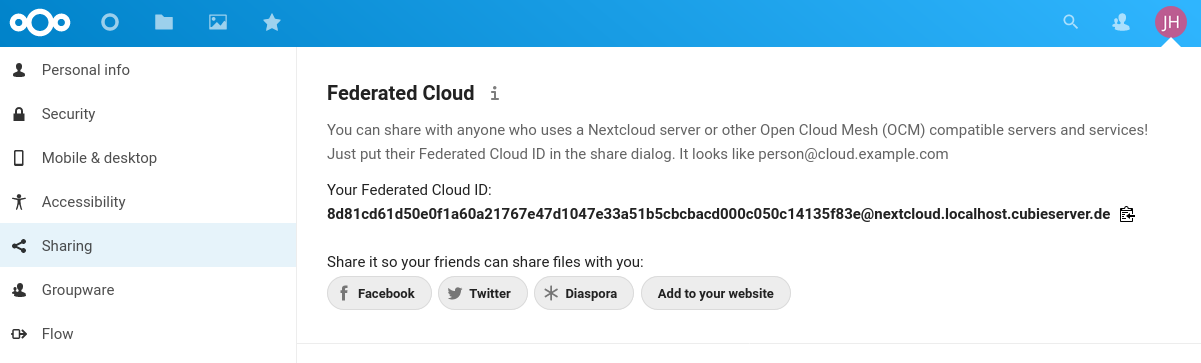
    - **Use unique user ID**: If this option is disabled, Nextcloud will use the mapped user ID as the Federated Cloud ID.
    
    ##### Info
    
    If authentik and Nextcloud are running on the same host, you will need to add `'allow_local_remote_servers' => true` to your nextcloud `config.php` file. This setting allows remote servers with local addresses.
    
    ##### Info
    
    To avoid a hashed Federated Cloud ID, deselect **Use unique user ID** and use `user_id` for the User ID mapping.
    
    ##### Danger
    
    If you're using the `Nextcloud Profile` property mapping and want administrators to retain their ability to log in, make sure that **Use unique user ID** is disabled. If this setting is enabled, it will remove administrator users from the internal admin group and replace them with a hashed group ID named "admin," which does not have real administrative privileges.

</div></div></div></div>#### Enabling OIDC back-channel logout

To automatically log users out of their Nextcloud sessions when they log out of authentik, enable back-channel logout.

<div class="theme-doc-markdown markdown" id="bkmrk-log-in-to-nextcloud-" style="text-align: justify;"><div class="theme-tabs-container tabs-container tabList_J5MA"><div class="margin-top--md"><div class="tabItem_wHwb" role="tabpanel">1. Log in to Nextcloud as an administrator and navigate to **Settings** &gt; **OpenID Connect**.
2. Under **Registered Providers**, locate the provider with the identifier used earlier.
3. Copy the `back-channel-logout-URL` value for that provider.   
    For example: `https://nextcloud.company/apps/user_oidc/backchannel-logout/<identifier>`
4. In authentik, navigate to **Applications** &gt; **Providers** and edit the Nextcloud provider.
5. Under **Protocol Settings**, set the **Logout URI** to the copied back-channel logout URL.
6. Set the **Logout Method** to `Back-channel`.

</div></div></div></div>#### Making OIDC the default login method

Automatically redirect users to authentik when they access Nextcloud by running the following command on your Nextcloud docker host:

<div class="theme-doc-markdown markdown" id="bkmrk-sudo-docker-exec---u" style="text-align: justify;"><div class="theme-tabs-container tabs-container tabList_J5MA"><div class="margin-top--md"><div class="tabItem_wHwb" role="tabpanel"><div class="language-bash codeBlockContainer_mQmQ theme-code-block"><div class="codeBlockContent_t_Hd"><div class="token-line"><span style="color: rgb(251, 238, 184);"><span class="token function"><span class="token plain">Opção 1 - (Tela de Login Authentik direto)</span>  
sudo</span> <span class="token function">docker</span> <span class="token builtin class-name">exec</span> <span class="token parameter variable">--user</span><span class="token plain"> www-data </span><span class="token parameter variable">-it</span><span class="token plain"> nextcloud-aio-nextcloud php occ config:app:set </span><span style="color: rgb(185, 106, 217);"><span class="token parameter variable">-**-value**</span>**<span class="token operator">=</span><span class="token number">0</span>**</span><span class="token plain"> user\_oidc allow\_multiple\_user\_backends. </span></span></div><div class="token-line"><span style="color: rgb(251, 238, 184);"><span class="token plain">  
<span class="token function">Opção 2 - (Tela de Login Authentik e Nextcloud)  
sudo</span> <span class="token function">docker</span> <span class="token builtin class-name">exec</span> <span class="token parameter variable">--user</span> www-data <span class="token parameter variable">-it</span> nextcloud-aio-nextcloud php occ config:app:set <span style="color: rgb(185, 106, 217);"><span class="token parameter variable">-**-value**</span>**<span class="token operator">=1</span>**</span> user\_oidc allow\_multiple\_user\_backends. </span></span></div><div class="buttonGroup_B0hJ"><button aria-label="Toggle word wrap" class="clean-btn" title="Toggle word wrap" type="button"><svg aria-hidden="true" class="wordWrapButtonIcon_CQkQ" viewbox="0 0 24 24"><path d="M4 19h6v-2H4v2zM20 5H4v2h16V5zm-3 6H4v2h13.25c1.1 0 2 .9 2 2s-.9 2-2 2H15v-2l-3 3l3 3v-2h2c2.21 0 4-1.79 4-4s-1.79-4-4-4z" fill="currentColor"></path></svg></button><button aria-label="Copy code to clipboard" class="clean-btn" title="Copy" type="button"><span aria-hidden="true" class="copyButtonIcons_Fy7c"><svg class="copyButtonIcon_r1h_" viewbox="0 0 24 24"><path d="M19,21H8V7H19M19,5H8A2,2 0 0,0 6,7V21A2,2 0 0,0 8,23H19A2,2 0 0,0 21,21V7A2,2 0 0,0 19,5M16,1H4A2,2 0 0,0 2,3V17H4V3H16V1Z" fill="currentColor"></path></svg><svg class="copyButtonSuccessIcon_BIMv" viewbox="0 0 24 24"><path d="M21,7L9,19L3.5,13.5L4.91,12.09L9,16.17L19.59,5.59L21,7Z" fill="currentColor"></path></svg></span></button></div></div></div></div></div></div></div>#### Configuration verification

To confirm that authentik is correctly configured with Nextcloud, log out and then log back in by clicking **OpenID Connect**. You'll then be redirected to authentik to log in, and once authentication is successful, you'll reach the Nextcloud dashboard.

#### Resources

<div class="theme-doc-markdown markdown" id="bkmrk-nextcloud-docs---use" style="text-align: justify;">- [Nextcloud docs - User authentication with LDAP](https://docs.nextcloud.com/server/latest/admin_manual/configuration_user/user_auth_ldap.html)
- [Nextcloud OIDC App - User Documentation](https://github.com/H2CK/oidc/wiki/User-Documentation)

</div><footer class="theme-doc-footer docusaurus-mt-lg" id="bkmrk-help-us-improve-this">---

<div class="theme-admonition theme-admonition-note admonition_WCGJ alert alert--secondary admonitionContrib_Zv8a margin-top--sm theme-doc-footer-edit-meta-row" style="text-align: justify;"><div class="admonitionContent_pbrs"><div class="admonitionHeader_FPxu">**Help us improve this content**</div></div></div>We welcome your knowledge and expertise. If you see areas of the documentation that you can improve (fix a typo, correct a technical detail, add additional context, etc.) we would really appreciate your contribution.

<div class="theme-admonition theme-admonition-note admonition_WCGJ alert alert--secondary admonitionContrib_Zv8a margin-top--sm theme-doc-footer-edit-meta-row"><div class="admonitionContent_pbrs"><div class="row"><div class="col col--12">- [Edit on GitHub](https://github.com/goauthentik/authentik/edit/main/website/integrations/chat-communication-collaboration/nextcloud/index.mdx)
- [Contributor Guide](https://docs.goauthentik.io/docs/developer-docs/)
- [Open an issue](https://github.com/goauthentik/authentik/issues/new)
- [Get Enterprise Support](https://goauthentik.io/pricing/)

</div></div></div></div></footer>

# Integração do Nextcloud com Authentik LDAP

Link: [https://integrations.goauthentik.io/chat-communication-collaboration/nextcloud/](https://integrations.goauthentik.io/chat-communication-collaboration/nextcloud/)

Em 09/04/2026

## What is Nextcloud

> Nextcloud is a suite of client-server software for creating and using file hosting services. Nextcloud is free and open-source, which means that anyone is allowed to install and operate it on their own private server devices.
> 
> \-- [https://nextcloud.com/](https://nextcloud.com/)

<div class="theme-doc-markdown markdown" id="bkmrk-warning" style="text-align: justify;"><div class="theme-admonition theme-admonition-warning admonition_WCGJ alert alert--warning"><div class="admonitionHeading_GCBg"><span style="color: rgb(241, 196, 15);">**WARNING**</span></div></div></div>If you require [server side encryption](https://docs.nextcloud.com/server/latest/admin_manual/configuration_files/encryption_configuration.html), you must use LDAP. OpenID and SAML will cause **irrevocable data loss**. Nextcloud server side encryption requires access to the user's cleartext password, which Nextcloud has access to only when using LDAP because the user enters their password directly into Nextcloud.

<div class="theme-doc-markdown markdown" id="bkmrk-caution" style="text-align: justify;"><div class="theme-admonition theme-admonition-warning admonition_WCGJ alert alert--warning"></div><div class="theme-admonition theme-admonition-caution admonition_WCGJ alert alert--warning"><div class="admonitionHeading_GCBg">**<span style="color: rgb(241, 196, 15);">CAUTION</span>**</div></div></div>This setup only works when Nextcloud is running with HTTPS enabled. See [here](https://docs.nextcloud.com/server/stable/admin_manual/configuration_server/reverse_proxy_configuration.html?highlight=overwriteprotocol#overwrite-parameters) on how to configure this.

<div class="theme-doc-markdown markdown" id="bkmrk-info" style="text-align: justify;"><div class="theme-admonition theme-admonition-caution admonition_WCGJ alert alert--warning"></div><div class="theme-admonition theme-admonition-info admonition_WCGJ alert alert--info"><div class="admonitionHeading_GCBg"><span style="color: rgb(241, 196, 15);">**INFO**</span></div></div></div>If there’s an issue with the configuration, you can log in using the built-in authentication by visiting [http://nextcloud.company/login?direct=1](http://nextcloud.company/login?direct=1).

#### Configuration methods

It is possible to configure Nextcloud to use OIDC, SAML, or LDAP for authentication. Below are the steps to configure each method.

<div class="theme-doc-markdown markdown" id="bkmrk-oidc-saml-ldap" style="text-align: justify;"><div class="theme-tabs-container tabs-container tabList_J5MA">- OIDC
- SAML
- LDAP

<div class="margin-top--md"></div></div></div>####  

#### <span style="color: rgb(241, 196, 15);">**LDAP Configuration**</span>

#### Preparation

The following placeholders are used in this guide:

<div class="theme-doc-markdown markdown" id="bkmrk-nextcloud.company%C2%A0is" style="text-align: justify;"><div class="theme-tabs-container tabs-container tabList_J5MA"><div class="margin-top--md"><div class="tabItem_wHwb" role="tabpanel">- `nextcloud.company` is the FQDN of the Nextcloud installation.
- `authentik.company` is the FQDN of the authentik installation.

<div class="theme-admonition theme-admonition-info admonition_WCGJ alert alert--info"><div class="admonitionHeading_GCBg">**<span style="color: rgb(241, 196, 15);">INFO</span>**</div></div></div></div></div></div>This documentation lists only the settings that you need to change from their default values. Be aware that any changes other than those explicitly mentioned in this guide could cause issues accessing your application.

#### Create an application and provider in authentik

<div class="theme-doc-markdown markdown" id="bkmrk-log-in-to-authentik-" style="text-align: justify;"><div class="theme-tabs-container tabs-container tabList_J5MA"><div class="margin-top--md"><div class="tabItem_wHwb" role="tabpanel">1. Log in to authentik as an administrator and open the authentik Admin interface.
2. Navigate to **Applications** &gt; **Applications** and click **Create with Provider** to create an application and provider pair. (Alternatively you can first create a provider separately, then create the application and connect it with the provider.)
    
    
    - **Application**: provide a descriptive name, an optional group for the type of application, the policy engine mode, and optional UI settings.
    - **Choose a Provider type**: select **LDAP** as the provider type.
    - **Configure the Provider**: provide a name (or accept the auto-provided name) and the bind flow to use for this provider
    - **Configure Bindings** *(optional)*: you can create a [binding](https://docs.goauthentik.io/add-secure-apps/bindings-overview/) (policy, group, or user) to manage the listing and access to applications on a user's **My applications** page.
3. Click **Submit** to save the new application and provider.

</div></div></div></div>#### Create an LDAP outpost

<div class="theme-doc-markdown markdown" id="bkmrk-log-in-to-authentik--1" style="text-align: justify;"><div class="theme-tabs-container tabs-container tabList_J5MA"><div class="margin-top--md"><div class="tabItem_wHwb" role="tabpanel">1. Log in to authentik as an admin, and open the authentik Admin interface.
2. Navigate to **Applications** &gt; **Outposts** and click **Create**.
    
    
    - **Name**: provide a suitable name for the outpost.
    - **Type**: `LDAP`
    - Under applications, add the newly created Nextcloud application to **Selected Applications**.
3. Click **Create**.

</div></div></div></div>### <span style="color: rgb(241, 196, 15);"> **Nextcloud configuration**</span>

<div class="theme-doc-markdown markdown" id="bkmrk-in-nextcloud%2C-ensure" style="text-align: justify;"><div class="theme-tabs-container tabs-container tabList_J5MA"><div class="margin-top--md"><div class="tabItem_wHwb" role="tabpanel">1. In Nextcloud, ensure that the **LDAP user and group backend** app is installed.
2. Log in to Nextcloud as an administrator.
3. Navigate to **Settings** &gt; **LDAP user and group backend** and configure the following settings:
    
    
    - On the **Server** tab:
        
        
        - Click the **+** icon and enter the following settings: 
            - **Host**: enter the hostname/IP address of the authentik LDAP outpost preceded by `ldap://` or `ldaps://`. If using LDAPS you will also need to specify the certificate that is being used.
            - **Port**: `389` or `636` for secure LDAP.
            - Under **Credentials**, enter the **Bind DN** of the authentik LDAP provider and the associated user password.
            - Under **Base DN**, enter the **Search base** of the authentik LDAP provider.
    - On the **Users** tab:
        
        
        - Set **Only these object classes** to `Users`.
    - On the **LDAP/AD integration** tab:
        
        
        - Uncheck **LDAP/AD Username**.
        - Set **Other Attributes** to `cn`.
        - Click **Expert** in the top right corner and enter these settings: 
            - **Internal Username Attribute**: `uid`
            - **UUID Attribute for Users**: `uid`
            - **UUID Attribute for Groups**: `gidNumber`
        - Click **Advanced** in the top right corner and enter these settings: 
            - Under **Connection Settings**: 
                - **Configuration Active**: checked
            - Under **Directory Settings**: 
                - **User Display Name Field**: `name`
                - **Base User Tree**: enter the **Search base** of the authentik LDAP provider.
                - **Group Display Name Field**: `cn`
                - **Base Group Tree**: enter the **Search base** of the authentik LDAP provider.
                - **Group-Member Association**: `gidNumber`
            - Under **Special Attributes**: 
                - **Email Field**: `mailPrimaryAddress`
    - On the **Groups** tab:
        
        
        - Set **Only these object classes** to `groups`.
        - Select the authentik groups that require Nextcloud access.
    
    <div class="theme-admonition theme-admonition-info admonition_WCGJ alert alert--info"><div class="admonitionHeading_GCBg"></div><div class="admonitionHeading_GCBg">**<span style="color: rgb(241, 196, 15);">INFO</span>**</div></div>If Nextcloud is behind a reverse proxy, force HTTPS by adding `'overwriteprotocol' => 'https'` to the Nextcloud `config/config.php` file. See [the Nextcloud admin manual](https://docs.nextcloud.com/server/latest/admin_manual/configuration_server/reverse_proxy_configuration.html#overwrite-parameters) for more details.

</div></div></div></div>#### Configuration verification

To confirm that authentik is properly configured with Nextcloud, log out and log back in using LDAP credentials. If successful you will then be redirected to the Nextcloud dashboard.

##### Resources

<div class="theme-doc-markdown markdown" id="bkmrk-nextcloud-docs---use" style="text-align: justify;">- [Nextcloud docs - User authentication with LDAP](https://docs.nextcloud.com/server/latest/admin_manual/configuration_user/user_auth_ldap.html)
- [Nextcloud OIDC App - User Documentation](https://github.com/H2CK/oidc/wiki/User-Documentation)

</div><footer class="theme-doc-footer docusaurus-mt-lg" id="bkmrk-help-us-improve-this">---

<div class="theme-admonition theme-admonition-note admonition_WCGJ alert alert--secondary admonitionContrib_Zv8a margin-top--sm theme-doc-footer-edit-meta-row" style="text-align: justify;"><div class="admonitionContent_pbrs"><div class="admonitionHeader_FPxu">**Help us improve this content**</div></div></div>We welcome your knowledge and expertise. If you see areas of the documentation that you can improve (fix a typo, correct a technical detail, add additional context, etc.) we would really appreciate your contribution.

<div class="theme-admonition theme-admonition-note admonition_WCGJ alert alert--secondary admonitionContrib_Zv8a margin-top--sm theme-doc-footer-edit-meta-row"><div class="admonitionContent_pbrs"><div class="row"><div class="col col--12">- [Edit on GitHub](https://github.com/goauthentik/authentik/edit/main/website/integrations/chat-communication-collaboration/nextcloud/index.mdx)
- [Contributor Guide](https://docs.goauthentik.io/docs/developer-docs/)
- [Open an issue](https://github.com/goauthentik/authentik/issues/new)
- [Get Enterprise Support](https://goauthentik.io/pricing/)

</div></div></div></div></footer>

# Configurações iniciais do Authentik

Link: [https://docs.goauthentik.io/install-config/first-steps/](https://docs.goauthentik.io/install-config/first-steps/)

<div class="theme-doc-markdown markdown" id="bkmrk-first-steps"><header>#### First steps

</header></div>After you have installed and started authentik, you are now ready to add your first application and provider, add some users, and get started with using authentik as your Identity provider.

[![image.png](https://capacita.multiautomacoes.com.br/uploads/images/gallery/2026-04/scaled-1680-/MWIimage.png)](https://capacita.multiautomacoes.com.br/uploads/images/gallery/2026-04/MWIimage.png)

<svg height="80" viewbox="0 0 24 24" width="80" xmlns="http://www.w3.org/2000/svg"><path d="M12 3a9 9 0 0 0 0 18c2 0 3.92-.66 5.5-1.86l-1.44-1.44A6.995 6.995 0 0 1 5 12c0-3.87 3.13-7 7-7s7 3.13 7 7h-3l4 4l4-4h-3a9 9 0 0 0-9-9M7.71 13.16c-.09.07-.12.19-.07.29l.9 1.55c.06.12.18.12.28.12l1.13-.45q.36.24.75.42l.18 1.19c.02.11.12.19.22.19h1.8c.1.03.21-.06.23-.17l.18-1.18c.27-.12.53-.27.76-.45l1.12.45c.11.04.23-.01.28-.12l.9-1.5c.05-.12.02-.24-.06-.31l-1-.74q.045-.45 0-.9l1-.76c.09-.07.11-.18.06-.29l-.9-1.55a.226.226 0 0 0-.28-.1l-1.12.45c-.24-.17-.5-.3-.77-.42l-.17-1.19a.244.244 0 0 0-.23-.19h-1.76c-.1 0-.19.07-.21.17l-.17 1.18c-.26.12-.53.27-.76.45l-1.15-.42a.234.234 0 0 0-.29.12l-.91 1.5c-.05.12-.02.24.06.31l1 .74q-.03.225 0 .45q-.015.225 0 .45l-1 .74m4.29.31c-.84 0-1.5-.68-1.5-1.5c0-.83.67-1.5 1.5-1.5s1.5.67 1.5 1.5s-.67 1.5-1.5 1.5" fill="currentColor"></path></svg>

#### Where are we now, and what's next?

The following tutorial assumes that you have already:

<div class="theme-doc-markdown markdown" id="bkmrk-installed-authentik-">1. Installed authentik on either [Docker Compose](https://docs.goauthentik.io/install-config/install/docker-compose/#install-and-start-authentik), [Kubernetes](https://docs.goauthentik.io/install-config/install/kubernetes/#install-authentik-helm-chart), or [AWS CloudFormation](https://docs.goauthentik.io/install-config/install/aws/) and confirmed that the server, worker, and the PostgreSQL database are started and running.
2. Opened authentik in your browser to the `initial-setup` flow and added credentials for a default Admin account. ([Docker](https://docs.goauthentik.io/install-config/install/docker-compose/#access-authentik), [Kubernetes](https://docs.goauthentik.io/install-config/install/kubernetes/#access-authentik)), or [AWS CloudFormation](https://docs.goauthentik.io/install-config/install/aws/#access-authentik-from-aws-cloudformation).

<div class="theme-admonition theme-admonition-info admonition_WCGJ alert alert--info"><div class="admonitionContent_pbrs">Initial setup in browser</div></div></div>You will get a `Not Found` error if the initial setup URL doesn't include the forward slash `/` at the very end of the URL. Also verify that the authentik server, worker, and PostgreSQL database are running and healthy. Review additional tips in our [troubleshooting docs](https://docs.goauthentik.io/troubleshooting/login/#cant-access-initial-setup-flow-during-installation-steps).

Other optional pre-installation configurations that you might have already completed include:

<div class="theme-doc-markdown markdown" id="bkmrk-configured-your-glob">- [Configured your global email address](https://docs.goauthentik.io/install-config/email/#global-email-settings).
- [Configured your PostgreSQL settings](https://docs.goauthentik.io/install-config/configuration/#postgresql-settings) (read-replica, connections, etc.).
- Configured a [reverse proxy](https://docs.goauthentik.io/install-config/reverse-proxy/).
- Configured your [media storage settings](https://docs.goauthentik.io/install-config/configuration/#media-storage-settings) or optionally [AWS S3 file storage](https://docs.goauthentik.io/sys-mgmt/ops/storage-s3/).
- Added additional [custom configurations environment variables](https://docs.goauthentik.io/install-config/configuration/#set-your-environment-variables).
- [Verified](https://docs.goauthentik.io/install-config/configuration/#verify-your-configuration-settings) your configuration settings.

</div>#### Install your first application and provider

Now that you have your authentik instance installed and configured with the required settings, you can add your first [application](https://docs.goauthentik.io/core/glossary/?application) and [provider](https://docs.goauthentik.io/core/glossary/?provider). After that, we'll walk through how to add your first user.

<div class="theme-doc-markdown markdown" id="bkmrk-security-best-practi"><div class="theme-admonition theme-admonition-tip admonition_WCGJ alert alert--success"><div class="admonitionContent_pbrs">Security Best Practice</div></div></div>In a production environment, best practice is to first [create a group](https://docs.goauthentik.io/users-sources/groups/manage_groups/#create-a-group), then [create the user(s)](https://docs.goauthentik.io/users-sources/user/user_basic_operations/#create-a-user), and then add the application. Then you can configure the application to have a [binding](https://docs.goauthentik.io/add-secure-apps/bindings-overview/work-with-bindings/) to a specific group or user. The binding controls the access to the application (whether or not it is displayed on a user's My Applications page).

authentik supports integration with any application; refer to our [Integrations documentation](https://integrations.goauthentik.io/) to view integrations guides for over 180 of the most common ones.

**In this guide we'll be setting up Grafana as an example application.**

<div class="theme-doc-markdown markdown" id="bkmrk-why-grafana%3F-%C2%A0"><details class="details_IpIu isBrowser_QD4r alert alert--info details_jERq" data-collapsed="true"><summary>Why Grafana?</summary>

 </details></div>#### 1. Log in to authentik as an administrator and open the authentik Admin interface.

**A.** In the Admin interface, navigate to **Applications** &gt; **Applications** and click **Create with Provider** to create an application and provider pair.

<div class="theme-doc-markdown markdown" id="bkmrk-about-application-an"><div class="theme-admonition theme-admonition-tip admonition_WCGJ alert alert--success"><div class="admonitionContent_pbrs">About application and provider pairs</div></div></div>Every application that you add to authentik requires a provider, which is used to configure the specific protocol between the application and authentik, for example OAuth2/OIDC, SAML, LDAP, or others.

**B.** Provide the details for the application (Grafana) and provider (OAuth2/OIDC).

<div class="theme-doc-markdown markdown" id="bkmrk-configure-the-applic">- **Configure the Application**:
    
    
    - **Name**: provide a descriptive name (such as Grafana). 
        - **Group**: select an optional group for the application; groups are used to visually separate applications. For example, you can choose to group applications that you use for coding from those you use for internal communication.
    - **Policy engine mode**: select **Any** for this tutorial; the mode determnes how strictly policies are adhered to. 
        - **TIP**: in authentik, [policies](https://docs.goauthentik.io/customize/policies/working_with_policies/) are used in authentik to fine-tune access to applications, flows, stages and many other authentik components. It is not required to use a policy at all, though. The *policy engine mode* setting of **Any** means that as long as a single policy passes (or if there are no policies bound to the application), then access to the application is granted. The mode **ALL** means that every one of any policies bound to the application must pass in order for a user to have access to the application.
    - **UI Settings**: optional UI settings that are displayed about the application, including the launch URL, and three settings to display extra information about the application on the **My Applications** page: an optional icon, the publisher of the application, and a brief description.
- **Choose a Provider type**: select **OAuth2/OpenID Connect** as the provider type.
- **Configure the Provider**:
    
    
    - **Name**: Provide a name (or accept the auto-provided name).
    - **Authorization flow**: Select the default `implicit` authorization flow to use for this provider. 
        - **TIP**: The authorization [flow](https://docs.goauthentik.io/add-secure-apps/flows-stages/flow/) is where the various steps, or [*stages*](https://docs.goauthentik.io/add-secure-apps/flows-stages/stages/) of authorization are defined and executed. The defined set of stages construct the workflows of authentication, authorization, etc.
    - **Protocol settings** provide the following required configurations: 
        - Note the **Client ID**, **Client Secret**, and **Slug** values because they will be required later when you configure Grafana to use authentik.
        - Set a `Strict` redirect URI to `https://grafana.company/login/generic_oauth`. 
            - **TIP**: The Redirect URI is where the application will go as soon as authentik's authorization flow is successfully completed.
    - **Logout URI**: set to `https://grafana.company/logout`.
    - **Logout Method**: set to `Front-channel`. 
        - **TIP**: With OAuth2, front-channel logout is considered the default because most application (including Grafana) do not support back-channel logout.
    - **Signing key**: select any available signing key. 
        - **TIP**: authentik generates a key that you can use, called the `authentik Self-signed Certificate`, if you do not have a specific signing key for an application.
- **Configure Bindings** *(optional)*: for this tutorial, skip this step because you do not yet have a user. Later, after you create your first user, you can [create a binding](https://docs.goauthentik.io/add-secure-apps/bindings-overview/work-with-bindings/) to manage the display and access to applications on a user's **My applications** page.
    
    
    - **TIP**: By creating a binding between an application and a specific user, you are ensuring that the application is accessible only to that user and any other users or groups for whom you created a binding. Learn more about how bindings are used in authentik in our [Bindings overview](https://docs.goauthentik.io/add-secure-apps/bindings-overview/).
    
    For any fields not mentioned above, you can leave the default value.

</div>**C.** Click **Submit** to save the new application and provider.

#### 2. Configure Grafana to use authentik as its IdP

For some applications, you log into the application and configure settings there; with Grafana you simply edit your Grafana Docker Compose file. Here you add basic configuration settings as well as the **Client ID**, **Client Secret**, and the **Slug** values that you obtained when you configured the application and provider in authentik in Step 1. above.

**A.** In the Grafana Docker Compose file, set the following environment variables:

<div class="theme-doc-markdown markdown" id="bkmrk-tips"><div class="theme-admonition theme-admonition-tip admonition_WCGJ alert alert--success"><div class="admonitionContent_pbrs">Tips</div></div></div>These values below are for a [Grafana instance running in Docker](https://grafana.com/docs/grafana/latest/setup-grafana/configure-docker/); for standalone or Helm Chart instances refer to our [Grafana integration guide](https://integrations.goauthentik.io/monitoring/grafana/).

Note that `authentik.company` is a placeholder that we use in our example settings; replace this with the domain that authentik is running on in your environment.

<div class="theme-doc-markdown markdown" id="bkmrk--2"><div class="theme-admonition theme-admonition-tip admonition_WCGJ alert alert--success"><div class="admonitionContent_pbrs">  
</div></div><div class="language-text codeBlockContainer_mQmQ theme-code-block"><div class="codeBlockContent_t_Hd"></div></div></div>```
environment:
    GF_AUTH_GENERIC_OAUTH_ENABLED: "true"
    GF_AUTH_GENERIC_OAUTH_NAME: "authentik"
    GF_AUTH_GENERIC_OAUTH_CLIENT_ID: "<Client ID from above>"
    GF_AUTH_GENERIC_OAUTH_CLIENT_SECRET: "<Client Secret from above>"
    GF_AUTH_GENERIC_OAUTH_SCOPES: "openid profile email"
    GF_AUTH_GENERIC_OAUTH_AUTH_URL: "https://authentik.company/application/o/authorize/"
    GF_AUTH_GENERIC_OAUTH_TOKEN_URL: "https://authentik.company/application/o/token/"
    GF_AUTH_GENERIC_OAUTH_API_URL: "https://authentik.company/application/o/userinfo/"
    GF_AUTH_SIGNOUT_REDIRECT_URL: "https://authentik.company/application/o/<application_slug>/end-session/"
    # Optionally enable auto-login (bypasses Grafana login screen)
    GF_AUTH_OAUTH_AUTO_LOGIN: "true"
    # Optionally map user groups to Grafana roles
    GF_AUTH_GENERIC_OAUTH_ROLE_ATTRIBUTE_PATH: "contains(groups[*], 'Grafana Admins') && 'Admin' || contains(groups[*], 'Grafana Editors') && 'Editor' || 'Viewer'"
    # Required if Grafana is running behind a reverse proxy
    GF_SERVER_ROOT_URL: "https://grafana.company"

```

<div class="theme-doc-markdown markdown" id="bkmrk--3"><div class="language-text codeBlockContainer_mQmQ theme-code-block"><div class="codeBlockContent_t_Hd"><div class="buttonGroup_B0hJ"><button aria-label="Toggle word wrap" class="clean-btn" title="Toggle word wrap" type="button"><svg aria-hidden="true" class="wordWrapButtonIcon_CQkQ" viewbox="0 0 24 24"><path d="M4 19h6v-2H4v2zM20 5H4v2h16V5zm-3 6H4v2h13.25c1.1 0 2 .9 2 2s-.9 2-2 2H15v-2l-3 3l3 3v-2h2c2.21 0 4-1.79 4-4s-1.79-4-4-4z" fill="currentColor"></path></svg></button><button aria-label="Copy code to clipboard" class="clean-btn" title="Copy" type="button"><span aria-hidden="true" class="copyButtonIcons_Fy7c"><svg class="copyButtonIcon_r1h_" viewbox="0 0 24 24"><path d="M19,21H8V7H19M19,5H8A2,2 0 0,0 6,7V21A2,2 0 0,0 8,23H19A2,2 0 0,0 21,21V7A2,2 0 0,0 19,5M16,1H4A2,2 0 0,0 2,3V17H4V3H16V1Z" fill="currentColor"></path></svg><svg class="copyButtonSuccessIcon_BIMv" viewbox="0 0 24 24"><path d="M21,7L9,19L3.5,13.5L4.91,12.09L9,16.17L19.59,5.59L21,7Z" fill="currentColor"></path></svg></span></button></div></div></div></div>**B.** Save your Grafana Docker Compose file, and then launch the stack and access Grafana via your browser at the configured URL.

**C.** To confirm that authentik is properly configured with the new application, log out of Grafana and then log back in using the **Sign in with authentik** button. You should be redirected to authentik to provide credentials.

#### Add your first user

Now that you can access the authentik Admin interface, and you have added an application and provider, let's add a new user.

##### 1. Log in to authentik as an administrator and open the authentik Admin interface.

**A.** Navigate to **Directory &gt; Users**, and click **New User**.

**B.** Fill in the ***required*** fields:

<div class="theme-doc-markdown markdown" id="bkmrk-username%3A-this-value">- **Username**: This value must be unique across all users.
- **TIP**: With OAuth2, front-channel logout is considered the default because most application (including Grafana) do not support back-channel logout.
- **Path**: The path where the user will be created. By default the new user is created in the `users` directory, but you can change that later by editing the user. 
    - **TIP**: Paths are basically directories, that are used to organize your users (for example HR vs Sales, etc.). Paths do not ipoact access; they are purely organizational. Note that the top-level **users** directory displays all users in that directory and all sub-directories.

</div>For information about the ***optional*** fields below, refer to our [documentation on managing users](https://docs.goauthentik.io/users-sources/user/user_basic_operations/#create-a-user).

<div class="theme-doc-markdown markdown" id="bkmrk-name%3A-the-display-na">- **Name**: The display name of the user.
- **Email**: The email address of the user. This is required for many integrations.
- **Is active**: Define the newly created user account as active.
- **Attributes**: You can leave this empty for this tutorial. This field can be used to store custom attributes for the user, in YAML or JSON format. These attributes can then be used within property mappings and policies.

</div>**C.** Click **Create**.

#### 2. Verify that the new user was created

<div class="theme-doc-markdown markdown" id="bkmrk-look-for-the-new-use">- Look for the new user in the list on the **Directory** &gt; **Users** page.

</div>#### What's next?

Now that you have added your first application, and a new user, here are some typical next steps:

<div class="theme-doc-markdown markdown" id="bkmrk-assign-your-new-user">- Assign your new user to appropriate [groups](https://docs.goauthentik.io/users-sources/user/user_basic_operations/#add-a-user-to-a-group) and [roles](https://docs.goauthentik.io/users-sources/user/user_basic_operations/#add-a-user-to-a-role).
- Configure federated or external [sources](https://docs.goauthentik.io/users-sources/sources/) (an existing source of user credentials and other user data).
- Set up MFA
- Define [property mappings](https://docs.goauthentik.io/add-secure-apps/providers/property-mappings/).
- Create a [custom flow](https://docs.goauthentik.io/add-secure-apps/flows-stages/flow/).
- Install an [Enterprise license](https://docs.goauthentik.io/enterprise/manage-enterprise/#purchase-a-license)
- [Create a policy](https://docs.goauthentik.io/customize/policies/) to control access, force MFA use, etc..

</div>#### Things to know and troubleshooting tips

Review the following information to learn more about the basics of setting up authentik and for troubleshooting tips.

#### Modifying the Docker Compose file

Especially when you are just starting out with authentik, we recommend that you use the default `docker-compose.yml` file that comes with the download, instead of trying to write the file from scratch. After you have successfully installed, configured, and accessed authentik, you can edit the file to do more advanced configurations, as documented in the [Configuration section](https://docs.goauthentik.io/install-config/configuration/).

#### Reverse proxy

Typically authentik is set up with a reverse proxy in front of it. If you already have a reverse proxy that you are using to handle your incoming network traffic, you can simply use that same reverse proxy for authentik, by adding a few configuration values. For more details see the [Reverse proxy guide](https://docs.goauthentik.io/install-config/reverse-proxy/).

#### The `latest` tag is deprecated

The `:latest` tag has been deprecated and will never be updated from the 2025.2 release. Instead, use a specific version tag for authentik instances' container images, such as `:2025.12`.

#### Using bindings to allow or restrict access to applications

Note that if you do not define any [bindings](https://docs.goauthentik.io/add-secure-apps/bindings-overview/), then all users have access to the application. To control access, you can [create a binding](https://docs.goauthentik.io/add-secure-apps/bindings-overview/work-with-bindings/). For more information about user access, refer to our documentation about [authorization](https://docs.goauthentik.io/add-secure-apps/applications/manage_apps/#policy-driven-authorization) and [hiding an application](https://docs.goauthentik.io/add-secure-apps/applications/manage_apps/#hide-applications).

#### Upgrades

When you are ready to upgrade to the latest version, be sure to read our [Upgrade documentation](https://docs.goauthentik.io/install-config/upgrade/) and refer to the [Release Notes](https://docs.goauthentik.io/releases/) for the specific version.

<footer class="theme-doc-footer docusaurus-mt-lg" id="bkmrk-help-us-improve-this">---

<div class="theme-admonition theme-admonition-note admonition_WCGJ alert alert--secondary admonitionContrib_Zv8a margin-top--sm theme-doc-footer-edit-meta-row"><div class="admonitionContent_pbrs"><div class="admonitionHeader_FPxu">**Help us improve this content**</div></div></div>We welcome your knowledge and expertise. If you see areas of the documentation that you can improve (fix a typo, correct a technical detail, add additional context, etc.) we would really appreciate your contribution.

<div class="theme-admonition theme-admonition-note admonition_WCGJ alert alert--secondary admonitionContrib_Zv8a margin-top--sm theme-doc-footer-edit-meta-row"><div class="admonitionContent_pbrs"><div class="row"><div class="col col--12">- [Edit on GitHub](https://github.com/goauthentik/authentik/edit/main/website/docs/install-config/first-steps/index.mdx)
- [Contributor Guide](https://docs.goauthentik.io/docs/developer-docs/)
- [Open an issue](https://github.com/goauthentik/authentik/issues/new)
- 

</div></div></div></div></footer>

# Tradução de mensagens no Authentik

##### **Procedimentos necessários**

##### **<span style="color: rgb(251, 238, 184);">1) Acessar o container do authentik server e instalar o pacote gettext</span>**

##### <span style="color: rgb(194, 224, 244);">docker container exec -ti authentik-server bash</span>

##### <span style="color: rgb(194, 224, 244);">apt update; apt upgrade; apt install gettext</span>


##### **<span style="color: rgb(251, 238, 184);">2) Acessar o diretório com arquivo para tradução de português brasileiro:</span>**

##### <span style="color: rgb(194, 224, 244);">locale/pt\_BR/LC\_MESSAGES/django.po</span>

##### Para facilitar as traduções e poder usar o vim para edição do arquivo, fazer o mapeamento persistente no docker-compose.

##### <span style="color: rgb(194, 224, 244);">volumes:</span>  
<span style="color: rgb(194, 224, 244);"> - ./volumes/locale/LC\_MESSAGES:/locale/pt\_BR/LC\_MESSAGES</span>

##### **<span style="color: rgb(251, 238, 184);">3) Após alterar o arquivo django.po deve ser compilado no container:</span>**

##### <span style="color: rgb(194, 224, 244);">python manage.py compilemessages</span>

##### <span style="color: rgb(255, 255, 255);">Este comando deve ser executado no diretório raiz onde está o arquivo manage.py</span>

#####   
<span style="color: rgb(251, 238, 184);">**4) Após finalizar os processos no container, regerar as configurações authentik com os comandos:**</span>

##### <span style="color: rgb(194, 224, 244);">docker compose build, e depois reiniciar com docker compose up e down.</span>

# Aplicações do Authentik

Modelos de aplicação do Authentik

# Authentik com Nextcloud

Link: [https://integrations.goauthentik.io/chat-communication-collaboration/nextcloud/](https://integrations.goauthentik.io/chat-communication-collaboration/nextcloud/)

<section class="text-token-text-primary w-full focus:outline-none [--shadow-height:45px] has-data-writing-block:pointer-events-none has-data-writing-block:-mt-(--shadow-height) has-data-writing-block:pt-(--shadow-height) [&:has([data-writing-block])>*]:pointer-events-auto scroll-mt-(--header-height)" data-scroll-anchor="false" data-testid="conversation-turn-7" data-turn="user" data-turn-id="eb786df6-50d4-4a56-a639-2f2fe556602b" dir="auto" id="bkmrk-o-que-significa-o-te"><div class="text-base my-auto mx-auto pt-12 [--thread-content-margin:var(--thread-content-margin-xs,calc(var(--spacing)*4))] @w-sm/main:[--thread-content-margin:var(--thread-content-margin-sm,calc(var(--spacing)*6))] @w-lg/main:[--thread-content-margin:var(--thread-content-margin-lg,calc(var(--spacing)*16))] px-(--thread-content-margin)"><div class="[--thread-content-max-width:40rem] @w-lg/main:[--thread-content-max-width:48rem] mx-auto max-w-(--thread-content-max-width) flex-1 group/turn-messages focus-visible:outline-hidden relative flex w-full min-w-0 flex-col"><div class="flex max-w-full flex-col gap-4 grow"><div class="min-h-8 text-message relative flex w-full flex-col items-end gap-2 text-start break-words whitespace-normal outline-none keyboard-focused:focus-ring [.text-message+&]:mt-1" data-message-author-role="user" data-message-id="eb786df6-50d4-4a56-a639-2f2fe556602b" dir="auto"><div class="flex w-full flex-col gap-1 empty:hidden items-end rtl:items-start"><div class="user-message-bubble-color corner-superellipse/0.98 relative rounded-[22px] px-4 py-2.5 leading-6 max-w-(--user-chat-width,70%)"><div class="whitespace-pre-wrap">O que significa o texto abaixo referente ao Nextcloud e o Authentik: aviso Se você precisa de criptografia do lado do servidor, deve usar LDAP. OpenID e SAML causarão perda irrevogável de dados. A criptografia do lado do servidor Nextcloud requer acesso à senha em texto claro do usuário, à qual o Nextcloud só tem acesso quando usa LDAP porque o usuário insere sua senha diretamente no Nextcloud.</div></div></div></div></div><div class="z-0 flex justify-end">  
</div></div></div></section><section class="text-token-text-primary w-full focus:outline-none [--shadow-height:45px] has-data-writing-block:pointer-events-none has-data-writing-block:-mt-(--shadow-height) has-data-writing-block:pt-(--shadow-height) [&:has([data-writing-block])>*]:pointer-events-auto scroll-mt-[calc(var(--header-height)+min(200px,max(70px,20svh)))]" data-scroll-anchor="false" data-testid="conversation-turn-8" data-turn="assistant" data-turn-id="request-WEB:dcc01d79-47e4-481d-bf57-8049f5d84f4d-3" dir="auto" id="bkmrk-esse-aviso-%C3%A9-muito-i">Esse aviso é **muito importante** — ele fala de uma limitação séria entre o <span class="hover:entity-accent entity-underline inline cursor-pointer align-baseline"><span class="whitespace-normal">Nextcloud</span></span> e provedores de identidade como o <span class="hover:entity-accent entity-underline inline cursor-pointer align-baseline"><span class="whitespace-normal">Authentik</span></span>.

Vamos traduzir e explicar de forma clara 👇

<div class="text-base my-auto mx-auto [--thread-content-margin:var(--thread-content-margin-xs,calc(var(--spacing)*4))] @w-sm/main:[--thread-content-margin:var(--thread-content-margin-sm,calc(var(--spacing)*6))] @w-lg/main:[--thread-content-margin:var(--thread-content-margin-lg,calc(var(--spacing)*16))] px-(--thread-content-margin)"><div class="[--thread-content-max-width:40rem] @w-lg/main:[--thread-content-max-width:48rem] mx-auto max-w-(--thread-content-max-width) flex-1 group/turn-messages focus-visible:outline-hidden relative flex w-full min-w-0 flex-col agent-turn"><div class="flex max-w-full flex-col gap-4 grow"><div class="min-h-8 text-message relative flex w-full flex-col items-end gap-2 text-start break-words whitespace-normal outline-none keyboard-focused:focus-ring [.text-message+&]:mt-1" data-message-author-role="assistant" data-message-id="9a931f8e-40ef-47b5-8ef0-eeaddd67becb" data-message-model-slug="gpt-5-3" dir="auto"><div class="flex w-full flex-col gap-1 empty:hidden"><div class="markdown prose dark:prose-invert w-full wrap-break-word dark markdown-new-styling">---

</div></div></div></div></div></div>#### 🧠 💡 Ideia central

O problema é a **criptografia do lado do servidor (Server-Side Encryption)** do Nextcloud.

👉 Esse tipo de criptografia **precisa da senha do usuário em texto claro**.

<div class="text-base my-auto mx-auto [--thread-content-margin:var(--thread-content-margin-xs,calc(var(--spacing)*4))] @w-sm/main:[--thread-content-margin:var(--thread-content-margin-sm,calc(var(--spacing)*6))] @w-lg/main:[--thread-content-margin:var(--thread-content-margin-lg,calc(var(--spacing)*16))] px-(--thread-content-margin)"><div class="[--thread-content-max-width:40rem] @w-lg/main:[--thread-content-max-width:48rem] mx-auto max-w-(--thread-content-max-width) flex-1 group/turn-messages focus-visible:outline-hidden relative flex w-full min-w-0 flex-col agent-turn"><div class="flex max-w-full flex-col gap-4 grow"><div class="min-h-8 text-message relative flex w-full flex-col items-end gap-2 text-start break-words whitespace-normal outline-none keyboard-focused:focus-ring [.text-message+&]:mt-1" data-message-author-role="assistant" data-message-id="9a931f8e-40ef-47b5-8ef0-eeaddd67becb" data-message-model-slug="gpt-5-3" dir="auto"><div class="flex w-full flex-col gap-1 empty:hidden"><div class="markdown prose dark:prose-invert w-full wrap-break-word dark markdown-new-styling">---

</div></div></div></div></div></div>#### 🔐 O que o aviso quer dizer

#### ✔️ Com LDAP (funciona)

Quando você usa LDAP:

<div class="text-base my-auto mx-auto [--thread-content-margin:var(--thread-content-margin-xs,calc(var(--spacing)*4))] @w-sm/main:[--thread-content-margin:var(--thread-content-margin-sm,calc(var(--spacing)*6))] @w-lg/main:[--thread-content-margin:var(--thread-content-margin-lg,calc(var(--spacing)*16))] px-(--thread-content-margin)"><div class="[--thread-content-max-width:40rem] @w-lg/main:[--thread-content-max-width:48rem] mx-auto max-w-(--thread-content-max-width) flex-1 group/turn-messages focus-visible:outline-hidden relative flex w-full min-w-0 flex-col agent-turn"><div class="flex max-w-full flex-col gap-4 grow"><div class="min-h-8 text-message relative flex w-full flex-col items-end gap-2 text-start break-words whitespace-normal outline-none keyboard-focused:focus-ring [.text-message+&]:mt-1" data-message-author-role="assistant" data-message-id="9a931f8e-40ef-47b5-8ef0-eeaddd67becb" data-message-model-slug="gpt-5-3" dir="auto"><div class="flex w-full flex-col gap-1 empty:hidden"><div class="markdown prose dark:prose-invert w-full wrap-break-word dark markdown-new-styling">- O usuário digita a senha **direto no Nextcloud**
- O Nextcloud recebe a senha em texto claro
- Ele usa essa senha para: 
    - gerar chaves
    - descriptografar arquivos

</div></div></div></div></div></div>👉 Exemplo:

<div class="text-base my-auto mx-auto [--thread-content-margin:var(--thread-content-margin-xs,calc(var(--spacing)*4))] @w-sm/main:[--thread-content-margin:var(--thread-content-margin-sm,calc(var(--spacing)*6))] @w-lg/main:[--thread-content-margin:var(--thread-content-margin-lg,calc(var(--spacing)*16))] px-(--thread-content-margin)"><div class="[--thread-content-max-width:40rem] @w-lg/main:[--thread-content-max-width:48rem] mx-auto max-w-(--thread-content-max-width) flex-1 group/turn-messages focus-visible:outline-hidden relative flex w-full min-w-0 flex-col agent-turn"><div class="flex max-w-full flex-col gap-4 grow"><div class="min-h-8 text-message relative flex w-full flex-col items-end gap-2 text-start break-words whitespace-normal outline-none keyboard-focused:focus-ring [.text-message+&]:mt-1" data-message-author-role="assistant" data-message-id="9a931f8e-40ef-47b5-8ef0-eeaddd67becb" data-message-model-slug="gpt-5-3" dir="auto"><div class="flex w-full flex-col gap-1 empty:hidden"><div class="markdown prose dark:prose-invert w-full wrap-break-word dark markdown-new-styling">- <span class="hover:entity-accent entity-underline inline cursor-pointer align-baseline"><span class="whitespace-normal">LDAP</span></span> ou Active Directory

---

</div></div></div></div></div></div>#### ❌ Com OpenID / SAML (problema)

Quando você usa:

<div class="text-base my-auto mx-auto [--thread-content-margin:var(--thread-content-margin-xs,calc(var(--spacing)*4))] @w-sm/main:[--thread-content-margin:var(--thread-content-margin-sm,calc(var(--spacing)*6))] @w-lg/main:[--thread-content-margin:var(--thread-content-margin-lg,calc(var(--spacing)*16))] px-(--thread-content-margin)"><div class="[--thread-content-max-width:40rem] @w-lg/main:[--thread-content-max-width:48rem] mx-auto max-w-(--thread-content-max-width) flex-1 group/turn-messages focus-visible:outline-hidden relative flex w-full min-w-0 flex-col agent-turn"><div class="flex max-w-full flex-col gap-4 grow"><div class="min-h-8 text-message relative flex w-full flex-col items-end gap-2 text-start break-words whitespace-normal outline-none keyboard-focused:focus-ring [.text-message+&]:mt-1" data-message-author-role="assistant" data-message-id="9a931f8e-40ef-47b5-8ef0-eeaddd67becb" data-message-model-slug="gpt-5-3" dir="auto"><div class="flex w-full flex-col gap-1 empty:hidden"><div class="markdown prose dark:prose-invert w-full wrap-break-word dark markdown-new-styling">- OpenID Connect (OIDC)
- SAML

</div></div></div></div></div></div>👉 O que acontece:

<div class="text-base my-auto mx-auto [--thread-content-margin:var(--thread-content-margin-xs,calc(var(--spacing)*4))] @w-sm/main:[--thread-content-margin:var(--thread-content-margin-sm,calc(var(--spacing)*6))] @w-lg/main:[--thread-content-margin:var(--thread-content-margin-lg,calc(var(--spacing)*16))] px-(--thread-content-margin)"><div class="[--thread-content-max-width:40rem] @w-lg/main:[--thread-content-max-width:48rem] mx-auto max-w-(--thread-content-max-width) flex-1 group/turn-messages focus-visible:outline-hidden relative flex w-full min-w-0 flex-col agent-turn"><div class="flex max-w-full flex-col gap-4 grow"><div class="min-h-8 text-message relative flex w-full flex-col items-end gap-2 text-start break-words whitespace-normal outline-none keyboard-focused:focus-ring [.text-message+&]:mt-1" data-message-author-role="assistant" data-message-id="9a931f8e-40ef-47b5-8ef0-eeaddd67becb" data-message-model-slug="gpt-5-3" dir="auto"><div class="flex w-full flex-col gap-1 empty:hidden"><div class="markdown prose dark:prose-invert w-full wrap-break-word dark markdown-new-styling">- O login é redirecionado para o Authentik
- O Nextcloud **NUNCA vê a senha**
- Ele só recebe um **token de autenticação**

---

</div></div></div></div></div></div>#### 💣 Consequência grave

Sem a senha:

<div class="text-base my-auto mx-auto [--thread-content-margin:var(--thread-content-margin-xs,calc(var(--spacing)*4))] @w-sm/main:[--thread-content-margin:var(--thread-content-margin-sm,calc(var(--spacing)*6))] @w-lg/main:[--thread-content-margin:var(--thread-content-margin-lg,calc(var(--spacing)*16))] px-(--thread-content-margin)"><div class="[--thread-content-max-width:40rem] @w-lg/main:[--thread-content-max-width:48rem] mx-auto max-w-(--thread-content-max-width) flex-1 group/turn-messages focus-visible:outline-hidden relative flex w-full min-w-0 flex-col agent-turn"><div class="flex max-w-full flex-col gap-4 grow"><div class="min-h-8 text-message relative flex w-full flex-col items-end gap-2 text-start break-words whitespace-normal outline-none keyboard-focused:focus-ring [.text-message+&]:mt-1" data-message-author-role="assistant" data-message-id="9a931f8e-40ef-47b5-8ef0-eeaddd67becb" data-message-model-slug="gpt-5-3" dir="auto"><div class="flex w-full flex-col gap-1 empty:hidden"><div class="markdown prose dark:prose-invert w-full wrap-break-word dark markdown-new-styling">- o Nextcloud **não consegue descriptografar os dados**
- arquivos podem ficar inacessíveis

</div></div></div></div></div></div>👉 Daí o aviso:

> **“perda irrevogável de dados”**

Ou seja:

<div class="text-base my-auto mx-auto [--thread-content-margin:var(--thread-content-margin-xs,calc(var(--spacing)*4))] @w-sm/main:[--thread-content-margin:var(--thread-content-margin-sm,calc(var(--spacing)*6))] @w-lg/main:[--thread-content-margin:var(--thread-content-margin-lg,calc(var(--spacing)*16))] px-(--thread-content-margin)"><div class="[--thread-content-max-width:40rem] @w-lg/main:[--thread-content-max-width:48rem] mx-auto max-w-(--thread-content-max-width) flex-1 group/turn-messages focus-visible:outline-hidden relative flex w-full min-w-0 flex-col agent-turn"><div class="flex max-w-full flex-col gap-4 grow"><div class="min-h-8 text-message relative flex w-full flex-col items-end gap-2 text-start break-words whitespace-normal outline-none keyboard-focused:focus-ring [.text-message+&]:mt-1" data-message-author-role="assistant" data-message-id="9a931f8e-40ef-47b5-8ef0-eeaddd67becb" data-message-model-slug="gpt-5-3" dir="auto"><div class="flex w-full flex-col gap-1 empty:hidden"><div class="markdown prose dark:prose-invert w-full wrap-break-word dark markdown-new-styling">- você pode perder acesso aos arquivos criptografados
- mesmo sendo o administrador

---

</div></div></div></div></div></div>#### 📊 Resumo simples

<div class="text-base my-auto mx-auto [--thread-content-margin:var(--thread-content-margin-xs,calc(var(--spacing)*4))] @w-sm/main:[--thread-content-margin:var(--thread-content-margin-sm,calc(var(--spacing)*6))] @w-lg/main:[--thread-content-margin:var(--thread-content-margin-lg,calc(var(--spacing)*16))] px-(--thread-content-margin)"><div class="[--thread-content-max-width:40rem] @w-lg/main:[--thread-content-max-width:48rem] mx-auto max-w-(--thread-content-max-width) flex-1 group/turn-messages focus-visible:outline-hidden relative flex w-full min-w-0 flex-col agent-turn"><div class="flex max-w-full flex-col gap-4 grow"><div class="min-h-8 text-message relative flex w-full flex-col items-end gap-2 text-start break-words whitespace-normal outline-none keyboard-focused:focus-ring [.text-message+&]:mt-1" data-message-author-role="assistant" data-message-id="9a931f8e-40ef-47b5-8ef0-eeaddd67becb" data-message-model-slug="gpt-5-3" dir="auto"><div class="flex w-full flex-col gap-1 empty:hidden"><div class="markdown prose dark:prose-invert w-full wrap-break-word dark markdown-new-styling"><div class="TyagGW_tableContainer"><div class="group TyagGW_tableWrapper flex flex-col-reverse w-fit" tabindex="-1"><table class="w-fit min-w-(--thread-content-width)" data-end="1501" data-start="1298"><thead data-end="1357" data-start="1298"><tr data-end="1357" data-start="1298"><th class="" data-col-size="sm" data-end="1307" data-start="1298">Método</th><th class="" data-col-size="sm" data-end="1331" data-start="1307">Nextcloud vê a senha?</th><th class="" data-col-size="sm" data-end="1357" data-start="1331">Criptografia funciona?</th></tr></thead><tbody data-end="1501" data-start="1413"><tr data-end="1437" data-start="1413"><td data-col-size="sm" data-end="1420" data-start="1413">LDAP</td><td data-col-size="sm" data-end="1428" data-start="1420">✅ Sim</td><td data-col-size="sm" data-end="1437" data-start="1428">✅ Sim</td></tr><tr data-end="1462" data-start="1438"><td data-col-size="sm" data-end="1445" data-start="1438">SAML</td><td data-col-size="sm" data-end="1453" data-start="1445">❌ Não</td><td data-col-size="sm" data-end="1462" data-start="1453">❌ Não</td></tr><tr data-end="1501" data-start="1463"><td data-col-size="sm" data-end="1484" data-start="1463">OpenID (Authentik)</td><td data-col-size="sm" data-end="1492" data-start="1484">❌ Não</td><td data-col-size="sm" data-end="1501" data-start="1492">❌ Não</td></tr></tbody></table>

</div></div>---

</div></div></div></div></div></div>#### ⚠️ Importante (muita gente ignora isso)

Esse problema não é bug:  
👉 é **limitação de design** do Nextcloud

<div class="text-base my-auto mx-auto [--thread-content-margin:var(--thread-content-margin-xs,calc(var(--spacing)*4))] @w-sm/main:[--thread-content-margin:var(--thread-content-margin-sm,calc(var(--spacing)*6))] @w-lg/main:[--thread-content-margin:var(--thread-content-margin-lg,calc(var(--spacing)*16))] px-(--thread-content-margin)"><div class="[--thread-content-max-width:40rem] @w-lg/main:[--thread-content-max-width:48rem] mx-auto max-w-(--thread-content-max-width) flex-1 group/turn-messages focus-visible:outline-hidden relative flex w-full min-w-0 flex-col agent-turn"><div class="flex max-w-full flex-col gap-4 grow"><div class="min-h-8 text-message relative flex w-full flex-col items-end gap-2 text-start break-words whitespace-normal outline-none keyboard-focused:focus-ring [.text-message+&]:mt-1" data-message-author-role="assistant" data-message-id="9a931f8e-40ef-47b5-8ef0-eeaddd67becb" data-message-model-slug="gpt-5-3" dir="auto"><div class="flex w-full flex-col gap-1 empty:hidden"><div class="markdown prose dark:prose-invert w-full wrap-break-word dark markdown-new-styling">---

</div></div></div></div></div></div>#### 🚀 O que você deve fazer

#### ✔️ Opção 1 — Usar Authentik + Nextcloud (sem criptografia)

<div class="text-base my-auto mx-auto [--thread-content-margin:var(--thread-content-margin-xs,calc(var(--spacing)*4))] @w-sm/main:[--thread-content-margin:var(--thread-content-margin-sm,calc(var(--spacing)*6))] @w-lg/main:[--thread-content-margin:var(--thread-content-margin-lg,calc(var(--spacing)*16))] px-(--thread-content-margin)"><div class="[--thread-content-max-width:40rem] @w-lg/main:[--thread-content-max-width:48rem] mx-auto max-w-(--thread-content-max-width) flex-1 group/turn-messages focus-visible:outline-hidden relative flex w-full min-w-0 flex-col agent-turn"><div class="flex max-w-full flex-col gap-4 grow"><div class="min-h-8 text-message relative flex w-full flex-col items-end gap-2 text-start break-words whitespace-normal outline-none keyboard-focused:focus-ring [.text-message+&]:mt-1" data-message-author-role="assistant" data-message-id="9a931f8e-40ef-47b5-8ef0-eeaddd67becb" data-message-model-slug="gpt-5-3" dir="auto"><div class="flex w-full flex-col gap-1 empty:hidden"><div class="markdown prose dark:prose-invert w-full wrap-break-word dark markdown-new-styling">- Pode usar OIDC/SAML normalmente
- **NÃO ativar Server-Side Encryption**

</div></div></div></div></div></div>👉 recomendado na maioria dos casos

<div class="text-base my-auto mx-auto [--thread-content-margin:var(--thread-content-margin-xs,calc(var(--spacing)*4))] @w-sm/main:[--thread-content-margin:var(--thread-content-margin-sm,calc(var(--spacing)*6))] @w-lg/main:[--thread-content-margin:var(--thread-content-margin-lg,calc(var(--spacing)*16))] px-(--thread-content-margin)"><div class="[--thread-content-max-width:40rem] @w-lg/main:[--thread-content-max-width:48rem] mx-auto max-w-(--thread-content-max-width) flex-1 group/turn-messages focus-visible:outline-hidden relative flex w-full min-w-0 flex-col agent-turn"><div class="flex max-w-full flex-col gap-4 grow"><div class="min-h-8 text-message relative flex w-full flex-col items-end gap-2 text-start break-words whitespace-normal outline-none keyboard-focused:focus-ring [.text-message+&]:mt-1" data-message-author-role="assistant" data-message-id="9a931f8e-40ef-47b5-8ef0-eeaddd67becb" data-message-model-slug="gpt-5-3" dir="auto"><div class="flex w-full flex-col gap-1 empty:hidden"><div class="markdown prose dark:prose-invert w-full wrap-break-word dark markdown-new-styling">---

</div></div></div></div></div></div>#### ✔️ Opção 2 — Usar criptografia

<div class="text-base my-auto mx-auto [--thread-content-margin:var(--thread-content-margin-xs,calc(var(--spacing)*4))] @w-sm/main:[--thread-content-margin:var(--thread-content-margin-sm,calc(var(--spacing)*6))] @w-lg/main:[--thread-content-margin:var(--thread-content-margin-lg,calc(var(--spacing)*16))] px-(--thread-content-margin)"><div class="[--thread-content-max-width:40rem] @w-lg/main:[--thread-content-max-width:48rem] mx-auto max-w-(--thread-content-max-width) flex-1 group/turn-messages focus-visible:outline-hidden relative flex w-full min-w-0 flex-col agent-turn"><div class="flex max-w-full flex-col gap-4 grow"><div class="min-h-8 text-message relative flex w-full flex-col items-end gap-2 text-start break-words whitespace-normal outline-none keyboard-focused:focus-ring [.text-message+&]:mt-1" data-message-author-role="assistant" data-message-id="9a931f8e-40ef-47b5-8ef0-eeaddd67becb" data-message-model-slug="gpt-5-3" dir="auto"><div class="flex w-full flex-col gap-1 empty:hidden"><div class="markdown prose dark:prose-invert w-full wrap-break-word dark markdown-new-styling">- Usar LDAP/AD direto no Nextcloud
- Não usar SSO via OIDC/SAML

---

</div></div></div></div></div></div>#### ✔️ Opção 3 — Alternativa moderna

<div class="text-base my-auto mx-auto [--thread-content-margin:var(--thread-content-margin-xs,calc(var(--spacing)*4))] @w-sm/main:[--thread-content-margin:var(--thread-content-margin-sm,calc(var(--spacing)*6))] @w-lg/main:[--thread-content-margin:var(--thread-content-margin-lg,calc(var(--spacing)*16))] px-(--thread-content-margin)"><div class="[--thread-content-max-width:40rem] @w-lg/main:[--thread-content-max-width:48rem] mx-auto max-w-(--thread-content-max-width) flex-1 group/turn-messages focus-visible:outline-hidden relative flex w-full min-w-0 flex-col agent-turn"><div class="flex max-w-full flex-col gap-4 grow"><div class="min-h-8 text-message relative flex w-full flex-col items-end gap-2 text-start break-words whitespace-normal outline-none keyboard-focused:focus-ring [.text-message+&]:mt-1" data-message-author-role="assistant" data-message-id="9a931f8e-40ef-47b5-8ef0-eeaddd67becb" data-message-model-slug="gpt-5-3" dir="auto"><div class="flex w-full flex-col gap-1 empty:hidden"><div class="markdown prose dark:prose-invert w-full wrap-break-word dark markdown-new-styling">- Não usar criptografia do Nextcloud
- Usar: 
    - criptografia no disco (LUKS, ZFS, etc.)
    - criptografia no storage

</div></div></div></div></div></div>👉 mais seguro e sem esse problema

<div class="text-base my-auto mx-auto [--thread-content-margin:var(--thread-content-margin-xs,calc(var(--spacing)*4))] @w-sm/main:[--thread-content-margin:var(--thread-content-margin-sm,calc(var(--spacing)*6))] @w-lg/main:[--thread-content-margin:var(--thread-content-margin-lg,calc(var(--spacing)*16))] px-(--thread-content-margin)"><div class="[--thread-content-max-width:40rem] @w-lg/main:[--thread-content-max-width:48rem] mx-auto max-w-(--thread-content-max-width) flex-1 group/turn-messages focus-visible:outline-hidden relative flex w-full min-w-0 flex-col agent-turn"><div class="flex max-w-full flex-col gap-4 grow"><div class="min-h-8 text-message relative flex w-full flex-col items-end gap-2 text-start break-words whitespace-normal outline-none keyboard-focused:focus-ring [.text-message+&]:mt-1" data-message-author-role="assistant" data-message-id="9a931f8e-40ef-47b5-8ef0-eeaddd67becb" data-message-model-slug="gpt-5-3" dir="auto"><div class="flex w-full flex-col gap-1 empty:hidden"><div class="markdown prose dark:prose-invert w-full wrap-break-word dark markdown-new-styling">---

</div></div></div></div></div></div>#### 🧠 Insight importante

A criptografia do Nextcloud:

<div class="text-base my-auto mx-auto [--thread-content-margin:var(--thread-content-margin-xs,calc(var(--spacing)*4))] @w-sm/main:[--thread-content-margin:var(--thread-content-margin-sm,calc(var(--spacing)*6))] @w-lg/main:[--thread-content-margin:var(--thread-content-margin-lg,calc(var(--spacing)*16))] px-(--thread-content-margin)"><div class="[--thread-content-max-width:40rem] @w-lg/main:[--thread-content-max-width:48rem] mx-auto max-w-(--thread-content-max-width) flex-1 group/turn-messages focus-visible:outline-hidden relative flex w-full min-w-0 flex-col agent-turn"><div class="flex max-w-full flex-col gap-4 grow"><div class="min-h-8 text-message relative flex w-full flex-col items-end gap-2 text-start break-words whitespace-normal outline-none keyboard-focused:focus-ring [.text-message+&]:mt-1" data-message-author-role="assistant" data-message-id="9a931f8e-40ef-47b5-8ef0-eeaddd67becb" data-message-model-slug="gpt-5-3" dir="auto"><div class="flex w-full flex-col gap-1 empty:hidden"><div class="markdown prose dark:prose-invert w-full wrap-break-word dark markdown-new-styling">- é considerada **limitada**
- não é “zero-knowledge”
- depende da senha do usuário

---

</div></div></div></div></div></div>#### 🔚 Conclusão

O aviso basicamente diz:

👉 **Se você usar Authentik com OpenID ou SAML, NÃO ative a criptografia do Nextcloud, ou você pode perder seus dados.**

<div class="text-base my-auto mx-auto [--thread-content-margin:var(--thread-content-margin-xs,calc(var(--spacing)*4))] @w-sm/main:[--thread-content-margin:var(--thread-content-margin-sm,calc(var(--spacing)*6))] @w-lg/main:[--thread-content-margin:var(--thread-content-margin-lg,calc(var(--spacing)*16))] px-(--thread-content-margin)"><div class="[--thread-content-max-width:40rem] @w-lg/main:[--thread-content-max-width:48rem] mx-auto max-w-(--thread-content-max-width) flex-1 group/turn-messages focus-visible:outline-hidden relative flex w-full min-w-0 flex-col agent-turn"><div class="flex max-w-full flex-col gap-4 grow"><div class="min-h-8 text-message relative flex w-full flex-col items-end gap-2 text-start break-words whitespace-normal outline-none keyboard-focused:focus-ring [.text-message+&]:mt-1" data-message-author-role="assistant" data-message-id="9a931f8e-40ef-47b5-8ef0-eeaddd67becb" data-message-model-slug="gpt-5-3" dir="auto"><div class="flex w-full flex-col gap-1 empty:hidden"><div class="markdown prose dark:prose-invert w-full wrap-break-word dark markdown-new-styling">---

</div></div></div></div></div></div>Se quiser, posso te orientar na melhor arquitetura:

<div class="text-base my-auto mx-auto [--thread-content-margin:var(--thread-content-margin-xs,calc(var(--spacing)*4))] @w-sm/main:[--thread-content-margin:var(--thread-content-margin-sm,calc(var(--spacing)*6))] @w-lg/main:[--thread-content-margin:var(--thread-content-margin-lg,calc(var(--spacing)*16))] px-(--thread-content-margin)"><div class="[--thread-content-max-width:40rem] @w-lg/main:[--thread-content-max-width:48rem] mx-auto max-w-(--thread-content-max-width) flex-1 group/turn-messages focus-visible:outline-hidden relative flex w-full min-w-0 flex-col agent-turn"><div class="flex max-w-full flex-col gap-4 grow"><div class="min-h-8 text-message relative flex w-full flex-col items-end gap-2 text-start break-words whitespace-normal outline-none keyboard-focused:focus-ring [.text-message+&]:mt-1" data-message-author-role="assistant" data-message-id="9a931f8e-40ef-47b5-8ef0-eeaddd67becb" data-message-model-slug="gpt-5-3" dir="auto"><div class="flex w-full flex-col gap-1 empty:hidden"><div class="markdown prose dark:prose-invert w-full wrap-break-word dark markdown-new-styling">- Authentik + Nextcloud seguro ✅
- com SSO funcionando
- sem risco de perda de dados

</div></div></div></div></div></div>Só me diz como você pretende usar 👍

</section><section class="text-token-text-primary w-full focus:outline-none [--shadow-height:45px] has-data-writing-block:pointer-events-none has-data-writing-block:-mt-(--shadow-height) has-data-writing-block:pt-(--shadow-height) [&:has([data-writing-block])>*]:pointer-events-auto scroll-mt-(--header-height)" data-scroll-anchor="false" data-testid="conversation-turn-9" data-turn="user" data-turn-id="c8382c65-52d7-4ae7-8d60-fa27f201415e" dir="auto" id="bkmrk-authentik-com-nextcl"><div class="text-base my-auto mx-auto pt-12 [--thread-content-margin:var(--thread-content-margin-xs,calc(var(--spacing)*4))] @w-sm/main:[--thread-content-margin:var(--thread-content-margin-sm,calc(var(--spacing)*6))] @w-lg/main:[--thread-content-margin:var(--thread-content-margin-lg,calc(var(--spacing)*16))] px-(--thread-content-margin)"><div class="[--thread-content-max-width:40rem] @w-lg/main:[--thread-content-max-width:48rem] mx-auto max-w-(--thread-content-max-width) flex-1 group/turn-messages focus-visible:outline-hidden relative flex w-full min-w-0 flex-col"><div class="flex max-w-full flex-col gap-4 grow"><div class="min-h-8 text-message relative flex w-full flex-col items-end gap-2 text-start break-words whitespace-normal outline-none keyboard-focused:focus-ring [.text-message+&]:mt-1" data-message-author-role="user" data-message-id="c8382c65-52d7-4ae7-8d60-fa27f201415e" dir="auto"><div class="flex w-full flex-col gap-1 empty:hidden items-end rtl:items-start"><div class="user-message-bubble-color corner-superellipse/0.98 relative rounded-[22px] px-4 py-2.5 leading-6 max-w-(--user-chat-width,70%)"><div class="whitespace-pre-wrap">Authentik com Nextcloud seguro</div></div></div></div></div><div class="z-0 flex justify-end">  
</div></div></div></section><section class="text-token-text-primary w-full focus:outline-none [--shadow-height:45px] has-data-writing-block:pointer-events-none has-data-writing-block:-mt-(--shadow-height) has-data-writing-block:pt-(--shadow-height) [&:has([data-writing-block])>*]:pointer-events-auto scroll-mt-[calc(var(--header-height)+min(200px,max(70px,20svh)))]" data-scroll-anchor="true" data-testid="conversation-turn-10" data-turn="assistant" data-turn-id="request-WEB:dcc01d79-47e4-481d-bf57-8049f5d84f4d-4" dir="auto" id="bkmrk-perfeito-%E2%80%94-d%C3%A1-pra-mo">Perfeito — dá pra montar uma integração **segura e moderna** entre <span class="hover:entity-accent entity-underline inline cursor-pointer align-baseline"><span class="whitespace-normal">Authentik</span></span> e <span class="hover:entity-accent entity-underline inline cursor-pointer align-baseline"><span class="whitespace-normal">Nextcloud</span></span> sem cair naquele problema da criptografia.

Vou te passar o **modelo recomendado hoje (produção)** 👇

<div class="text-base my-auto mx-auto pb-10 [--thread-content-margin:var(--thread-content-margin-xs,calc(var(--spacing)*4))] @w-sm/main:[--thread-content-margin:var(--thread-content-margin-sm,calc(var(--spacing)*6))] @w-lg/main:[--thread-content-margin:var(--thread-content-margin-lg,calc(var(--spacing)*16))] px-(--thread-content-margin)" style="text-align: justify;"><div class="[--thread-content-max-width:40rem] @w-lg/main:[--thread-content-max-width:48rem] mx-auto max-w-(--thread-content-max-width) flex-1 group/turn-messages focus-visible:outline-hidden relative flex w-full min-w-0 flex-col agent-turn"><div class="flex max-w-full flex-col gap-4 grow"><div class="min-h-8 text-message relative flex w-full flex-col items-end gap-2 text-start break-words whitespace-normal outline-none keyboard-focused:focus-ring [.text-message+&]:mt-1" data-message-author-role="assistant" data-message-id="1583bfeb-a60f-4524-98e2-52ed97813551" data-message-model-slug="gpt-5-3" data-turn-start-message="true" dir="auto" tabindex="0"><div class="flex w-full flex-col gap-1 empty:hidden"><div class="markdown prose dark:prose-invert w-full wrap-break-word dark markdown-new-styling">---

</div></div></div></div></div></div>#### 🧠 Arquitetura segura (recomendada)

#### 🔐 Autenticação

<div class="text-base my-auto mx-auto pb-10 [--thread-content-margin:var(--thread-content-margin-xs,calc(var(--spacing)*4))] @w-sm/main:[--thread-content-margin:var(--thread-content-margin-sm,calc(var(--spacing)*6))] @w-lg/main:[--thread-content-margin:var(--thread-content-margin-lg,calc(var(--spacing)*16))] px-(--thread-content-margin)" style="text-align: justify;"><div class="[--thread-content-max-width:40rem] @w-lg/main:[--thread-content-max-width:48rem] mx-auto max-w-(--thread-content-max-width) flex-1 group/turn-messages focus-visible:outline-hidden relative flex w-full min-w-0 flex-col agent-turn"><div class="flex max-w-full flex-col gap-4 grow"><div class="min-h-8 text-message relative flex w-full flex-col items-end gap-2 text-start break-words whitespace-normal outline-none keyboard-focused:focus-ring [.text-message+&]:mt-1" data-message-author-role="assistant" data-message-id="1583bfeb-a60f-4524-98e2-52ed97813551" data-message-model-slug="gpt-5-3" data-turn-start-message="true" dir="auto" tabindex="0"><div class="flex w-full flex-col gap-1 empty:hidden"><div class="markdown prose dark:prose-invert w-full wrap-break-word dark markdown-new-styling">- Authentik → **OpenID Connect (OIDC)**
- Nextcloud → login via SSO

---

</div></div></div></div></div></div>#### 🔒 Criptografia (IMPORTANTE)

❌ **NÃO usar**:

<div class="text-base my-auto mx-auto pb-10 [--thread-content-margin:var(--thread-content-margin-xs,calc(var(--spacing)*4))] @w-sm/main:[--thread-content-margin:var(--thread-content-margin-sm,calc(var(--spacing)*6))] @w-lg/main:[--thread-content-margin:var(--thread-content-margin-lg,calc(var(--spacing)*16))] px-(--thread-content-margin)" style="text-align: justify;"><div class="[--thread-content-max-width:40rem] @w-lg/main:[--thread-content-max-width:48rem] mx-auto max-w-(--thread-content-max-width) flex-1 group/turn-messages focus-visible:outline-hidden relative flex w-full min-w-0 flex-col agent-turn"><div class="flex max-w-full flex-col gap-4 grow"><div class="min-h-8 text-message relative flex w-full flex-col items-end gap-2 text-start break-words whitespace-normal outline-none keyboard-focused:focus-ring [.text-message+&]:mt-1" data-message-author-role="assistant" data-message-id="1583bfeb-a60f-4524-98e2-52ed97813551" data-message-model-slug="gpt-5-3" data-turn-start-message="true" dir="auto" tabindex="0"><div class="flex w-full flex-col gap-1 empty:hidden"><div class="markdown prose dark:prose-invert w-full wrap-break-word dark markdown-new-styling">- criptografia do lado do servidor do Nextcloud

</div></div></div></div></div></div>✅ **Usar no lugar**:

<div class="text-base my-auto mx-auto pb-10 [--thread-content-margin:var(--thread-content-margin-xs,calc(var(--spacing)*4))] @w-sm/main:[--thread-content-margin:var(--thread-content-margin-sm,calc(var(--spacing)*6))] @w-lg/main:[--thread-content-margin:var(--thread-content-margin-lg,calc(var(--spacing)*16))] px-(--thread-content-margin)" style="text-align: justify;"><div class="[--thread-content-max-width:40rem] @w-lg/main:[--thread-content-max-width:48rem] mx-auto max-w-(--thread-content-max-width) flex-1 group/turn-messages focus-visible:outline-hidden relative flex w-full min-w-0 flex-col agent-turn"><div class="flex max-w-full flex-col gap-4 grow"><div class="min-h-8 text-message relative flex w-full flex-col items-end gap-2 text-start break-words whitespace-normal outline-none keyboard-focused:focus-ring [.text-message+&]:mt-1" data-message-author-role="assistant" data-message-id="1583bfeb-a60f-4524-98e2-52ed97813551" data-message-model-slug="gpt-5-3" data-turn-start-message="true" dir="auto" tabindex="0"><div class="flex w-full flex-col gap-1 empty:hidden"><div class="markdown prose dark:prose-invert w-full wrap-break-word dark markdown-new-styling">- criptografia de disco: 
    - LUKS (Linux)
    - ZFS encryption
- ou criptografia no storage (cloud, NAS, etc.)

---

</div></div></div></div></div></div>#### 🧩 Componentes

<div class="text-base my-auto mx-auto pb-10 [--thread-content-margin:var(--thread-content-margin-xs,calc(var(--spacing)*4))] @w-sm/main:[--thread-content-margin:var(--thread-content-margin-sm,calc(var(--spacing)*6))] @w-lg/main:[--thread-content-margin:var(--thread-content-margin-lg,calc(var(--spacing)*16))] px-(--thread-content-margin)" style="text-align: justify;"><div class="[--thread-content-max-width:40rem] @w-lg/main:[--thread-content-max-width:48rem] mx-auto max-w-(--thread-content-max-width) flex-1 group/turn-messages focus-visible:outline-hidden relative flex w-full min-w-0 flex-col agent-turn"><div class="flex max-w-full flex-col gap-4 grow"><div class="min-h-8 text-message relative flex w-full flex-col items-end gap-2 text-start break-words whitespace-normal outline-none keyboard-focused:focus-ring [.text-message+&]:mt-1" data-message-author-role="assistant" data-message-id="1583bfeb-a60f-4524-98e2-52ed97813551" data-message-model-slug="gpt-5-3" data-turn-start-message="true" dir="auto" tabindex="0"><div class="flex w-full flex-col gap-1 empty:hidden"><div class="markdown prose dark:prose-invert w-full wrap-break-word dark markdown-new-styling">- Nextcloud
- Authentik (IdP)
- <span class="hover:entity-accent entity-underline inline cursor-pointer align-baseline"><span class="whitespace-normal">PostgreSQL</span></span> (recomendado para ambos)
- <span class="hover:entity-accent entity-underline inline cursor-pointer align-baseline"><span class="whitespace-normal">Redis</span></span> (performance)
- Reverse proxy (Traefik ou Nginx)

---

</div></div></div></div></div></div>#### 🔐 Fluxo de login

<div class="text-base my-auto mx-auto pb-10 [--thread-content-margin:var(--thread-content-margin-xs,calc(var(--spacing)*4))] @w-sm/main:[--thread-content-margin:var(--thread-content-margin-sm,calc(var(--spacing)*6))] @w-lg/main:[--thread-content-margin:var(--thread-content-margin-lg,calc(var(--spacing)*16))] px-(--thread-content-margin)" style="text-align: justify;"><div class="[--thread-content-max-width:40rem] @w-lg/main:[--thread-content-max-width:48rem] mx-auto max-w-(--thread-content-max-width) flex-1 group/turn-messages focus-visible:outline-hidden relative flex w-full min-w-0 flex-col agent-turn"><div class="flex max-w-full flex-col gap-4 grow"><div class="min-h-8 text-message relative flex w-full flex-col items-end gap-2 text-start break-words whitespace-normal outline-none keyboard-focused:focus-ring [.text-message+&]:mt-1" data-message-author-role="assistant" data-message-id="1583bfeb-a60f-4524-98e2-52ed97813551" data-message-model-slug="gpt-5-3" data-turn-start-message="true" dir="auto" tabindex="0"><div class="flex w-full flex-col gap-1 empty:hidden"><div class="markdown prose dark:prose-invert w-full wrap-break-word dark markdown-new-styling">1. Usuário acessa Nextcloud
2. Redireciona para Authentik
3. Login no Authentik
4. Volta autenticado via token (OIDC)

</div></div></div></div></div></div>👉 senha nunca passa pelo Nextcloud (isso é bom)

<div class="text-base my-auto mx-auto pb-10 [--thread-content-margin:var(--thread-content-margin-xs,calc(var(--spacing)*4))] @w-sm/main:[--thread-content-margin:var(--thread-content-margin-sm,calc(var(--spacing)*6))] @w-lg/main:[--thread-content-margin:var(--thread-content-margin-lg,calc(var(--spacing)*16))] px-(--thread-content-margin)" style="text-align: justify;"><div class="[--thread-content-max-width:40rem] @w-lg/main:[--thread-content-max-width:48rem] mx-auto max-w-(--thread-content-max-width) flex-1 group/turn-messages focus-visible:outline-hidden relative flex w-full min-w-0 flex-col agent-turn"><div class="flex max-w-full flex-col gap-4 grow"><div class="min-h-8 text-message relative flex w-full flex-col items-end gap-2 text-start break-words whitespace-normal outline-none keyboard-focused:focus-ring [.text-message+&]:mt-1" data-message-author-role="assistant" data-message-id="1583bfeb-a60f-4524-98e2-52ed97813551" data-message-model-slug="gpt-5-3" data-turn-start-message="true" dir="auto" tabindex="0"><div class="flex w-full flex-col gap-1 empty:hidden"><div class="markdown prose dark:prose-invert w-full wrap-break-word dark markdown-new-styling">---

</div></div></div></div></div></div>#### ⚙️ Configuração resumida

#### 1. No Authentik

Criar:

<div class="text-base my-auto mx-auto pb-10 [--thread-content-margin:var(--thread-content-margin-xs,calc(var(--spacing)*4))] @w-sm/main:[--thread-content-margin:var(--thread-content-margin-sm,calc(var(--spacing)*6))] @w-lg/main:[--thread-content-margin:var(--thread-content-margin-lg,calc(var(--spacing)*16))] px-(--thread-content-margin)" style="text-align: justify;"><div class="[--thread-content-max-width:40rem] @w-lg/main:[--thread-content-max-width:48rem] mx-auto max-w-(--thread-content-max-width) flex-1 group/turn-messages focus-visible:outline-hidden relative flex w-full min-w-0 flex-col agent-turn"><div class="flex max-w-full flex-col gap-4 grow"><div class="min-h-8 text-message relative flex w-full flex-col items-end gap-2 text-start break-words whitespace-normal outline-none keyboard-focused:focus-ring [.text-message+&]:mt-1" data-message-author-role="assistant" data-message-id="1583bfeb-a60f-4524-98e2-52ed97813551" data-message-model-slug="gpt-5-3" data-turn-start-message="true" dir="auto" tabindex="0"><div class="flex w-full flex-col gap-1 empty:hidden"><div class="markdown prose dark:prose-invert w-full wrap-break-word dark markdown-new-styling">- **Application**
- **Provider → OpenID Connect**

</div></div></div></div></div></div>Configurar:

<div class="text-base my-auto mx-auto pb-10 [--thread-content-margin:var(--thread-content-margin-xs,calc(var(--spacing)*4))] @w-sm/main:[--thread-content-margin:var(--thread-content-margin-sm,calc(var(--spacing)*6))] @w-lg/main:[--thread-content-margin:var(--thread-content-margin-lg,calc(var(--spacing)*16))] px-(--thread-content-margin)" style="text-align: justify;"><div class="[--thread-content-max-width:40rem] @w-lg/main:[--thread-content-max-width:48rem] mx-auto max-w-(--thread-content-max-width) flex-1 group/turn-messages focus-visible:outline-hidden relative flex w-full min-w-0 flex-col agent-turn"><div class="flex max-w-full flex-col gap-4 grow"><div class="min-h-8 text-message relative flex w-full flex-col items-end gap-2 text-start break-words whitespace-normal outline-none keyboard-focused:focus-ring [.text-message+&]:mt-1" data-message-author-role="assistant" data-message-id="1583bfeb-a60f-4524-98e2-52ed97813551" data-message-model-slug="gpt-5-3" data-turn-start-message="true" dir="auto" tabindex="0"><div class="flex w-full flex-col gap-1 empty:hidden"><div class="markdown prose dark:prose-invert w-full wrap-break-word dark markdown-new-styling">- Redirect URI:

<div class="relative w-full mt-4 mb-1"><div class=""><div class="relative"><div class="h-full min-h-0 min-w-0"><div class="h-full min-h-0 min-w-0"><div class="border border-token-border-light border-radius-3xl corner-superellipse/1.1 rounded-3xl"><div class="h-full w-full border-radius-3xl bg-token-bg-elevated-secondary corner-superellipse/1.1 overflow-clip rounded-3xl lxnfua_clipPathFallback"><div class="w-full overflow-x-hidden overflow-y-auto pe-11 pt-3"><div class="relative z-0 flex max-w-full"><div class="q9tKkq_viewer cm-editor z-10 light:cm-light dark:cm-light flex h-full w-full flex-col items-stretch ͼk ͼy" dir="ltr" id="bkmrk-https%3A%2F%2Fcloud.seudom"><div class="cm-scroller"><div class="cm-content q9tKkq_readonly">https://cloud.seudominio.com/apps/user_oidc/code</div></div></div></div></div></div></div></div></div><div class=""></div></div></div></div></div></div></div></div></div></div>Scopes:

<div class="text-base my-auto mx-auto pb-10 [--thread-content-margin:var(--thread-content-margin-xs,calc(var(--spacing)*4))] @w-sm/main:[--thread-content-margin:var(--thread-content-margin-sm,calc(var(--spacing)*6))] @w-lg/main:[--thread-content-margin:var(--thread-content-margin-lg,calc(var(--spacing)*16))] px-(--thread-content-margin)" style="text-align: justify;"><div class="[--thread-content-max-width:40rem] @w-lg/main:[--thread-content-max-width:48rem] mx-auto max-w-(--thread-content-max-width) flex-1 group/turn-messages focus-visible:outline-hidden relative flex w-full min-w-0 flex-col agent-turn"><div class="flex max-w-full flex-col gap-4 grow"><div class="min-h-8 text-message relative flex w-full flex-col items-end gap-2 text-start break-words whitespace-normal outline-none keyboard-focused:focus-ring [.text-message+&]:mt-1" data-message-author-role="assistant" data-message-id="1583bfeb-a60f-4524-98e2-52ed97813551" data-message-model-slug="gpt-5-3" data-turn-start-message="true" dir="auto" tabindex="0"><div class="flex w-full flex-col gap-1 empty:hidden"><div class="markdown prose dark:prose-invert w-full wrap-break-word dark markdown-new-styling"><div class="relative w-full mt-4 mb-1"><div class=""><div class="relative"><div class="h-full min-h-0 min-w-0"><div class="h-full min-h-0 min-w-0"><div class="border border-token-border-light border-radius-3xl corner-superellipse/1.1 rounded-3xl"><div class="h-full w-full border-radius-3xl bg-token-bg-elevated-secondary corner-superellipse/1.1 overflow-clip rounded-3xl lxnfua_clipPathFallback"><div class="w-full overflow-x-hidden overflow-y-auto pe-11 pt-3"><div class="relative z-0 flex max-w-full"><div class="q9tKkq_viewer cm-editor z-10 light:cm-light dark:cm-light flex h-full w-full flex-col items-stretch ͼk ͼy" dir="ltr" id="bkmrk-openid-profile-email"><div class="cm-scroller"><div class="cm-content q9tKkq_readonly">openid profile email</div></div></div></div></div></div></div></div></div><div class=""><div class="">  
</div></div></div></div></div>---

</div></div></div></div></div></div>#### 2. No Nextcloud

Instalar app:

<div class="text-base my-auto mx-auto pb-10 [--thread-content-margin:var(--thread-content-margin-xs,calc(var(--spacing)*4))] @w-sm/main:[--thread-content-margin:var(--thread-content-margin-sm,calc(var(--spacing)*6))] @w-lg/main:[--thread-content-margin:var(--thread-content-margin-lg,calc(var(--spacing)*16))] px-(--thread-content-margin)" style="text-align: justify;"><div class="[--thread-content-max-width:40rem] @w-lg/main:[--thread-content-max-width:48rem] mx-auto max-w-(--thread-content-max-width) flex-1 group/turn-messages focus-visible:outline-hidden relative flex w-full min-w-0 flex-col agent-turn"><div class="flex max-w-full flex-col gap-4 grow"><div class="min-h-8 text-message relative flex w-full flex-col items-end gap-2 text-start break-words whitespace-normal outline-none keyboard-focused:focus-ring [.text-message+&]:mt-1" data-message-author-role="assistant" data-message-id="1583bfeb-a60f-4524-98e2-52ed97813551" data-message-model-slug="gpt-5-3" data-turn-start-message="true" dir="auto" tabindex="0"><div class="flex w-full flex-col gap-1 empty:hidden"><div class="markdown prose dark:prose-invert w-full wrap-break-word dark markdown-new-styling">- **"OpenID Connect Login"**

</div></div></div></div></div></div>Configurar algo assim:

<div class="text-base my-auto mx-auto pb-10 [--thread-content-margin:var(--thread-content-margin-xs,calc(var(--spacing)*4))] @w-sm/main:[--thread-content-margin:var(--thread-content-margin-sm,calc(var(--spacing)*6))] @w-lg/main:[--thread-content-margin:var(--thread-content-margin-lg,calc(var(--spacing)*16))] px-(--thread-content-margin)" style="text-align: justify;"><div class="[--thread-content-max-width:40rem] @w-lg/main:[--thread-content-max-width:48rem] mx-auto max-w-(--thread-content-max-width) flex-1 group/turn-messages focus-visible:outline-hidden relative flex w-full min-w-0 flex-col agent-turn"><div class="flex max-w-full flex-col gap-4 grow"><div class="min-h-8 text-message relative flex w-full flex-col items-end gap-2 text-start break-words whitespace-normal outline-none keyboard-focused:focus-ring [.text-message+&]:mt-1" data-message-author-role="assistant" data-message-id="1583bfeb-a60f-4524-98e2-52ed97813551" data-message-model-slug="gpt-5-3" data-turn-start-message="true" dir="auto" tabindex="0"><div class="flex w-full flex-col gap-1 empty:hidden"><div class="markdown prose dark:prose-invert w-full wrap-break-word dark markdown-new-styling"><div class="relative w-full mt-4 mb-1"><div class=""><div class="relative"><div class="h-full min-h-0 min-w-0"><div class="h-full min-h-0 min-w-0"><div class="border border-token-border-light border-radius-3xl corner-superellipse/1.1 rounded-3xl"><div class="h-full w-full border-radius-3xl bg-token-bg-elevated-secondary corner-superellipse/1.1 overflow-clip rounded-3xl lxnfua_clipPathFallback"><div class="w-full overflow-x-hidden overflow-y-auto"><div class="relative z-0 flex max-w-full"><div class="q9tKkq_viewer cm-editor z-10 light:cm-light dark:cm-light flex h-full w-full flex-col items-stretch ͼk ͼy" dir="ltr" id="bkmrk-%27oidc_login_provider"><div class="cm-scroller"><div class="cm-content q9tKkq_readonly">'oidc_login_provider_url' =&gt; 'https://auth.seudominio.com/application/o/',  
'oidc_login_client_id' =&gt; 'nextcloud',  
'oidc_login_client_secret' =&gt; 'SECRET',  
'oidc_login_auto_redirect' =&gt; true,  
'oidc_login_end_session_redirect' =&gt; true,  
'oidc_login_button_text' =&gt; 'Login com SSO',  
'oidc_login_attributes' =&gt; [  
'id' =&gt; 'sub',  
'name' =&gt; 'name',  
'mail' =&gt; 'email',  
],</div></div></div></div></div></div></div></div></div><div class=""><div class="">  
</div></div></div></div></div>---

</div></div></div></div></div></div>#### 🛡️ Hardening (segurança de verdade)

#### ✅ No Authentik

<div class="text-base my-auto mx-auto pb-10 [--thread-content-margin:var(--thread-content-margin-xs,calc(var(--spacing)*4))] @w-sm/main:[--thread-content-margin:var(--thread-content-margin-sm,calc(var(--spacing)*6))] @w-lg/main:[--thread-content-margin:var(--thread-content-margin-lg,calc(var(--spacing)*16))] px-(--thread-content-margin)" style="text-align: justify;"><div class="[--thread-content-max-width:40rem] @w-lg/main:[--thread-content-max-width:48rem] mx-auto max-w-(--thread-content-max-width) flex-1 group/turn-messages focus-visible:outline-hidden relative flex w-full min-w-0 flex-col agent-turn"><div class="flex max-w-full flex-col gap-4 grow"><div class="min-h-8 text-message relative flex w-full flex-col items-end gap-2 text-start break-words whitespace-normal outline-none keyboard-focused:focus-ring [.text-message+&]:mt-1" data-message-author-role="assistant" data-message-id="1583bfeb-a60f-4524-98e2-52ed97813551" data-message-model-slug="gpt-5-3" data-turn-start-message="true" dir="auto" tabindex="0"><div class="flex w-full flex-col gap-1 empty:hidden"><div class="markdown prose dark:prose-invert w-full wrap-break-word dark markdown-new-styling">- ativar MFA (2FA)
- políticas de senha forte
- limitar tentativas de login

---

</div></div></div></div></div></div>#### ✅ No Nextcloud

<div class="text-base my-auto mx-auto pb-10 [--thread-content-margin:var(--thread-content-margin-xs,calc(var(--spacing)*4))] @w-sm/main:[--thread-content-margin:var(--thread-content-margin-sm,calc(var(--spacing)*6))] @w-lg/main:[--thread-content-margin:var(--thread-content-margin-lg,calc(var(--spacing)*16))] px-(--thread-content-margin)" style="text-align: justify;"><div class="[--thread-content-max-width:40rem] @w-lg/main:[--thread-content-max-width:48rem] mx-auto max-w-(--thread-content-max-width) flex-1 group/turn-messages focus-visible:outline-hidden relative flex w-full min-w-0 flex-col agent-turn"><div class="flex max-w-full flex-col gap-4 grow"><div class="min-h-8 text-message relative flex w-full flex-col items-end gap-2 text-start break-words whitespace-normal outline-none keyboard-focused:focus-ring [.text-message+&]:mt-1" data-message-author-role="assistant" data-message-id="1583bfeb-a60f-4524-98e2-52ed97813551" data-message-model-slug="gpt-5-3" data-turn-start-message="true" dir="auto" tabindex="0"><div class="flex w-full flex-col gap-1 empty:hidden"><div class="markdown prose dark:prose-invert w-full wrap-break-word dark markdown-new-styling">- HTTPS obrigatório
- headers de segurança
- usar Redis para cache
- usar PostgreSQL (evitar SQLite)

---

</div></div></div></div></div></div>#### ✅ Infraestrutura

<div class="text-base my-auto mx-auto pb-10 [--thread-content-margin:var(--thread-content-margin-xs,calc(var(--spacing)*4))] @w-sm/main:[--thread-content-margin:var(--thread-content-margin-sm,calc(var(--spacing)*6))] @w-lg/main:[--thread-content-margin:var(--thread-content-margin-lg,calc(var(--spacing)*16))] px-(--thread-content-margin)" style="text-align: justify;"><div class="[--thread-content-max-width:40rem] @w-lg/main:[--thread-content-max-width:48rem] mx-auto max-w-(--thread-content-max-width) flex-1 group/turn-messages focus-visible:outline-hidden relative flex w-full min-w-0 flex-col agent-turn"><div class="flex max-w-full flex-col gap-4 grow"><div class="min-h-8 text-message relative flex w-full flex-col items-end gap-2 text-start break-words whitespace-normal outline-none keyboard-focused:focus-ring [.text-message+&]:mt-1" data-message-author-role="assistant" data-message-id="1583bfeb-a60f-4524-98e2-52ed97813551" data-message-model-slug="gpt-5-3" data-turn-start-message="true" dir="auto" tabindex="0"><div class="flex w-full flex-col gap-1 empty:hidden"><div class="markdown prose dark:prose-invert w-full wrap-break-word dark markdown-new-styling">- backup frequente
- snapshots
- firewall (ex: só portas 80/443 abertas)

---

</div></div></div></div></div></div>#### ⚠️ Coisas que você NÃO deve fazer

❌ Ativar:

<div class="text-base my-auto mx-auto pb-10 [--thread-content-margin:var(--thread-content-margin-xs,calc(var(--spacing)*4))] @w-sm/main:[--thread-content-margin:var(--thread-content-margin-sm,calc(var(--spacing)*6))] @w-lg/main:[--thread-content-margin:var(--thread-content-margin-lg,calc(var(--spacing)*16))] px-(--thread-content-margin)" style="text-align: justify;"><div class="[--thread-content-max-width:40rem] @w-lg/main:[--thread-content-max-width:48rem] mx-auto max-w-(--thread-content-max-width) flex-1 group/turn-messages focus-visible:outline-hidden relative flex w-full min-w-0 flex-col agent-turn"><div class="flex max-w-full flex-col gap-4 grow"><div class="min-h-8 text-message relative flex w-full flex-col items-end gap-2 text-start break-words whitespace-normal outline-none keyboard-focused:focus-ring [.text-message+&]:mt-1" data-message-author-role="assistant" data-message-id="1583bfeb-a60f-4524-98e2-52ed97813551" data-message-model-slug="gpt-5-3" data-turn-start-message="true" dir="auto" tabindex="0"><div class="flex w-full flex-col gap-1 empty:hidden"><div class="markdown prose dark:prose-invert w-full wrap-break-word dark markdown-new-styling">- Server-Side Encryption do Nextcloud

</div></div></div></div></div></div>❌ Misturar:

<div class="text-base my-auto mx-auto pb-10 [--thread-content-margin:var(--thread-content-margin-xs,calc(var(--spacing)*4))] @w-sm/main:[--thread-content-margin:var(--thread-content-margin-sm,calc(var(--spacing)*6))] @w-lg/main:[--thread-content-margin:var(--thread-content-margin-lg,calc(var(--spacing)*16))] px-(--thread-content-margin)" style="text-align: justify;"><div class="[--thread-content-max-width:40rem] @w-lg/main:[--thread-content-max-width:48rem] mx-auto max-w-(--thread-content-max-width) flex-1 group/turn-messages focus-visible:outline-hidden relative flex w-full min-w-0 flex-col agent-turn"><div class="flex max-w-full flex-col gap-4 grow"><div class="min-h-8 text-message relative flex w-full flex-col items-end gap-2 text-start break-words whitespace-normal outline-none keyboard-focused:focus-ring [.text-message+&]:mt-1" data-message-author-role="assistant" data-message-id="1583bfeb-a60f-4524-98e2-52ed97813551" data-message-model-slug="gpt-5-3" data-turn-start-message="true" dir="auto" tabindex="0"><div class="flex w-full flex-col gap-1 empty:hidden"><div class="markdown prose dark:prose-invert w-full wrap-break-word dark markdown-new-styling">- LDAP + OIDC ao mesmo tempo (gera conflito)

---

</div></div></div></div></div></div>#### 🚀 Extras (opcional, mas top)

<div class="text-base my-auto mx-auto pb-10 [--thread-content-margin:var(--thread-content-margin-xs,calc(var(--spacing)*4))] @w-sm/main:[--thread-content-margin:var(--thread-content-margin-sm,calc(var(--spacing)*6))] @w-lg/main:[--thread-content-margin:var(--thread-content-margin-lg,calc(var(--spacing)*16))] px-(--thread-content-margin)" style="text-align: justify;"><div class="[--thread-content-max-width:40rem] @w-lg/main:[--thread-content-max-width:48rem] mx-auto max-w-(--thread-content-max-width) flex-1 group/turn-messages focus-visible:outline-hidden relative flex w-full min-w-0 flex-col agent-turn"><div class="flex max-w-full flex-col gap-4 grow"><div class="min-h-8 text-message relative flex w-full flex-col items-end gap-2 text-start break-words whitespace-normal outline-none keyboard-focused:focus-ring [.text-message+&]:mt-1" data-message-author-role="assistant" data-message-id="1583bfeb-a60f-4524-98e2-52ed97813551" data-message-model-slug="gpt-5-3" data-turn-start-message="true" dir="auto" tabindex="0"><div class="flex w-full flex-col gap-1 empty:hidden"><div class="markdown prose dark:prose-invert w-full wrap-break-word dark markdown-new-styling">- Provisionamento automático de usuários via Authentik
- Grupos → roles no Nextcloud
- Logout único (Single Logout)

---

</div></div></div></div></div></div>#### 📊 Resumo final

✔️ Authentik + OIDC = melhor UX  
✔️ Sem criptografia interna do Nextcloud  
✔️ Segurança via infra (disco + rede)  
✔️ Escalável e moderno

</section>

# Authentik com SAML - Youtube

Link: [https://www.youtube.com/watch?v=BHtL3Gvn31o](https://www.youtube.com/watch?v=BHtL3Gvn31o)

# Authentik LDAP Provider

**LDAP Provider:** Link: [https://docs.goauthentik.io/add-secure-apps/providers/ldap/](https://docs.goauthentik.io/add-secure-apps/providers/ldap/)

**Create LDAP Provider:** Link: [https://docs.goauthentik.io/add-secure-apps/providers/ldap/create-ldap-provider/](https://docs.goauthentik.io/add-secure-apps/providers/ldap/create-ldap-provider/)

**Outposts:** Link: [https://docs.goauthentik.io/add-secure-apps/outposts/](https://docs.goauthentik.io/add-secure-apps/outposts/)

**Outposts Compose:** link: [https://docs.goauthentik.io/add-secure-apps/outposts/](https://docs.goauthentik.io/add-secure-apps/outposts/)

<div class="theme-doc-markdown markdown" id="bkmrk-create-an-ldap-provi"><header>### Create an LDAP provider

</header></div>Creating an authentik LDAP provider requires the following steps:

<div class="theme-doc-markdown markdown" id="bkmrk-create-an-ldap-authe">1. [Create an LDAP authentication flow *(optional)*](https://docs.goauthentik.io/add-secure-apps/providers/ldap/create-ldap-provider/#create-an-ldap-authentication-flow-optional)
2. [Create an LDAP application and provider](https://docs.goauthentik.io/add-secure-apps/providers/ldap/create-ldap-provider/#create-an-ldap-application-and-provider)
3. [Create a service account and assign the LDAP search permission](https://docs.goauthentik.io/add-secure-apps/providers/ldap/create-ldap-provider/#create-a-service-account)
4. [Create an LDAP Outpost](https://docs.goauthentik.io/add-secure-apps/providers/ldap/create-ldap-provider/#create-an-ldap-outpost)

</div>### Create an LDAP authentication flow *(optional)*

The `default-authentication-flow` validates MFA by default. Duo, TOTP, and static authenticators are supported by the LDAP provider. WebAuthn and SMS are not supported.

If you plan to use only dedicated service accounts to bind to LDAP, or only use LDAP supported MFA authenticators, then you can use the default authentication flow and skip this section and continue with the [Create an LDAP application and provider](https://docs.goauthentik.io/add-secure-apps/providers/ldap/create-ldap-provider/#create-an-ldap-application-and-provider) section.

Refer to [Code-Based MFA support](https://docs.goauthentik.io/add-secure-apps/providers/ldap/#code-based-mfa-support) for more information on LDAP and MFA.

### Create custom stages

You'll need to create the stages that make up the flow.

<div class="theme-doc-markdown markdown" id="bkmrk-log-in-to-authentik-">1. Log in to authentik as an administrator and open the authentik Admin interface.
2. Navigate to **Flows and Stages** &gt; **Stages**, and click **Create**.

</div>#### Password Stage

First, you'll need to create a Password Stage.

<div class="theme-doc-markdown markdown" id="bkmrk-select-password-stag">3. Select **Password Stage** as the stage type, click **Next**, and set the following required configurations: 
    - Provide a **Name** for the stage (e.g. `ldap-authentication-password-stage`).
    - For **Backends**, leave the default settings.
4. Click **Finish**

</div>#### Identification Stage

Next, you'll need to create an Identification Stage.

<div class="theme-doc-markdown markdown" id="bkmrk-on-the-stages-page%2C-">5. On the **Stages** page, click **Create**.
6. Select **Identification Stage** as the stage type, click **Next**, and set the following required configurations: 
    - Provide a **Name** for the stage (e.g. `ldap-identification-stage`).
    - For **User fields**, select `Username` and `Email` (and UPN if it is relevant to your setup).
    - Set **Password stage** to the Password Stage created in the previous section (e.g. `ldap-authentication-password-stage`)
7. Click **Finish**

</div>#### User Login Stage

Finally, you'll need to create a User Login Stage.

<div class="theme-doc-markdown markdown" id="bkmrk-on-the-stages-page%2C--1">8. On the **Stages** page, click **Create**.
9. Select **User Login Stage** as the stage type, click **Next**, and set the following required configurations: 
    - Provide a **Name** for the stage (e.g. `ldap-authentication-login-stage`).
10. Click **Finish**

</div>### Create an LDAP authentication flow

Now you'll need to create the LDAP authentication flow and bind the previously created stages.

<div class="theme-doc-markdown markdown" id="bkmrk-log-in-to-authentik--1">1. Log in to authentik as an administrator and open the authentik Admin interface.
2. Navigate to **Flows and Stages** &gt; **Flows**, click **Create**, and set the following required configurations: 
    - Provide a **Name**, **Title** and **Slug** for the flow (e.g. `ldap-authentication-flow`).
    - Set **Designation** to `Authentication`.
3. Click **Create**.
4. Click the name of the newly created flow, open the **Stage Bindings** tab, and click **Bind existing stage**.
5. Select the previously created LDAP Identification Stage (e.g.`ldap-identification-stage`), set the order to `10`, and click **Create**.
6. Click **Bind existing stage**.
7. Select the previously created LDAP User Login Stage (e.g.`ldap-authentication-login-stage`), set the order to `30`, and click **Create**.

</div>## Create an LDAP application and provider

The LDAP application and provider can now be created.

<div class="theme-doc-markdown markdown" id="bkmrk-log-in-to-authentik--2">1. Log in to authentik as an administrator and open the authentik Admin interface.
2. Navigate to **Applications** &gt; **Applications**, click **Create with Provider** to create an application and provider pair.
3. On the **New application** page, define the application details, and then click **Next**.
4. Select **LDAP Provider** as the **Provider Type**, and then click **Next**.
5. On the **Configure LDAP Provider** page, provide the configuration settings and then click **Submit** to create both the application and the provider.

<div class="theme-admonition theme-admonition-info admonition_WCGJ alert alert--info"><div class="admonitionContent_pbrs">**INFO**</div></div></div>If you followed the optional [Create an LDAP authentication flow](https://docs.goauthentik.io/add-secure-apps/providers/ldap/create-ldap-provider/#create-an-ldap-authentication-flow-optional) section, ensure that you set **Bind flow** to newly created authentication flow (e.g. `ldap-authentication-flow`).

## Create a service account

Create a service account to bind to LDAP with.

<div class="theme-doc-markdown markdown" id="bkmrk-log-in-to-authentik--3">1. Log in to authentik as an administrator and open the authentik Admin interface.
2. Navigate to **Directory** &gt; **Users** and click **New User**.
3. Provide a name for the service account (e.g. `ldapservice`) and click **Create**.
4. Click the name of the newly created service account.
5. Under **Recovery**, click **Set password**, provide a secure password for the account, and click **Update password**.

<div class="theme-admonition theme-admonition-info admonition_WCGJ alert alert--info"><div class="admonitionHeading_GCBg">**Default DN of service account**</div></div></div>The default DN of this user will be `cn=ldapservice,ou=users,dc=ldap,dc=goauthentik,dc=io`

### Assign the LDAP search permission to the service account

The service account needs permissions to search the LDAP directory. You'll need to create a role with the permission and assign the service account to that role.

<div class="theme-doc-markdown markdown" id="bkmrk-log-in-to-authentik--4">1. Log in to authentik as an administrator and open the authentik Admin interface.
2. Navigate to **Directory** &gt; **Roles** and click **Create**.
3. Provide a name for the role (e.g. `LDAP search`) and then click **Create**.
4. Click on the newly created role and open the **Users** tab.
5. Click **Add existing user**, select the service account, and then click **Assign**.
6. Navigate to **Applications** &gt; **Providers**.
7. Click on the name of the newly created LDAP provider and open the **Permissions** tab.
8. Click **Assign Object Permissions**.
9. Select the role that you created (e.g. `LDAP search`), enable the **Search full LDAP directory** permission, and then click **Assign**.

</div>## Create an LDAP Outpost

The LDAP provider requires the deployment of an LDAP [Outpost](https://docs.goauthentik.io/add-secure-apps/outposts/).

<div class="theme-doc-markdown markdown" id="bkmrk-log-in-to-authentik--5">1. Log in to authentik as an administrator and open the authentik Admin interface.
2. Navigate to **Applications** &gt; **Outposts**, click **Create** and set the following required configurations:
    
    
    - Provide a **Name** for the outpost (e.g. `LDAP Outpost').
    - Set the **Type** as `LDAP`.
    - Set **Integration** to match your deployment method or manually deploy an outpost via [Docker-Compose](https://docs.goauthentik.io/add-secure-apps/outposts/manual-deploy-docker-compose/) or [Kubernetes](https://docs.goauthentik.io/add-secure-apps/outposts/manual-deploy-kubernetes/). For more information, refer to the [Outpost documentation](https://docs.goauthentik.io/add-secure-apps/outposts/).
    - Under **Applications**, select the LDAP application created in the previous section.
    - Under **Advanced settings**, set the required outpost configurations. For more information, refer to [Outpost Configuration](https://docs.goauthentik.io/add-secure-apps/outposts/#configuration)
3. Click **Create**.

<div class="theme-admonition theme-admonition-warning admonition_WCGJ alert alert--warning"><div class="admonitionContent_pbrs">**Multiple LDAP providers**</div></div></div>The LDAP Outpost selects different providers based on their Base DN. Adding multiple providers with the same Base DN will result in inconsistent access.

## Configuration verification

You can test the LDAP provider by using the `ldapsearch` tool on Linux and macOS, or the `dsquery` tool on Windows.

<div class="theme-doc-markdown markdown" id="bkmrk-ldapsearch-dsquery"><div class="theme-tabs-container tabs-container tabList_J5MA">- ldapsearch
- dsquery

<div class="margin-top--md"><div class="tabItem_wHwb" role="tabpanel">  
</div></div></div></div>To install the `ldapsearch` tool, use one of the following commands:

```shell
sudo apt-get install ldap-utils -y # Debian-based systems
sudo yum install openldap-clients -y # CentOS-based systems
brew install openldap #macOS based systems (requires Homebrew to be installed)
```

<div class="theme-doc-markdown markdown" id="bkmrk-"><div class="theme-tabs-container tabs-container tabList_J5MA"><div class="margin-top--md"><div class="tabItem_wHwb" role="tabpanel"><div class="language-shell codeBlockContainer_mQmQ theme-code-block"><div class="codeBlockContent_t_Hd"><div class="buttonGroup_B0hJ">  
</div></div></div></div></div></div></div>To search the LDAP directory using the previously created `ldapservice` service account, use the following command:

```shell
ldapsearch \
  -x \
  -H ldap://<LDAP outpost IP address>:389 \
  -D 'cn=ldapservice,ou=users,DC=ldap,DC=goauthentik,DC=io' \
  -w '<ldapuserpassword>' \
  -b 'DC=ldap,DC=goauthentik,DC=io' \
  '(objectClass=user)'
```

This example query will return all users and log the first successful attempt in an event in **Events** &gt; **Logs**. Subsequent successful logins from the same user are not logged by default, as they are cached in the outpost. For more details see [Bind modes](https://docs.goauthentik.io/add-secure-apps/providers/ldap/#bind-modes).

<div class="theme-doc-markdown markdown" id="bkmrk-ldaps"><div class="theme-tabs-container tabs-container tabList_J5MA"><div class="margin-top--md"><div class="tabItem_wHwb" role="tabpanel"><div class="theme-admonition theme-admonition-warning admonition_WCGJ alert alert--warning"><div class="admonitionContent_pbrs">**LDAPS**</div></div></div></div></div></div>In production it is recommended to use LDAPS, which requires `ldaps://` as the protocol, and port number `636` rather than `389`. See [LDAPS](https://docs.goauthentik.io/add-secure-apps/providers/ldap/#ldaps-via-ssl-or-starttls) for more information.

<footer class="theme-doc-footer docusaurus-mt-lg" id="bkmrk--1">---

</footer>

# Complete guide to Nextcloud OIDC authentication with Authentik

Link: [https://blog.cubieserver.de/2022/complete-guide-to-nextcloud-oidc-authentication-with-authentik/](https://blog.cubieserver.de/2022/complete-guide-to-nextcloud-oidc-authentication-with-authentik/)

<header id="bkmrk-posted-on%C2%A0nov-3%2C-202"><div class="post-meta clearfix"><div class="post-date pull-left">Posted on <time datetime="2022-11-03T00:00:00Z">Nov 3, 2022</time></div><div class="pull-right"><span class="post-tag small">[\#nextcloud](https://blog.cubieserver.de/tags/nextcloud/)</span> <span class="post-tag small">[\#authentik](https://blog.cubieserver.de/tags/authentik/)</span> <span class="post-tag small">[\#authz](https://blog.cubieserver.de/tags/authz/)</span> <span class="post-tag small">[\#oidc](https://blog.cubieserver.de/tags/oidc/)</span></div></div></header><section id="bkmrk-after%C2%A0migrating-my-u">After [migrating my user accounts from OpenLDAP to Authentik](https://blog.cubieserver.de/2022/migrating-users-from-ldap-to-authentik/), I still need to switch the Nextcloud authentication to a modern protocol, instead of relying on [Authentik’s built-in LDAP outpost](https://goauthentik.io/docs/providers/ldap) (which emulates an LDAP server). In [a previous post a couple of months ago](https://blog.cubieserver.de/2022/complete-guide-to-nextcloud-saml-authentication-with-authentik/) I explored how to connect [the Nextcloud file-hosting suite](https://github.com/nextcloud/server) to [the Authentik identity provider](https://github.com/goauthentik/authentik) with SAML. I managed to get the setup working, but in the end I was neither satisfied with the solution nor convinced by its long-term maintenance. For reference, at this point I have been running Nextcloud with the [LDAP user backend](https://docs.nextcloud.com/server/stable/admin_manual/configuration_user/user_auth_ldap.html) for six years, and it want any solution that is going to replace this setup to last at least that long, too.

Hence, in this post I am going through the setup of Nextcloud with OIDC to connect to Authentik. Specifically, I will go over the following aspects:

- [What is OIDC?](https://blog.cubieserver.de/2022/complete-guide-to-nextcloud-oidc-authentication-with-authentik/#oidc)
- [Which options are available for using OIDC with Nextcloud?](https://blog.cubieserver.de/2022/complete-guide-to-nextcloud-oidc-authentication-with-authentik/#options)
- [Authentik setup](https://blog.cubieserver.de/2022/complete-guide-to-nextcloud-oidc-authentication-with-authentik/#authentik)
- [Nextcloud setup](https://blog.cubieserver.de/2022/complete-guide-to-nextcloud-oidc-authentication-with-authentik/#nextcloud)
- [Advanced login and logout behavior](https://blog.cubieserver.de/2022/complete-guide-to-nextcloud-oidc-authentication-with-authentik/#auto-login-redirect)
- [Conclusion](https://blog.cubieserver.de/2022/complete-guide-to-nextcloud-oidc-authentication-with-authentik/#conclusion)

### [\# ](https://blog.cubieserver.de/2022/complete-guide-to-nextcloud-oidc-authentication-with-authentik/#oidc) OIDC

[*OpenID Connect*](https://openid.net/connect/) (or *OIDC* for short) is an identity layer based on the more extensive [OAuth2 authorization framework](https://oauth.net/2/). Whereas OAuth2 can handle many different authentication and authorization functions, OIDC is a trimmed down version that focuses on one aspect: user identification. Applications can use OIDC to authenticate a user (i.e. verify the identity of a user) and retrieve metadata about the user (name, email address etc.), but at the same time can use their own internal authorization mechanisms (i.e. what the user has access to). [JSON Web Tokens](https://jwt.io/) (*JWT*) are most commonly used to exchange *authentic* (meaning: *signed* and *verified*) information about a user.

In an OIDC authentication flow, there are generally three parties:

- the **subject** (the end user)
- the **identity provider** or **token issuer** (in my case this will be Authentik)
- the **relying party** (the secure application, here: Nextcloud)

If you want to learn more about it, I recommend looking into [this excellent quickstart guide to OIDC](https://frontegg.com/guides/oidc-authentication).

OIDC is seeing widespread adoption these days by many different types of applications. In fact, OIDC is what most of the popular “Social Login” methods are based on (e.g. *“Login with Google/Apple/…"*).

### [\# ](https://blog.cubieserver.de/2022/complete-guide-to-nextcloud-oidc-authentication-with-authentik/#options) Options

After establishing that OIDC looks like a solid and future proof authentication protocol, let’s take a look at the options we have for integrating it with Nextcloud.

There are no less than three plugins for Nextcloud that provide some sort of OIDC integration:

- [Social Login](https://github.com/zorn-v/nextcloud-social-login): focuses mainly on Google/Amazon/… identity providers, but since all of these are based OIDC internally, also custom providers can be used. The plugin is actively maintained, but unfortunately just by a single developer.
- [Nextcloud OIDC Login](https://github.com/pulsejet/nextcloud-oidc-login): a polished and well-documented plugin that [unfortunately is in maintenance-only mode](https://github.com/pulsejet/nextcloud-oidc-login/issues/182) due to lack of developers.
- [user\_oidc](https://github.com/nextcloud/user_oidc): least polished, but located under the `github.com/nextcloud` organization and seemingly maintained by Nextcloud developers.

### [\# ](https://blog.cubieserver.de/2022/complete-guide-to-nextcloud-oidc-authentication-with-authentik/#user_oidc) user\_oidc

Out of the three options presented above, I decided to give [user\_oidc](https://apps.nextcloud.com/apps/user_oidc) a try, simply because I’m hoping that it’s used by many enterprises and will therefore be supported for a long time by the Nextcloud developers (*we’ll see how this bet turns out in a couple of years - fingers crossed*). If it wasn’t for the state of maintenance, I would have opted for [Nextcloud OIDC Login](https://github.com/pulsejet/nextcloud-oidc-login).

Before we get to deep into the technical details, I should mention that `user_oidc` currently does not support group provisioning for users - if this is something that is required for your setup, you should check out one of the alternatives. However, [work is in progress](https://github.com/nextcloud/user_oidc/pull/502) to address this shortcoming.

Another (slightly) negative aspect about `user_oidc` is the confusing configuration: as the following sections will show, some settings are configured via the Web UI, some via the `occ` CLI, others via Nextcloud’s `config.php`. In the end it works, but this aspect is handled much more consistently in the other plugins mentioned before.

In the next sections, we’ll first look at the configuration required on the Authentik side and then on the Nextcloud side.

### [\# ](https://blog.cubieserver.de/2022/complete-guide-to-nextcloud-oidc-authentication-with-authentik/#authentik) Authentik

Since OIDC describes a trust relationship between the *identity provider* (Authentik) and the *relying party* (Nextcloud), we need to let Authentik know about the new application it should handle authentication for. To do this, log into your Authentik instance as an administrator and switch to the “Admin interface” (the button in the top-right corner). Go to the `Applications` menu and click on `Create`:

<figure><figcaption>Authentik ‘Application’ Creation Menu

</figcaption>[![Authentik &lsquo;Application&rsquo; Creation Menu](https://blog.cubieserver.de/2022/complete-guide-to-nextcloud-oidc-authentication-with-authentik/authentik-create-application.png)](https://blog.cubieserver.de/2022/complete-guide-to-nextcloud-oidc-authentication-with-authentik/authentik-create-application.png)</figure>Click on the `Create Provider` button and fill the menu (shown below) with following settings:

- *Type*: Oauth2/OIDC Provider
- *Authorization flow*: implicit consent (otherwise your users need to confirm each login explicitly!)
- *Client type*: Confidential
- *Client ID*: (leave auto-generated value as-is) 
    - =&gt; copy this value for later use
- *Client Secret*: **\[IMPORTANT\]** trim the auto-generated value to 64 characters - there is currently [a bug in user\_oidc that prevents longer client secrets](https://github.com/nextcloud/user_oidc/issues/405). A client secret of 64 chars is still sufficient from a security perspective. 
    - =&gt; copy this value for later use
- *Redirect URIs*: `https://<NEXTCLOUD-HOSTNAME>/apps/user_oidc/code`
- *Advanced protocol settings* &gt; *Subject mode*: based on the username 
    - this setting should be used to ensure Nextcloud’s federated cloud ID will have a human-readable value, like `username@nextcloud-hostname.com`.
- Click on *Finish*

<figure><figcaption>Authentik ‘Provider’ Creation Menu

</figcaption>[![Authentik &lsquo;Provider&rsquo; Creation Menu](https://blog.cubieserver.de/2022/complete-guide-to-nextcloud-oidc-authentication-with-authentik/authentik-create-provider.png)](https://blog.cubieserver.de/2022/complete-guide-to-nextcloud-oidc-authentication-with-authentik/authentik-create-provider.png)</figure>Back in the **application creation menu**, click on `Create`.

Now switch to the “Providers” section, click on the newly created provider and copy the `OpenID Configuration URL` - it should look like `https://<AUTHENTIK-HOSTNAME>/application/o/nextcloud/.well-known/openid-configuration`.

### [\# ](https://blog.cubieserver.de/2022/complete-guide-to-nextcloud-oidc-authentication-with-authentik/#nextcloud) Nextcloud

Now we can switch to the Nextcloud instance. To get started, simply log in to your Nextcloud instance as an administrator, navigate to the “Apps” section and search for `OpenID Connect user backend`, then click on `Download and enable`. I’m using Nextcloud version 24 and `user_oidc` 1.2.1 at the time of writing.

Open the Admin Settings of Nextcloud (top-right behind the profile picture) and locate the `OpenID Connect` section (bottom-left corner). Click on the small `+` button next to “Registered Providers” and fill the following fields with the data obtained on the Authentik admin interface:

- *Identifier*: `Authentik` (you may choose any value here, but it will be shown to your users in the form of a `Login with <IDENTIFIER>` button)
- *Client ID*: (value copied from Authentik)
- *Client Secret*: (value copied from Authentik)
- *Discovery endpoint*: (OpenID Configuration URL copied from Authentik, should end with `.well-known/openid-configuration`)
- *Attribute mappings*: unless you have a non-standard identity provider setup (with custom fields / attributes), the placeholder values should work and can be left as-is.
- Uncheck `Use unique user ID` - when this option is enabled, Nextcloud will use the hash (checksum) of the provider identifier + user identifier as the internal user ID. Unfortunately, this creates rather ugly and long [federated cloud IDs](https://docs.nextcloud.com/server/latest/admin_manual/configuration_files/federated_cloud_sharing_configuration.html). Unless you are using multiple OIDC providers or multiple Nextcloud user backends, I believe it’s safe to disable (untick) this option, since there can be no name collision within a single OIDC provider.
- Click on *Submit*

<figure><figcaption>Nextcloud OIDC provider configuration

</figcaption>[![Nextcloud OIDC provider configuration](https://blog.cubieserver.de/2022/complete-guide-to-nextcloud-oidc-authentication-with-authentik/nextcloud-register-oidc-provider.png)](https://blog.cubieserver.de/2022/complete-guide-to-nextcloud-oidc-authentication-with-authentik/nextcloud-register-oidc-provider.png)</figure>Note that the same setup as described above can be achieved on the CLI with the following commands. This may be useful in case you want to automate the setup and avoid going through the manual steps in the web interface.

<div class="highlight"><div><table><tbody><tr><td>```
 1
 2
 3
 4
 5
 6
 7
 8
 9
10
11
12

```

</td><td>```sh
# assuming that your are in the root nextcloud folder and running this as the `www-data` user
php ./occ app:install user_oidc
php ./occ user_oidc:provider "Authentik" \
    --clientid="<CLIENT-ID>" \
    --clientsecret="<CLIENT-SECRET>" \
    --discoveryuri="<AUTHENTIK-OPENID-CONFIGURATION-URL>" \
    --unique-uid=0

# for help, refer to:
php ./occ user_oidc:provider -h
php ./occ user_oidc:provider:delete -h
php ./occ app -h
```

</td></tr></tbody></table>

</div></div><figure><figcaption>A long federated cloud ID caused by the ‘Use unique user ID’ setting

</figcaption>[![A long federated cloud ID caused by the &lsquo;Use unique user ID&rsquo; setting](https://blog.cubieserver.de/2022/complete-guide-to-nextcloud-oidc-authentication-with-authentik/nextcloud-hashed-federated-id.png)](https://blog.cubieserver.de/2022/complete-guide-to-nextcloud-oidc-authentication-with-authentik/nextcloud-hashed-federated-id.png)</figure>### [\# ](https://blog.cubieserver.de/2022/complete-guide-to-nextcloud-oidc-authentication-with-authentik/#first-try) First try

Since all the configuration settings are in place now, it’s time for a first test. Open a new browser session / private window and navigate to your Nextcloud instance.

<video controls="controls" height="150" src="https://blog.cubieserver.de/2022/complete-guide-to-nextcloud-oidc-authentication-with-authentik/login-flow.webm" width="100%"></video>

The short video shows that I am not able to use my credentials to log in as a regular (local) user to Nextcloud (in the same way as I could previously with the LDAP backend). That is actually desirable, because this way the authentication provider (in this case: Authentik) can take care of the entire authentication flow, including any possible password, 2-FA or MFA prompts. In addition, if the user is already logged in, there is no need to re-enter the credentials - hence this is proper *Single Sign-On* (not just *Single-password*).

When clicking on the `Login with Authentik` button, I get redirected to Authentik, where I can log in. Finally, Authentik redirects me to Nextcloud (including an authentication token in the URL) and I get automatically logged in to Nextcloud. If the `Redirect URIs` setting was not configured properly, an error will occur during this last step.

### [\# ](https://blog.cubieserver.de/2022/complete-guide-to-nextcloud-oidc-authentication-with-authentik/#auto-login--redirect) Auto-login / redirect

At this point the setup is working – *yay!* – but still a bit confusing for users. How are the users supposed to know that they need to click on `Login with X` instead of using the built-in username and password fields (especially because these seem much more inviting)?

There are two ways this can be addressed:

- 1: disabling the built-in login form by setting `'hide_login_form' => false` in the `config.php` (see [Nextcloud documentation](https://docs.nextcloud.com/server/stable/admin_manual/configuration_server/config_sample_php_parameters.html#default-parameters)). This will show a slightly ugly warning message on the login page, but at least it’s clear for users that they need to click on the `Login with X` button. The login form is just *hidden*, because it can still be accessed at `https://<NEXTCLOUD-HOSTNAME>/login?direct=1` - this is required when you want to access Nextcloud with your local admin account.

<figure><figcaption>Nextcloud with disabled login form

</figcaption>[![Nextcloud with disabled login form](https://blog.cubieserver.de/2022/complete-guide-to-nextcloud-oidc-authentication-with-authentik/nextcloud-disable-login-form.png)](https://blog.cubieserver.de/2022/complete-guide-to-nextcloud-oidc-authentication-with-authentik/nextcloud-disable-login-form.png)</figure>- 2: Making OIDC the default login method. This only works if you have *just a single* OIDC provider configured and no other login methods in Nextcloud (no SAML, external users etc.). With this option, any unauthenticated request to the Nextcloud instance immediately gets redirect to the authentication provider (with an HTTP Status Code `302 Found` and an appropriate `Location` header). Like in the previous case, admins can still use the regular login by appending `?direct=1` to the login URL. At the time of writing, this setting can only be enabled from the command line:

<div class="highlight"><div><table><tbody><tr><td>```
1

```

</td><td>```sh
php ./occ config:app:set user_oidc allow_multiple_user_backends --value=1
```

</td></tr></tbody></table>

</div></div>For now, I’m sticking with the `hide_login_form` method, even though it requires an additional click from the user, because it’s less “automagic”. I might switch to the automatic redirect in the future once I’m more comfortable with the setup.

### [\# ](https://blog.cubieserver.de/2022/complete-guide-to-nextcloud-oidc-authentication-with-authentik/#advanced-logout) Advanced logout

The `user_oidc` plugin provides two options for customizing how the logout is handled.

The first one is *single logout*: if this option is enabled (which it is by default), the user is also logged out of the entire SSO session (instead of *just* Nextcloud). However, Authentik will still ask the user if they want to log out of their SSO session, therefore we can [leave this setting as-is](https://github.com/nextcloud/user_oidc#single-logout).

<figure><figcaption>Single logout is enabled, but Authentik still asks if the user want to end all SSO sessions

</figcaption>[![Single logout is enabled, but Authentik still asks if the user want to end all SSO sessions](https://blog.cubieserver.de/2022/complete-guide-to-nextcloud-oidc-authentication-with-authentik/single-signout.png)](https://blog.cubieserver.de/2022/complete-guide-to-nextcloud-oidc-authentication-with-authentik/single-signout.png)</figure>The second one is *backchannel logout*: if a user signs out of their SSO session at the identity provider level (instead of just a single application), the identity provider can notify all other applications that the user should be logged out now (so they can invalidate their sessions, too). Unfortunately, this feature is [currently not supported in Authentik](https://github.com/goauthentik/authentik/issues/2023) (as far as I can tell), but you can use it if you have a different identity provider (e.g. Keycloak). Note that this feature requires that the identity provider can make a direct POST request to the applications (e.g. Nextcloud instance), which may not always be the case depending on your firewall settings or network topology.

Learn more about [OIDC Single Logout](https://curity.io/resources/learn/openid-connect-logout/).

### [\# ](https://blog.cubieserver.de/2022/complete-guide-to-nextcloud-oidc-authentication-with-authentik/#conclusion) Conclusion

While this blog post turned out much longer than I initially expected, I would still say that overall this setup was much simpler than the [Nextcloud SAML integration I wrote about previously](https://blog.cubieserver.de/2022/complete-guide-to-nextcloud-saml-authentication-with-authentik/). Even though the documentation of the “official” OIDC app (official as-in provided by the core maintainers) is quite sparse, with a bit of experience in the OpenID Connect realm it is pretty straightforward. (The lack of official documentation is also the reason I made sure to describe all the details in this post.)

I’m relatively confident that this setup will be stable over the next couple of years and will put me in a good position to roll out 2FA in [my homelab](https://blog.cubieserver.de/tags/homelab/).

</section><footer id="bkmrk-author%3A-%C2%A0%C2%A0jack-hensc"><section class="author-info"><div class="author-container"><div class="avatar author-avatar">![Author Avatar](https://blog.cubieserver.de/images/wheel.jpg)</div><div class="name">Author: [<span class="author-name text-primary">Jack Henschel</span>](https://blog.cubieserver.de/)</div><div class="contact">[ Contact me](mailto:jack.henschel@mailbox.org)</div><div class="bio">Cloud computing engineer, IT security specialist, avid cyclist.</div></div></section><section class="related-content-box" id="bkmrk-more-posts-like-this"><div>More posts like this: <div><span class="post-tag small">[\#nextcloud](https://blog.cubieserver.de/tags/nextcloud/)</span> <span class="post-tag small">[\#authentik](https://blog.cubieserver.de/tags/authentik/)</span> <span class="post-tag small">[\#authz](https://blog.cubieserver.de/tags/authz/)</span> <span class="post-tag small">[\#oidc](https://blog.cubieserver.de/tags/oidc/)</span></div><div></div></div><article>[Complete guide to Nextcloud SAML authentication with Authentik](https://blog.cubieserver.de/2022/complete-guide-to-nextcloud-saml-authentication-with-authentik/)<time datetime="2022-02-04T00:00:00Z">2022-02-04</time>

</article><article>[Migrating users from LDAP to Authentik](https://blog.cubieserver.de/2022/migrating-users-from-ldap-to-authentik/)<time datetime="2022-02-02T00:00:00Z">2022-02-02</time>

</article><article>[Remove Nextcloud Share from Database](https://blog.cubieserver.de/2018/remove-nextcloud-share-from-database/)<time datetime="2018-03-11T18:57:00+01:00">2018-03-11</time>

</article></section></footer>

# Migrating users from LDAP to Authentik

Link: [https://blog.cubieserver.de/2022/migrating-users-from-ldap-to-authentik/](https://blog.cubieserver.de/2022/migrating-users-from-ldap-to-authentik/)

<header id="bkmrk-posted-on%C2%A0feb-2%2C-202"><div class="post-meta clearfix"><div class="post-date pull-left">Posted on <time datetime="2022-02-02T00:00:00Z">Feb 2, 2022</time></div><div class="pull-right"><span class="post-tag small">[\#ldap](https://blog.cubieserver.de/tags/ldap/)</span> <span class="post-tag small">[\#authentik](https://blog.cubieserver.de/tags/authentik/)</span> <span class="post-tag small">[\#authz](https://blog.cubieserver.de/tags/authz/)</span></div></div></header><section id="bkmrk-for-several-years-%28t">For several years (*the earliest timestamp I could find is from 2016*), I have been using [OpenLDAP](https://www.openldap.org/) (a.k.a [slapd](https://www.openldap.org/software/man.cgi?query=slapd)) as the source of truth for user accounts in my homelab. The initial setup was tricky – especially figuring out the “memberOf” overlay to get group memberships – but once I had it nailed down and [put it into Puppet manifests](https://git.cubieserver.de/Cubieserver/puppet-control/src/branch/master/site/profile/manifests/openldap.pp), it was rock solid. The setup is still rock solid, but definitely starts showing its age: friendly user-interfaces for self-service are rare (I’ve been using [LTB’s *Self Service Password*](https://github.com/ltb-project/self-service-password), but it only allows users to change their password, not email address etc.), and modern features like multi-factor authentication need to be re-implemented by each application, instead of being centrally managed by the authentication source.

Thus, in 2022 it was time to look for something new. There are lots of choices available in this space, but [Authentik](https://goauthentik.io/) in particular struck me as simple to set up and use. For this reason it seems that in recent months Authentik has become a bit of a “secret tip” in self-hosting circles.

Despite the small number of users of my homelab, I was reluctant to start from scratch with my authentication source. I was looking for a way to automatically import the user accounts from OpenLDAP into Authentik – and it turns out that Authentik makes this super easy, if you know what to look for. The following guide shows how to set up and use an *LDAP Source* in Authentik, and that it can simply be removed again without deleting the user accounts, thereby acting as an import functionality.

## [\# ](https://blog.cubieserver.de/2022/migrating-users-from-ldap-to-authentik/#setup) Setup

My (old) setup consists of an OpenLDAP server (`slapd 2.4.47` on Debian 10 Buster) with TLS encryption (i.e. `ldaps` instead of StartTLS).

Authentik is version `2021.12.5` and installed with their official Helm chart `5.2.1`:

<div class="highlight"><div><table><tbody><tr><td>```
 1
 2
 3
 4
 5
 6
 7
 8
 9
10
11
12
13
14
15
16
17
18
19
20
21

```

</td><td>```yaml
authentik:
  secret_key: "ThisIsNotASecretKey"
  error_reporting:
    enabled: false
  postgresql:
    password: "ThisIsNotASecurePassword"

ingress:
  enabled: true
  hosts:
    - host: auth.example.com
      paths:
        - path: "/"
          pathType: Prefix


postgresql:
  enabled: true
  postgresqlPassword: "ThisIsNotASecurePassword"
redis:
  enabled: true

```

</td></tr></tbody></table>

</div></div>After adding the Helm repository , run `helm install authentik authentik/authentik` and then open `https://auth.example.com/if/flow/initial-setup/` to set a password for the admin user.

## [\# ](https://blog.cubieserver.de/2022/migrating-users-from-ldap-to-authentik/#syncing-with-openldap) Syncing with OpenLDAP

After logging in as the admin user, you should be greeted with the following dashboard. Navigate to the “Directory” section in the left sidebar and choose “Federation &amp; Social Login”. Then, click the blue “Create” button and select “LDAP Source”.

<figure><figcaption>Authentik Dashboard Overview

</figcaption>[![Authentik Dashboard Overview](https://blog.cubieserver.de/2022/migrating-users-from-ldap-to-authentik/authentik-default-dashboard.png)](https://blog.cubieserver.de/2022/migrating-users-from-ldap-to-authentik/authentik-default-dashboard.png)</figure>Give your LDAP Source a human-friendly *name* and a unique identifier (*slug*). Then, scroll down to the *Connection settings* section.

Here is the full configuration I used. Below you will find detailed explanations for each field.

<figure><figcaption>Authentik LDAP Source configuration

</figcaption>[![Authentik LDAP Source configuration](https://blog.cubieserver.de/2022/migrating-users-from-ldap-to-authentik/ldap-source.png)](https://blog.cubieserver.de/2022/migrating-users-from-ldap-to-authentik/ldap-source.png)</figure>For the *Server URI* you can either use `ldap://1.2.3.4` or `ldap://example.com` if your server is un-encrypted *OR* uses StartTLS (in this case tick the checkbox below), or `ldaps://example.com` if your [server uses regular TLS encryption](https://blog.cubieserver.de/2019/openldap-implementation-specific-error-80-when-adding-tls-certificate/). Optionally, you can specify a port if your server uses a non-default port (add `:386` for regular connections or `:686` for TLS-encrypted connections at the end).

If your server uses the encrypted LDAP protocol and does not use a publicly trusted (*self-signed*) TLS certificate, then you first need to import this certificate into Authentik and then select it in *TLS Verification Certificate*. Otherwise, you can leave this field empty.

Enter the *CN* and *Password* of a user account that can [bind to the LDAP server](https://ldap.com/the-ldap-bind-operation/).

Enter the *Base DN* for your LDAP directory – this can be used to only import part of your user tree.

Next, we configure the *LDAP Attribute Mapping* section. To do this correctly, you should first take a look at your LDAP schema to figure out which attributes are present for your users and groups.

If your are running OpenLDAP (like me), one excellent way to do this is simply dumping the entire LDAP database with [slapcat](https://manpages.debian.org/buster/slapd/slapd.8.en.html):

```
slapcat -b "$BASE_DN"

...
dn: cn=Git,ou=Groups,dc=cubieserver,dc=de
cn: Git
objectClass: groupOfNames
objectClass: top
owner: cn=admin,dc=cubieserver,dc=de
structuralObjectClass: groupOfNames
entryUUID: 55e6b8f6-7370-1035-8c1d-b5b0eb6b5c72
creatorsName: cn=admin,dc=cubieserver,dc=de
createTimestamp: 20160229203955Z
member: cn=Mr Cubie,ou=People,dc=cubieserver,dc=de
modifiersName: cn=admin,dc=cubieserver,dc=de
modifyTimestamp: 20170506200330Z

...
dn: cn=Mr Cubie,ou=People,dc=cubieserver,dc=de
objectClass: posixAccount
objectClass: inetOrgPerson
objectClass: organizationalPerson
objectClass: person
uid: cubie
cn: Mr Cubie
structuralObjectClass: inetOrgPerson
entryUUID: f05f8080-7752-1035-8092-8fc71d8bef3a
creatorsName: cn=admin,dc=cubieserver,dc=de
createTimestamp: 20160305191934Z
mail: cubie@example.com
memberOf: cn=Git,ou=Groups,dc=cubieserver,dc=de
userPassword:: XXXXXXXXXXXXXXXXXXXXXXXXXXXFpHSmg=
modifiersName: cn=admin,dc=cubieserver,dc=de
modifyTimestamp: 20190723062033Z

```

In the example above I have included one user and one group of my schema. Among all the noise, there are a couple of important fields to note here:

- users have `cn`, `uid` and `mail` attributes ⟶ select these fields in *User Property Mappings*.
- groups have just the `cn` attribute ⟶ select this field in *Group Property Mappings*.
- groups have `objectClass: groupOfNames` ⟶ use *Group object filter* `(objectClass=groupOfNames)`.
- users have `objectClass: posixAccount` ⟶ use *User object filter* `(objectClass=posixAccount)`.
- group membership is indicated by the `member` attribute ⟶ use *Group membership field* `member`.
- users are uniquely identified by the `uid` attribute, but groups don’t have that. However, both have the `cn` (*Common Name*) attribute ⟶ use as the *Object uniqueness field*.

Finally, after you filled in all those fields, click the blue *Create* button at the bottom.

Choose the newly created authentication source and click the blue *Run Sync* button. Depending on the size of your LDAP database, this might take a while (in my case it’s pretty insignificant). Authentik will helpfully display the number of synced users, groups and group memberships. If there are any errors, it will also report them here. In that case, you need to go back to edit your LDAP source and fiddle with the attributes and mappings.

<figure><figcaption>Successful LDAP Synchronization

</figcaption>[![Successful LDAP Synchronization](https://blog.cubieserver.de/2022/migrating-users-from-ldap-to-authentik/successful-sync.png)](https://blog.cubieserver.de/2022/migrating-users-from-ldap-to-authentik/successful-sync.png)</figure>After a successful synchronization, you should see the users and groups by clicking on *Users* under *Directory* in the left sidebar. Here you should check that the user attributes have been imported fully and mapped correctly.

<figure><figcaption>Users after import into Authentik

</figcaption>[![Users after import into Authentik](https://blog.cubieserver.de/2022/migrating-users-from-ldap-to-authentik/imported-users.png)](https://blog.cubieserver.de/2022/migrating-users-from-ldap-to-authentik/imported-users.png)</figure>## [\# ](https://blog.cubieserver.de/2022/migrating-users-from-ldap-to-authentik/#removing-the-sync) Removing the Sync

After you verified all users, groups and membership have been imported correctly, you can return to the *Federation &amp; Social Login* and simply remove the LDAP Source created previously.

*Yes, that’s it.* I’m not sure if its a feature or a bug (because the first time I did this I was expecting all the LDAP users to be deleted from the database again, since the process is called *Synchronization* and not *Import* or *Migration*), but I’m really happy about this behavior. Now I can simply turn off my OpenLDAP server after 6 years of service – it has served me well and I hope Authentik will serve me just as long.

</section><footer id="bkmrk-author%3A-%C2%A0%C2%A0jack-hensc"><section class="author-info"><div class="author-container"><div class="avatar author-avatar">![Author Avatar](https://blog.cubieserver.de/images/wheel.jpg)</div><div class="name">Author: [<span class="author-name text-primary">Jack Henschel</span>](https://blog.cubieserver.de/)</div><div class="contact">[ Contact me](mailto:jack.henschel@mailbox.org)</div><div class="bio">Cloud computing engineer, IT security specialist, avid cyclist.</div></div></section></footer>